Awakening: The Skyward Castle: Chapter 3: The Skyward Castle
Our Awakening: The Skyward Castle Walkthrough takes you through this charming final installment of the quest of young Princess Sophia, who has awakened from a magical century-long slumber into a land threatened by an ancient evil. Join Sophia as she braves untold dangers to find her exiled kingdom and save her people. Use this Skyward Castle walkthrough whenever you need a helping hand or as a constant companion through your journey.
General Info and Tips
Chapter 1: Landsong Village
Chapter 2: Cloud Court
Chapter 3: The Skyward Castle
Chapter 4: Ascension
Ask for help in the comments below!
Chapter 1: Landsong Village
Chapter 2: Cloud Court
Chapter 3: The Skyward Castle
Chapter 4: Ascension
Ask for help in the comments below!
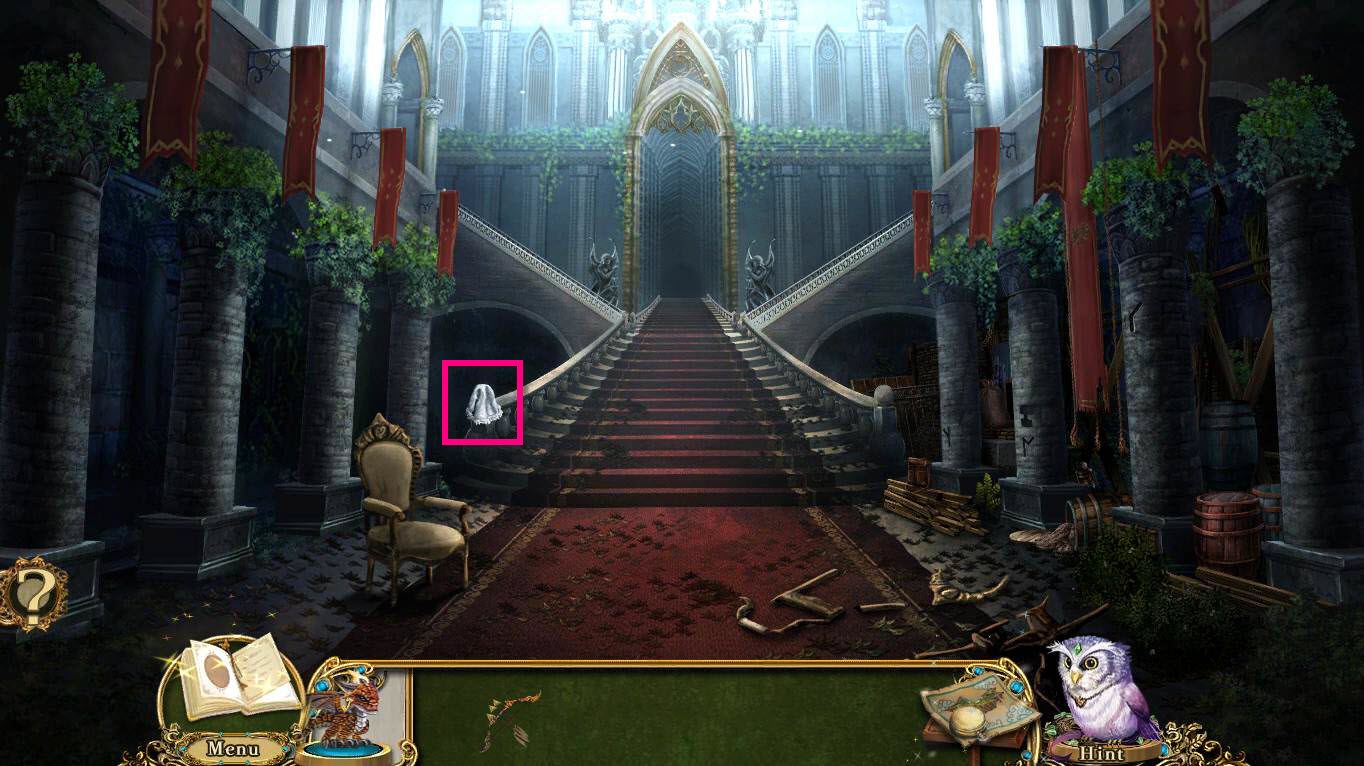
- Click on the APRON on the stairs to take it.
-
Walk forward.
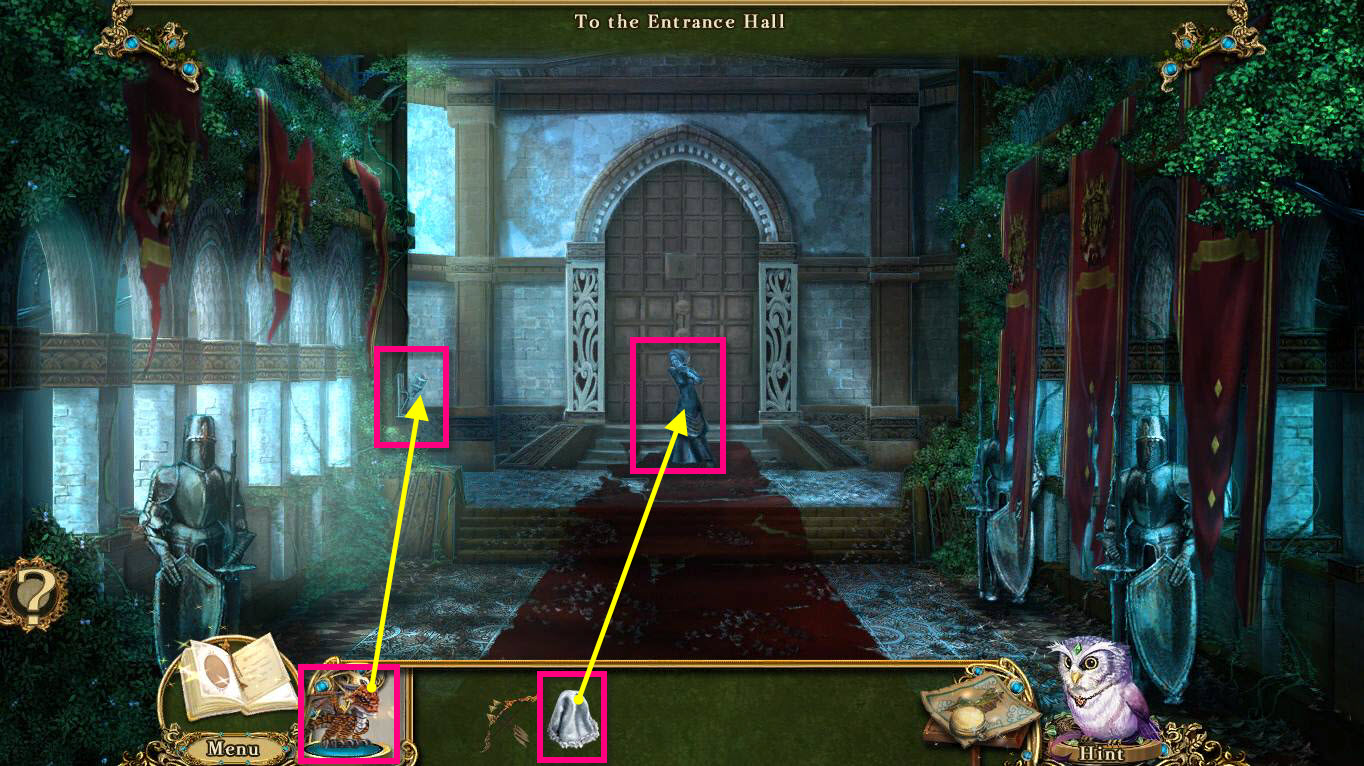
- Click on the petrified maid to zoom in.
- Take the KITCHEN KNIFE.
- Use the APRON on the maid.
- Click on the Wall Sconce to zoom in.
- Use the Pocket Dragon on the sconce to light it.
- Take the TORCH.
-
Walk down.
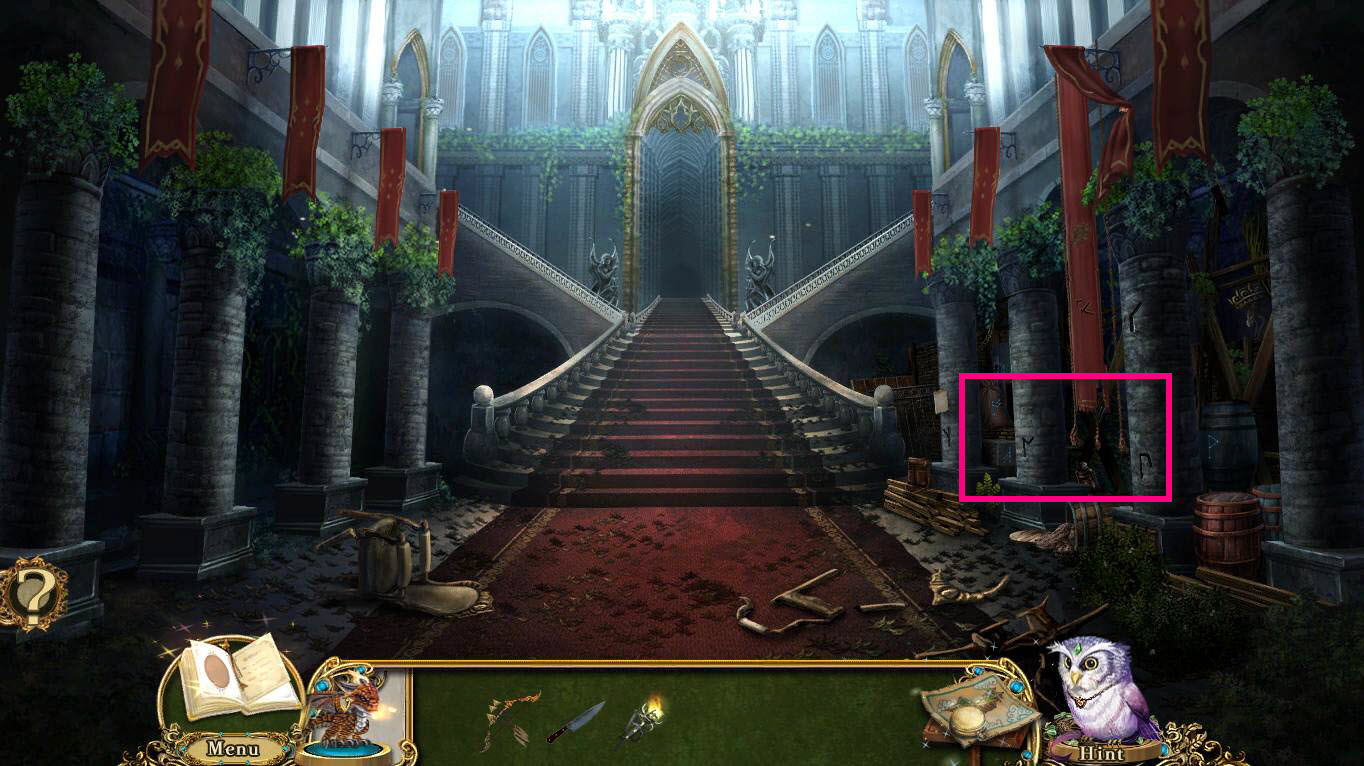
- Click on the pillars on the right to zoom in.
-
This will start a Hidden Object Game.
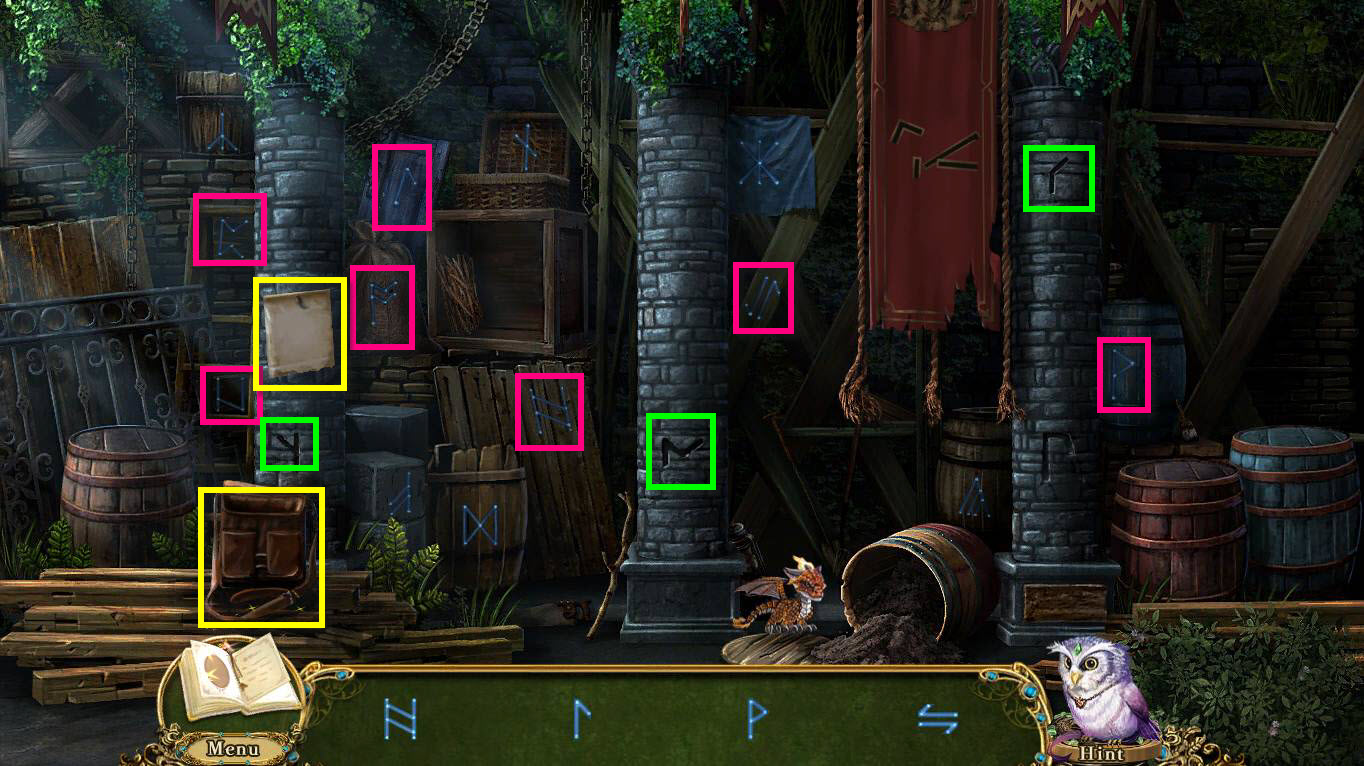
- Find the symbols in the scene.
- Click on the Artisan's Satchel to open it.
- You will see a piece of charcoal.
- There's also a paper on the left column.
-
Click to grab the paper and then place it over one of the symbols on the pillars.
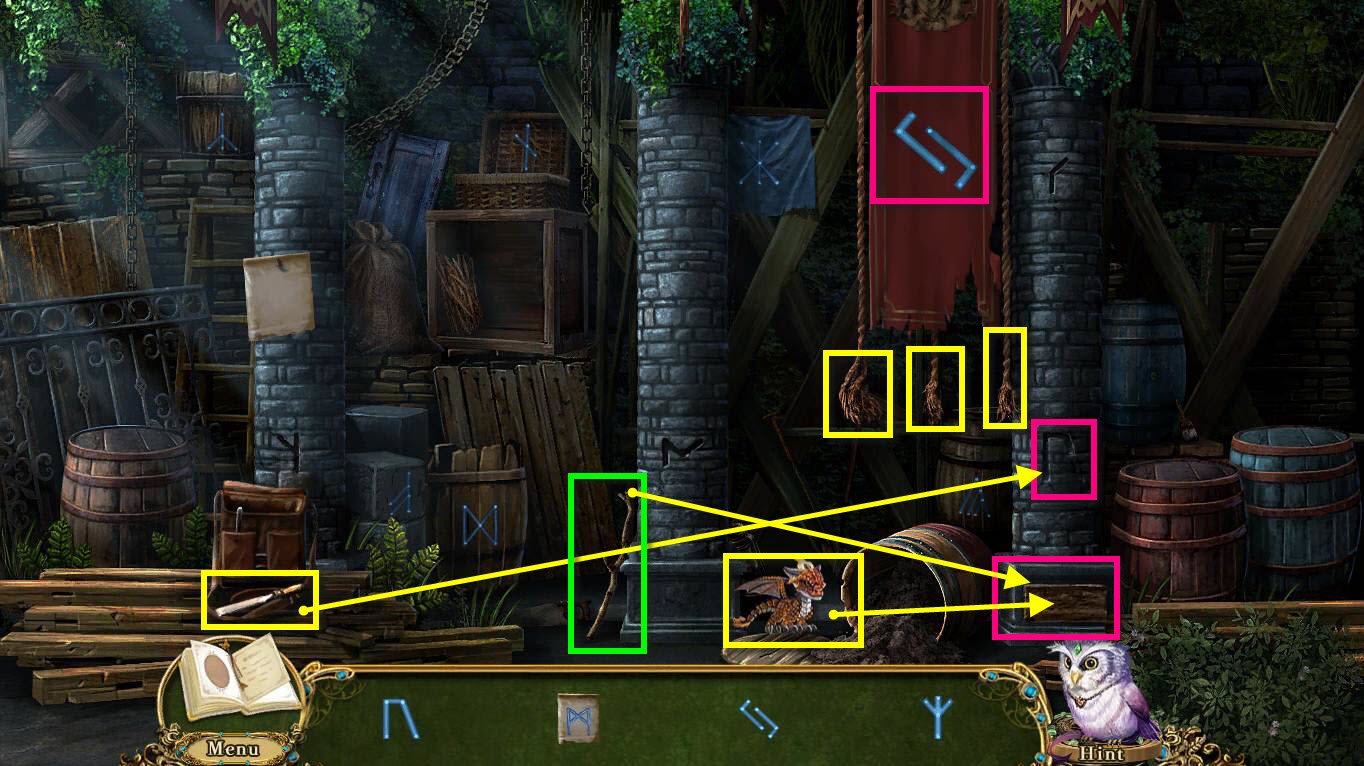
- Click on the ropes under the banner to move the symbols in the correct position.
- Click on the chisel in the Artisan's Satchel and use it on the symbol at the base of the pillar on the right.
- Use the Pocket Dragon on the board on the pillar on the right.
- Use the Stick on the soot left on the pillar after the Pocket Dragon burned it.
-
This will start a mini-game.
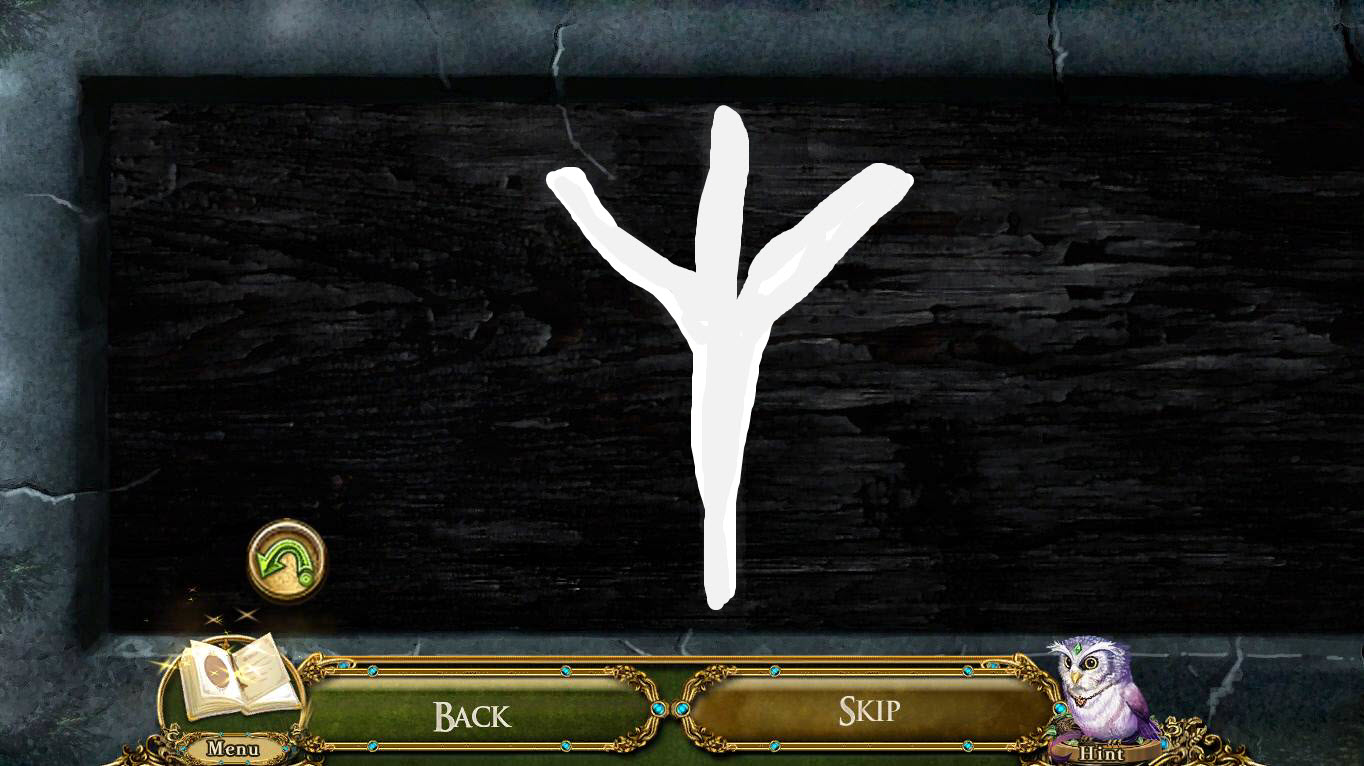
- All you have to do is fill in the soot in the symbol.
-
Just click and hold the mouse to draw in the lines.
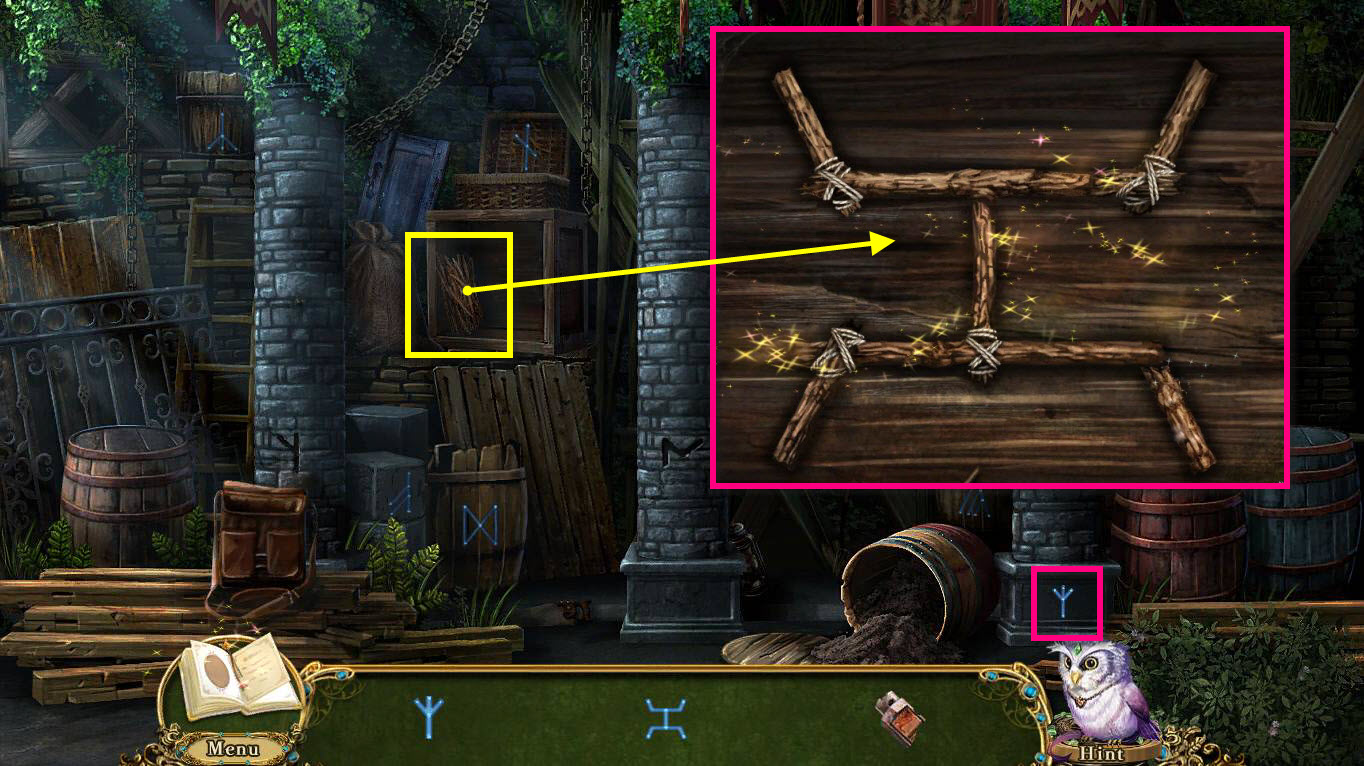
- Click on the wooden plaque to zoom in.
- This will start a mini-game.
- You just need to place the wooden pieces back together.
- Click to rotate them.
- See the screenshot for the solution.
-
Once you find all the symbols, you will find the 1/4 CIPHER KEY FRAGMENT.
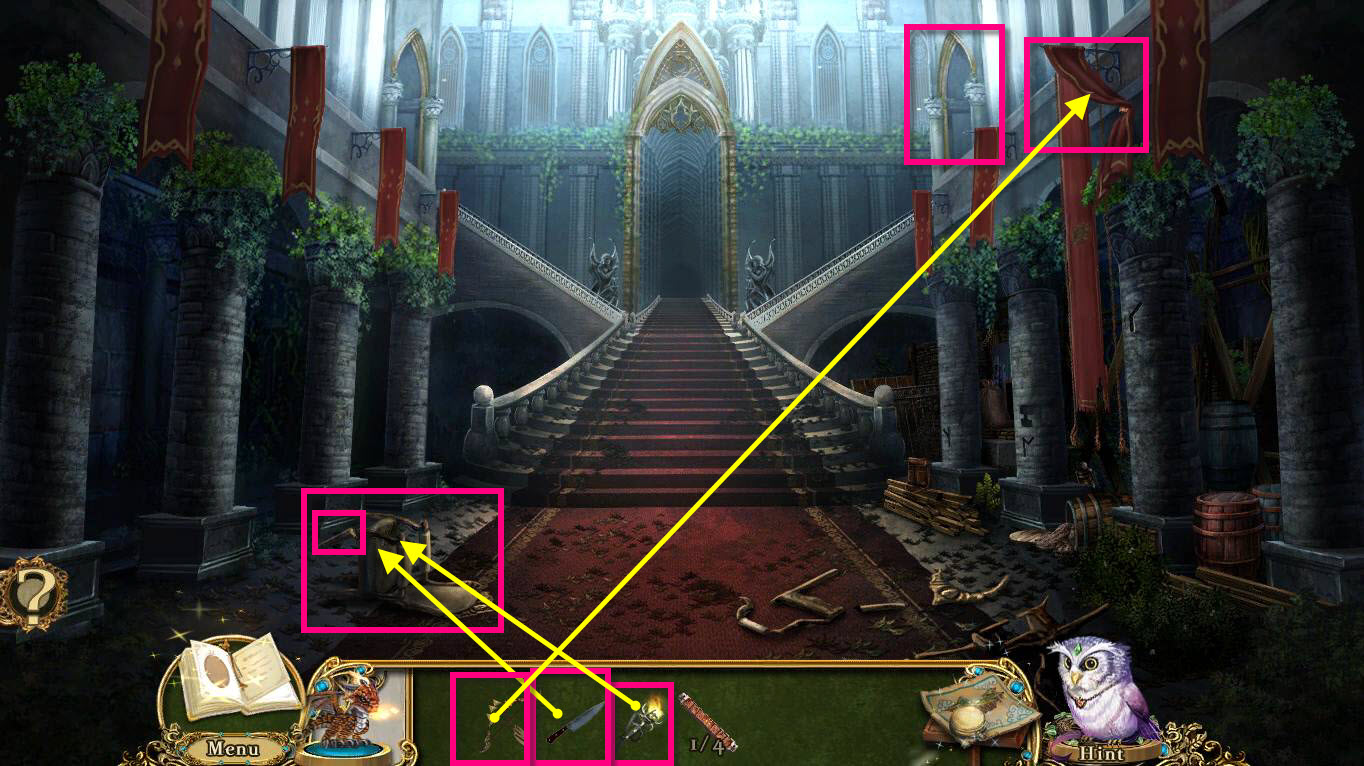
- Click on the chair on the left to zoom in.
- Use the TORCH on the chair to see a tear in the upholstery.
- Use the KITCHEN KNIFE on the tear.
- Take the 2/4 CIPHER KEY FRAGMENT.
- Take the BROKEN CHAIR LEG.
- Use the BOW AND ARROWS on the perforated banner on the right.
- Take the 3/4 CIPHER KEY FRAGMENT.
-
Click on the Sunward gate to zoom in.
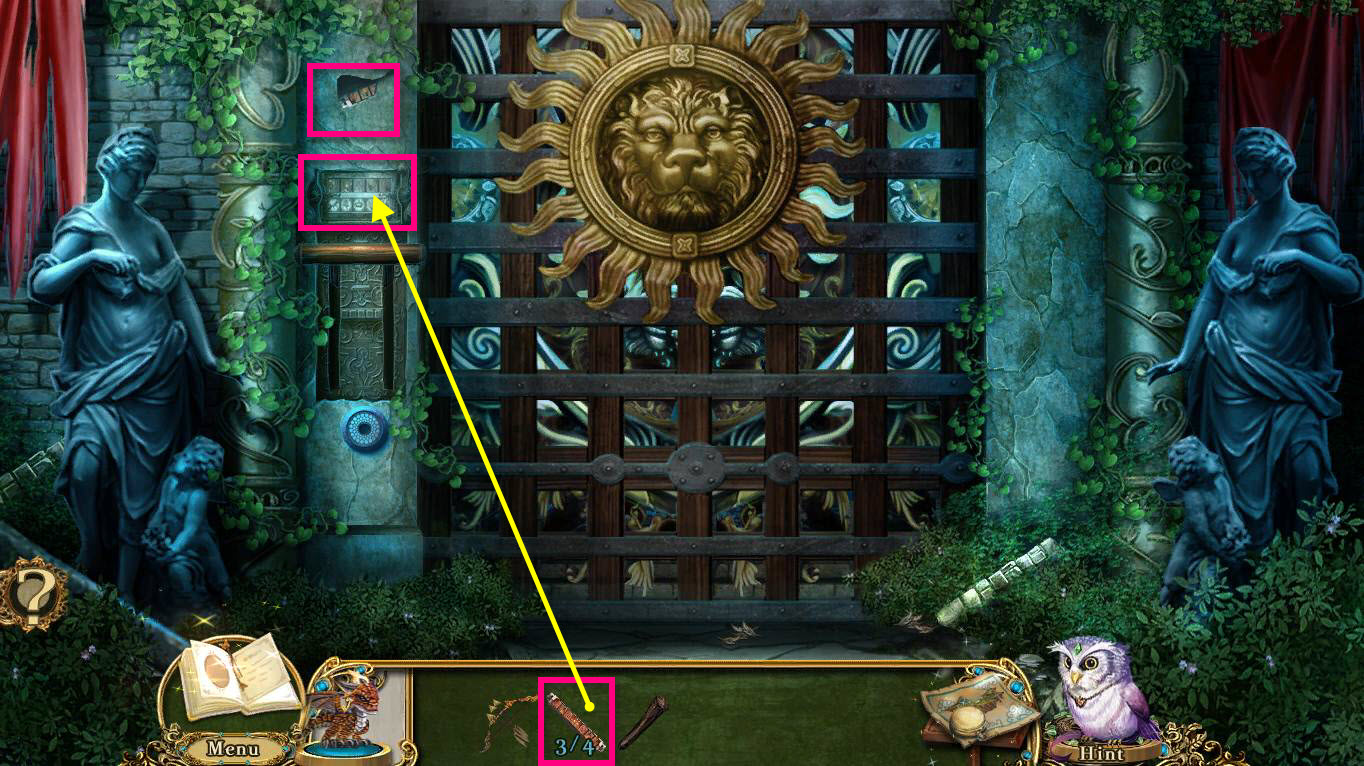
- Take the 4/4 CIPHER KEY FRAGMENT that's lodged in the left pillar.
- Use the CIPHER KEY FRAGMENTS on the gate controls.
-
This will start a mini-game.
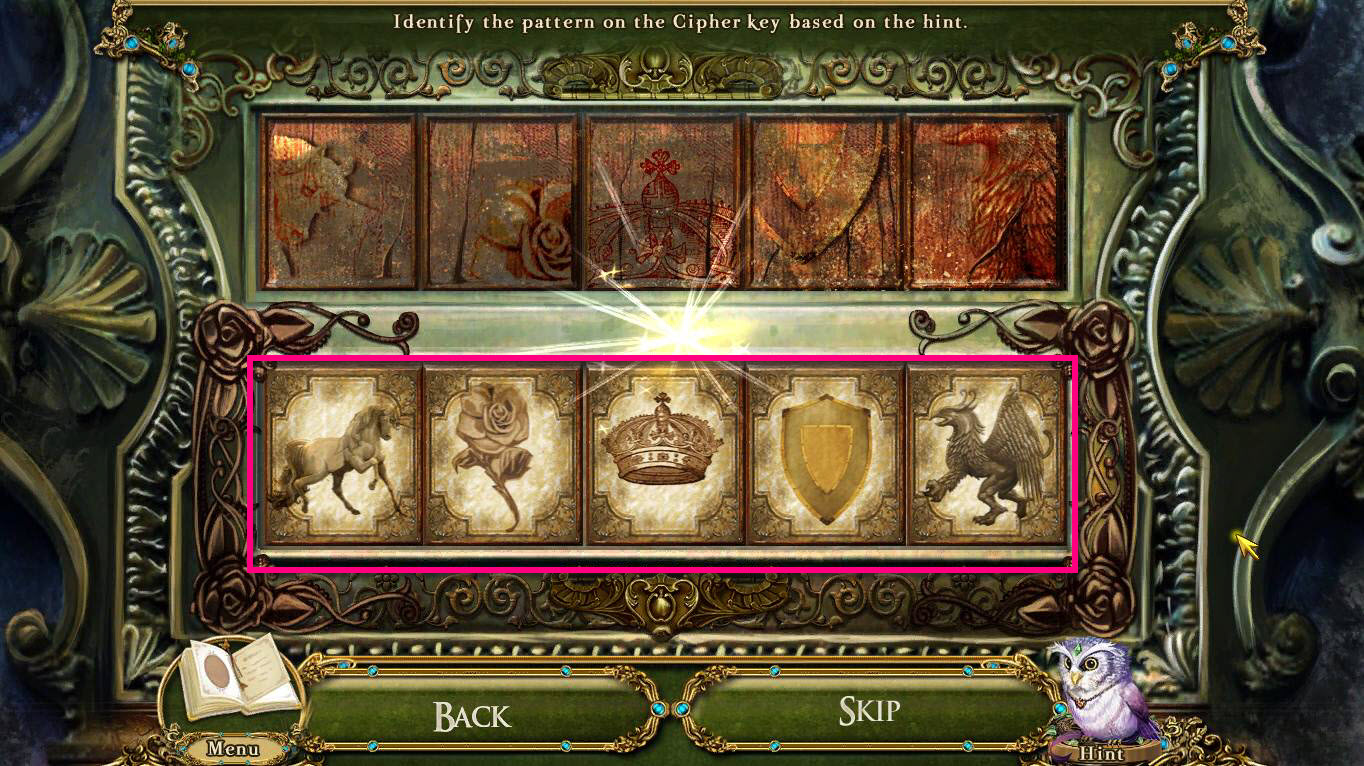
- All you have to do is click on the bottom tiles to change it so it matches the tiles on top.
- Each tile on top will have a little piece or hint of what the bottom one should be. For example, a piece of a rose.
- See the screenshot for the solution.
-
Click on the lever when you are done and the gate will open.
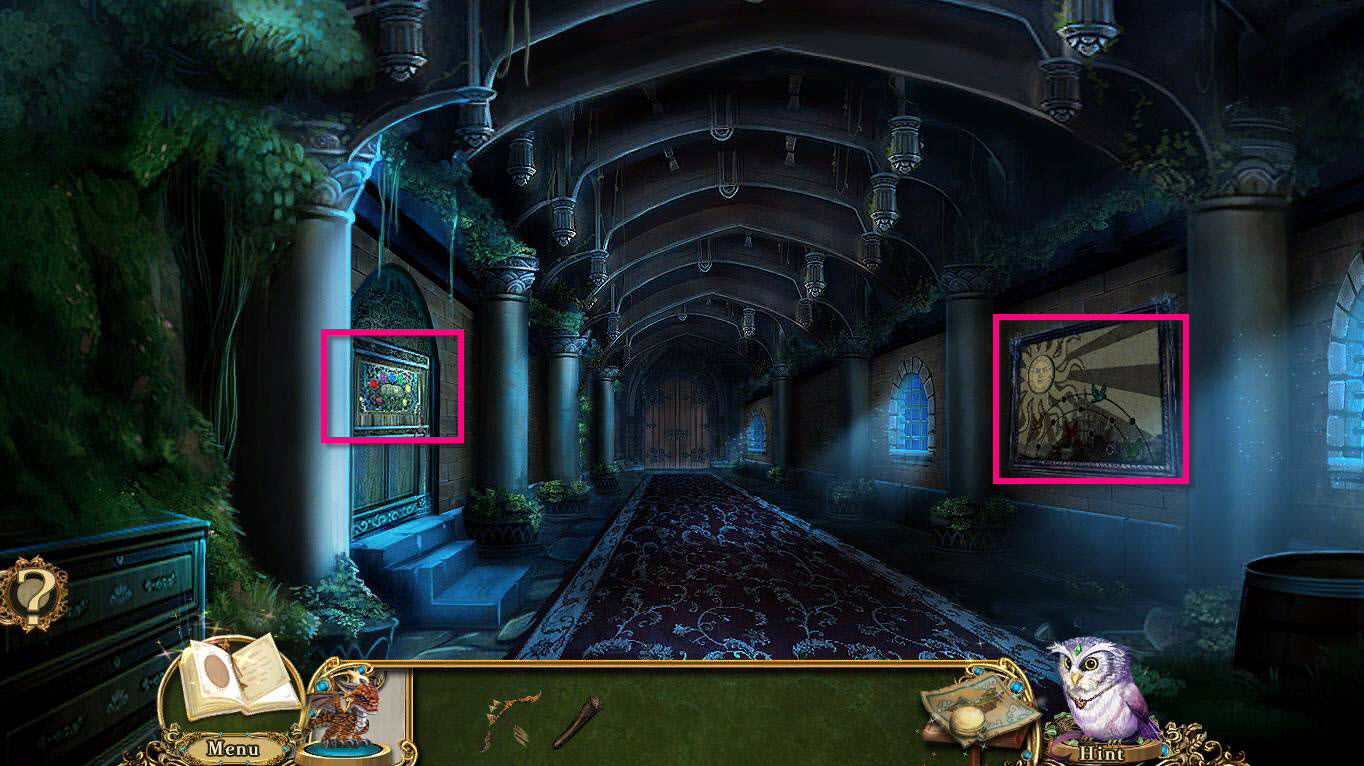
- Click on the sun painting to zoom in.
- Take the SUN EMBLEM.
- Click on the door on the left with the colors to zoom in.
-
This will start a mini-game.
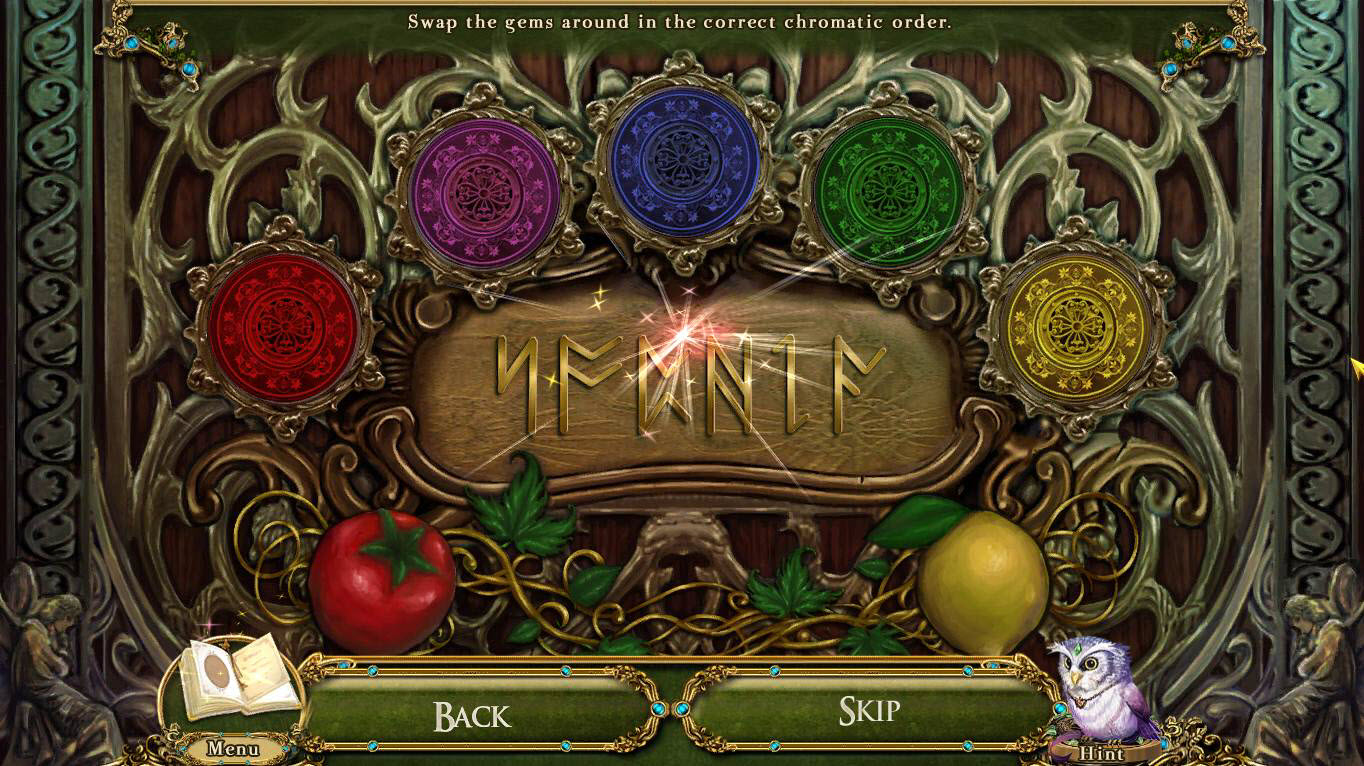
- The goal of the game is to put the games in the right order.
- Use the tomato and the lemon as hints, meaning the red should be all the way on the left and the yellow, all the way on the right.
- See the screenshot for the solution: Red, purple, blue, green, yellow.
-
Enter Sophia's Bedroom.
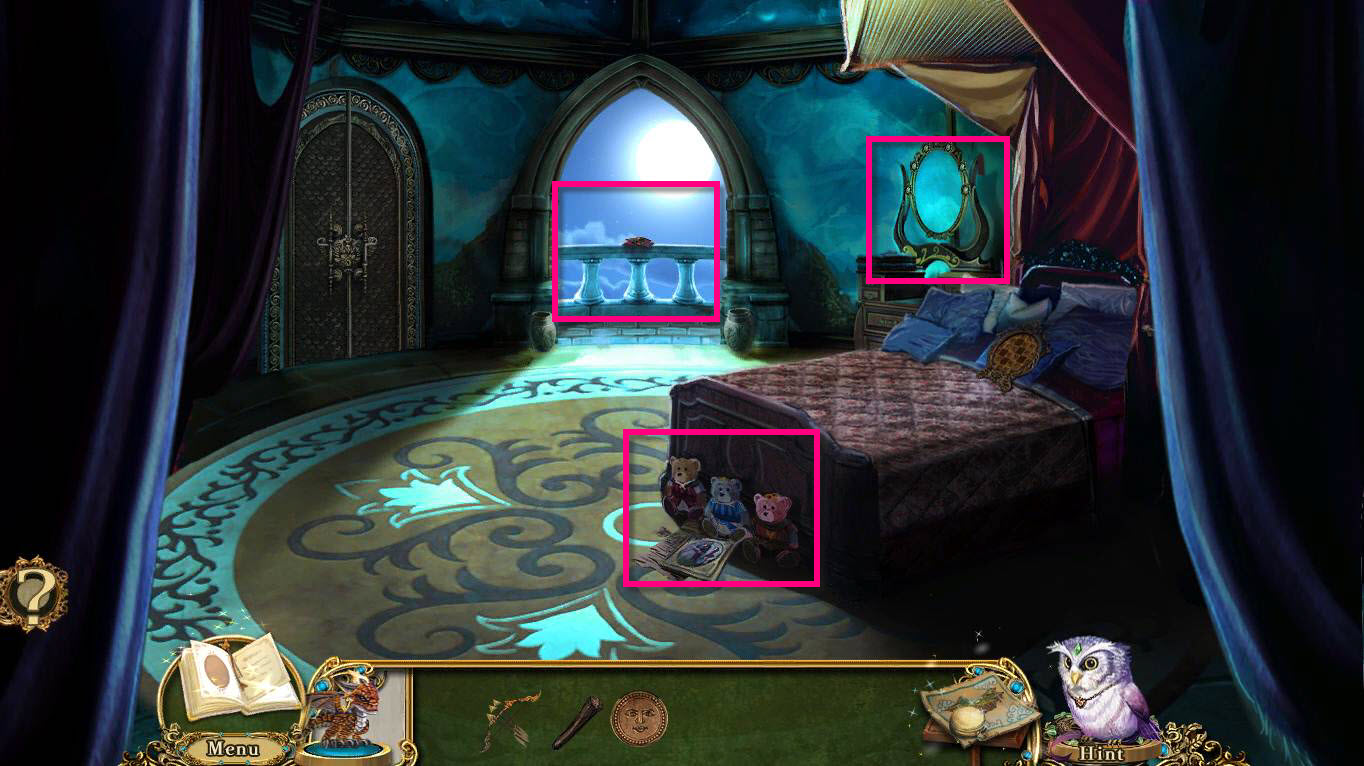
- Click on the mirror to zoom in.
- Take the 1/5 QUILT PATCH.
- Take the 1/5 RUNES that was under the quilt patch.
- Click on the balcony to zoom in.
- Take the 2/5 RUNES.
- Click on the teddy bears on the floor to zoom in.
-
This will start a mini-game.
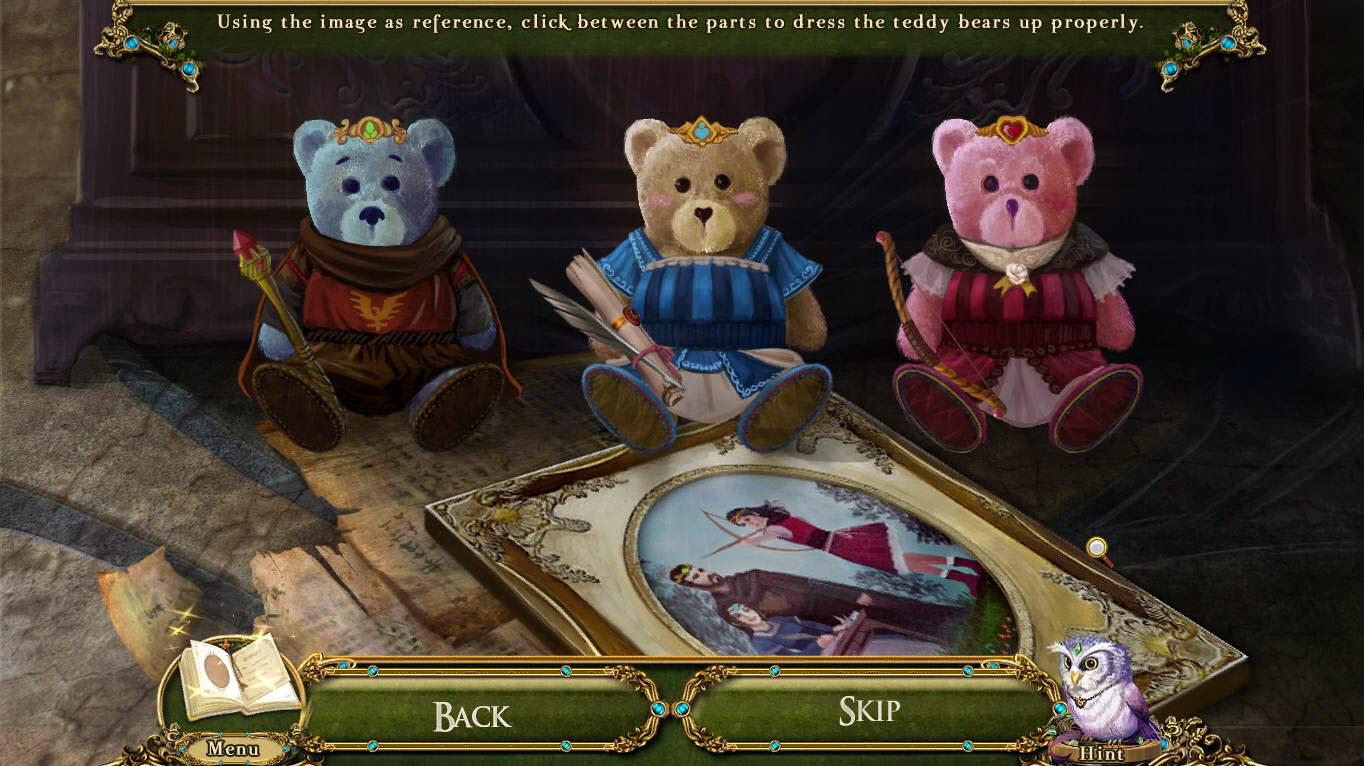
- You must dress the bears properly.
- Check out the photo as a reference.
- The king is the blue bear, the queen is the brown bear, and Sophia is the pink bear.
- You can change their crown, shoes, clothing, and their personal item.
- See the screenshot above for the solution.
- When you are done, take the 3/5 RUNES and the DOORKNOB.
-
Go back one screen.
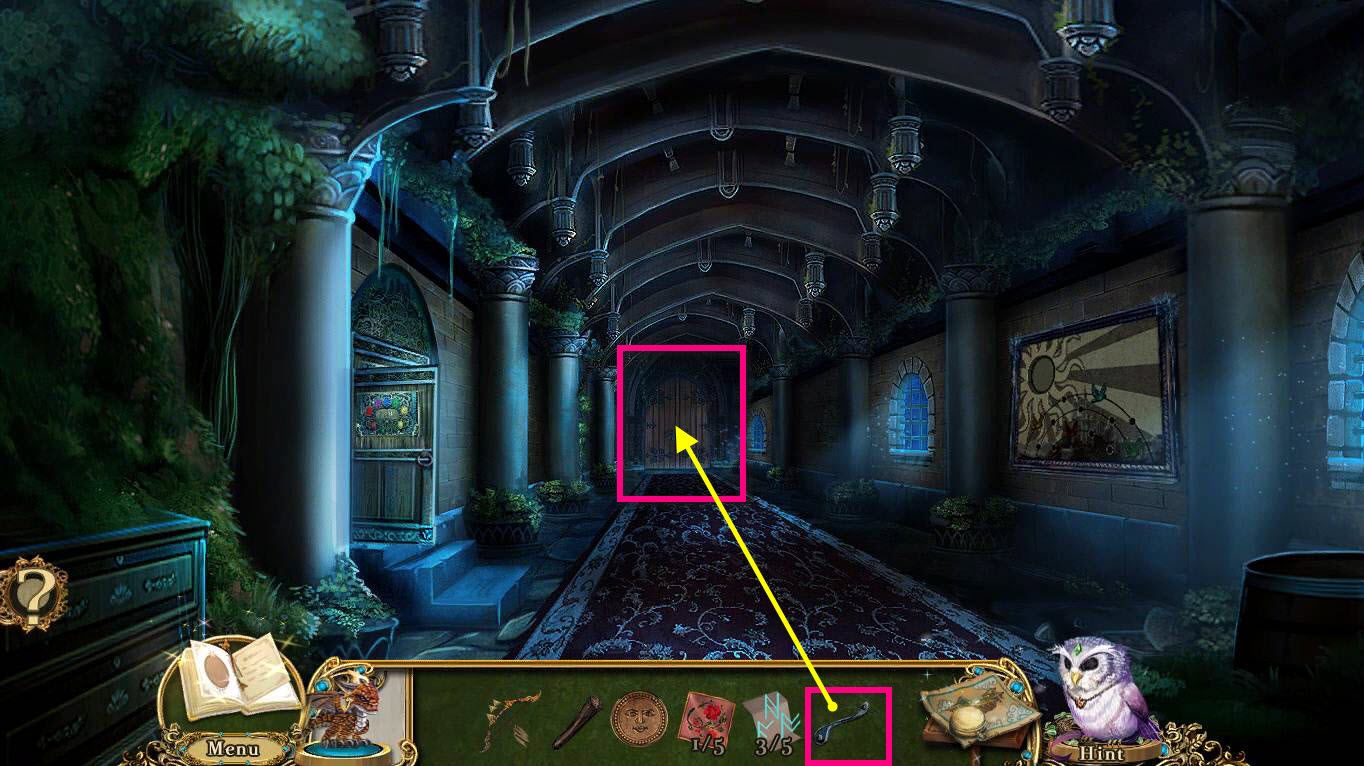
- Click on the door at the end of the hall to zoom in.
- Use the DOORKNOB on the door.
- Click on the handle to open the door.
-
Go forward to the Cartographer's Room.
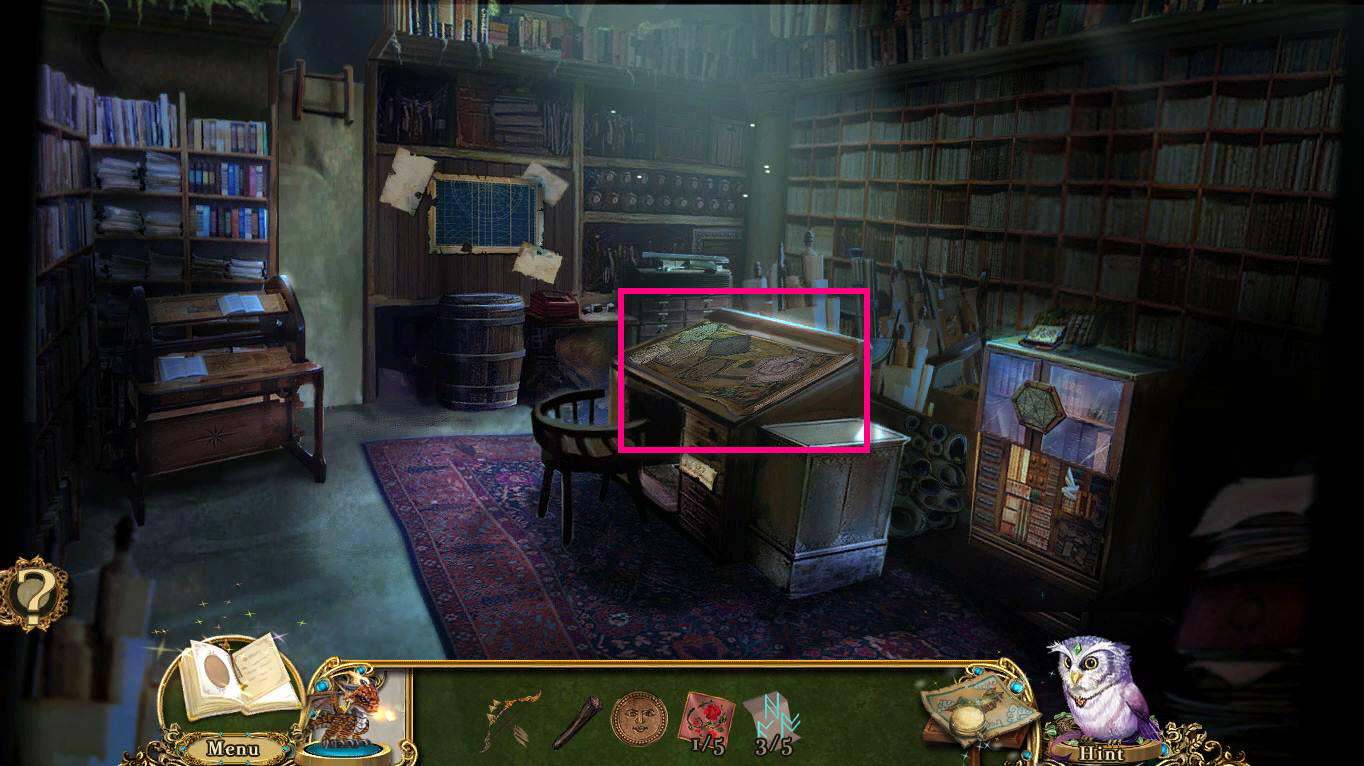
- Click on the Map Desk.
-
This will start a mini-game.
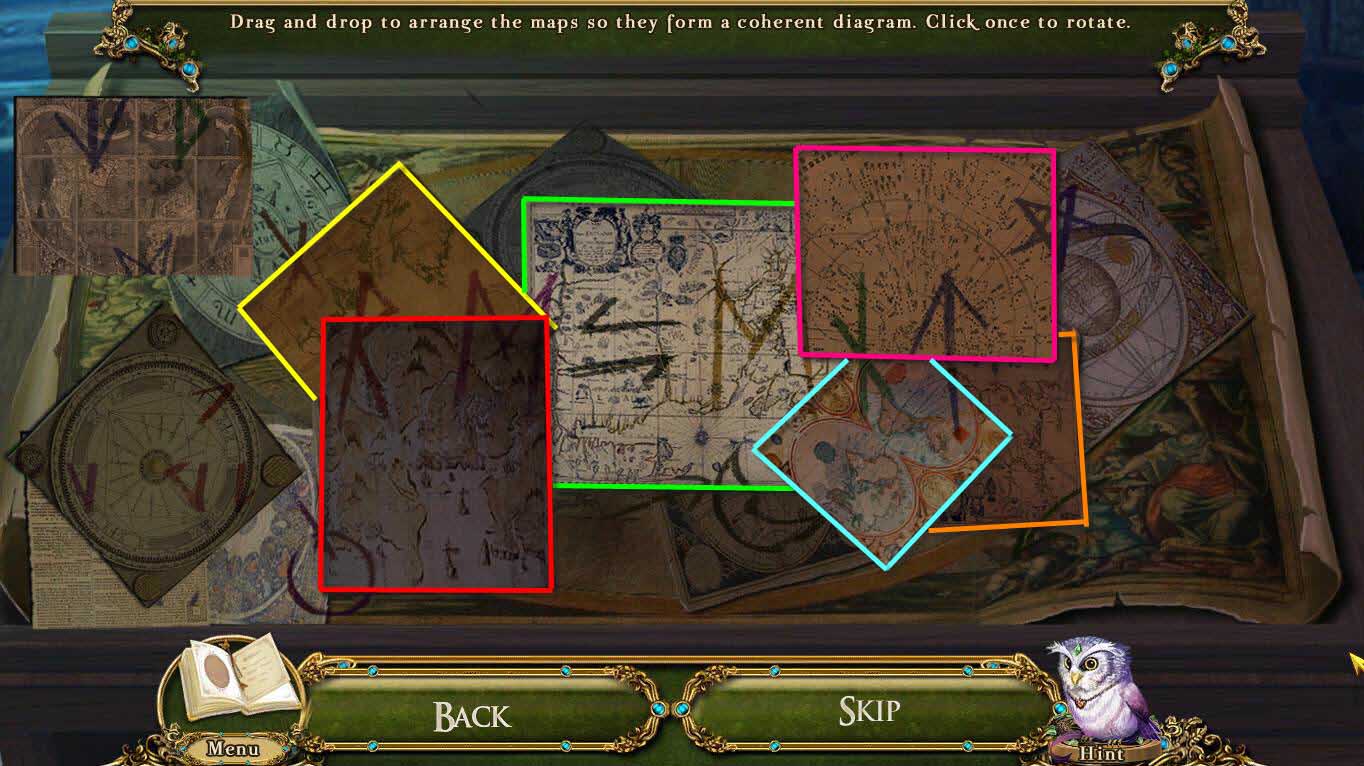
- This mini-game is a little tricky because if you don't have the maps in just the right spot, it won't work.
- The goal is to arrange the maps so that they form a diagram.
- Note the markings on the map. You need to take different pieces of maps and try to match them up.
- Not all the maps will be used. I've moved the ones I didn't use over to the left.
- Once the map is in the right place, it will lock down.
- Start with the map on the left outlined in yellow in the screenshot above.
- Then place green, red, pink, orange, and blue.
- Once you are done, you will receive the Map Markings.
-
Take the LOUPE on the maps.
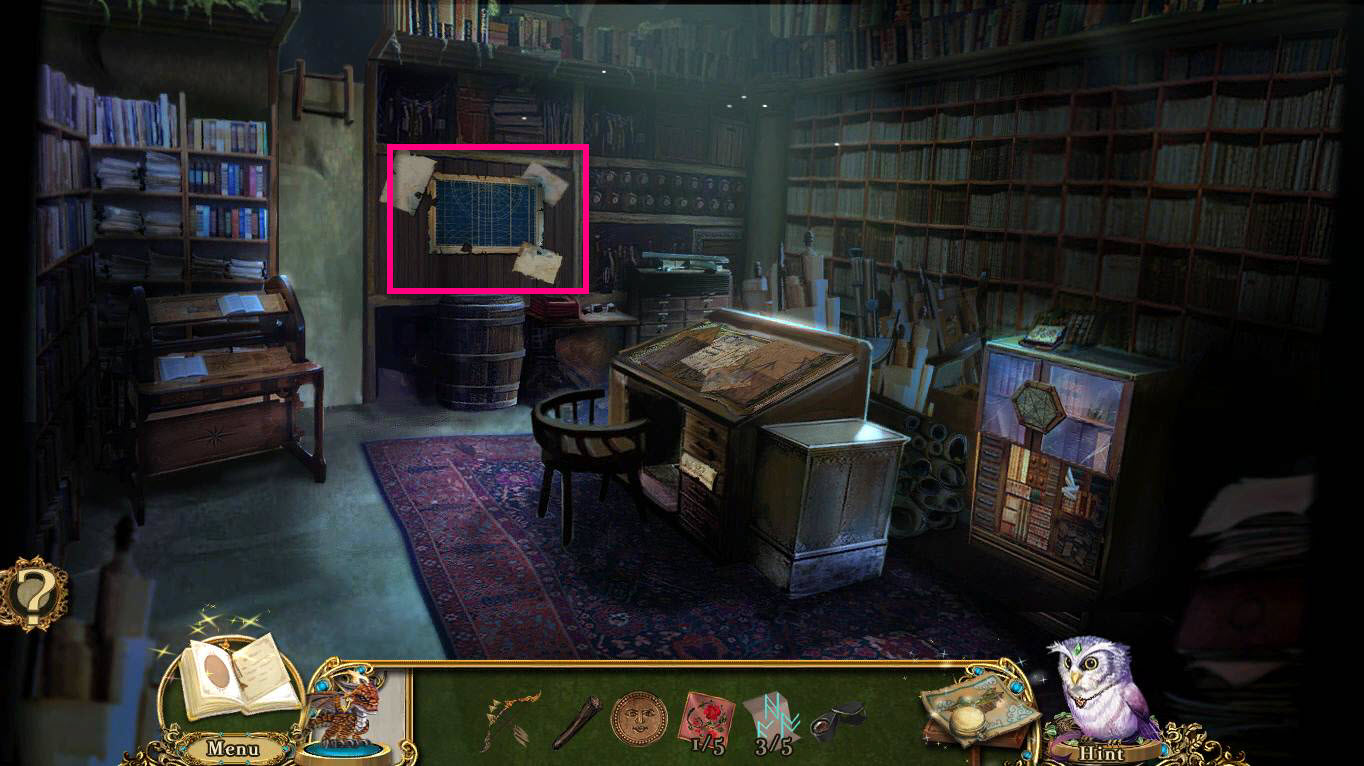
- Click on the Star Map on the wall.
-
This will start a mini-game.


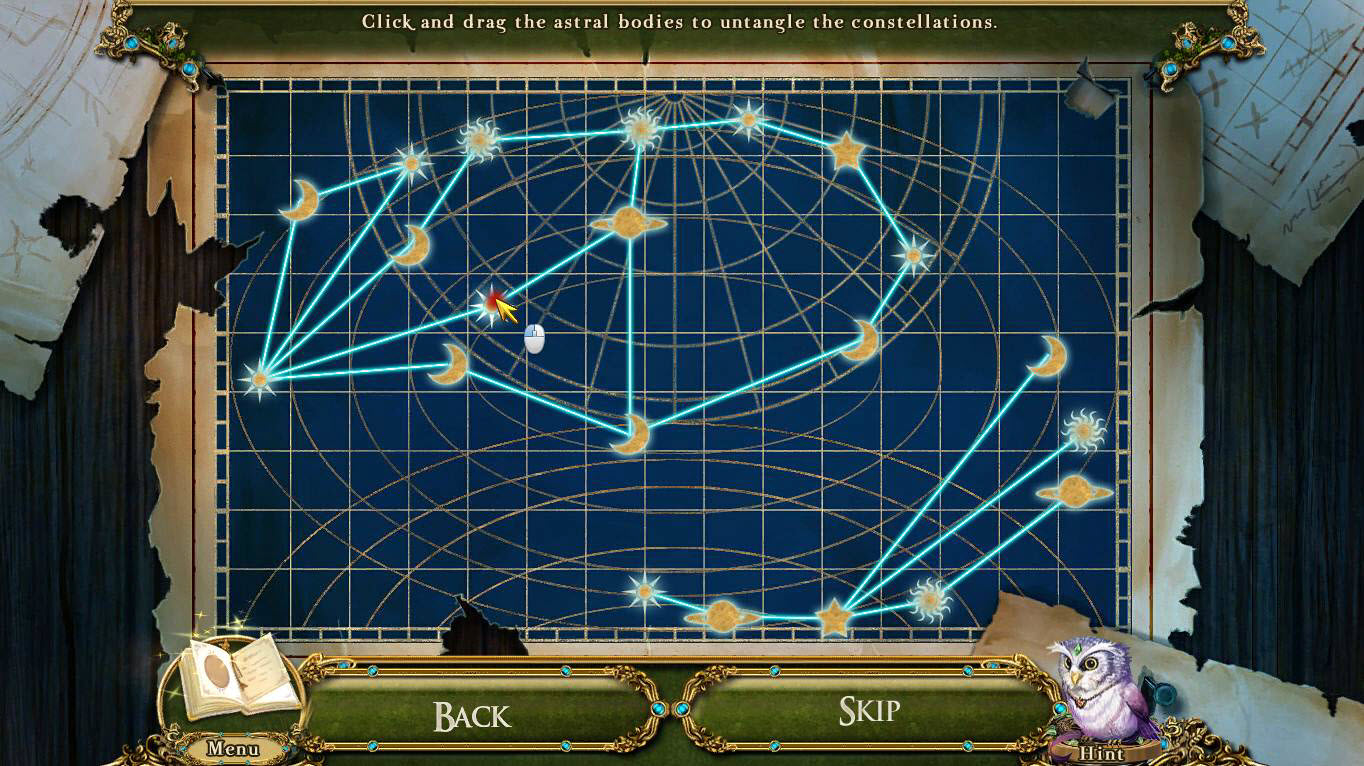
- The goal of the game is to drag all the astral bodies so that none of the lines cross and are red.
- There are 3 puzzles that you have to solve in this mini-game.
- See the screenshots above for the solutions.
-
Take the 4/5 RUNES.
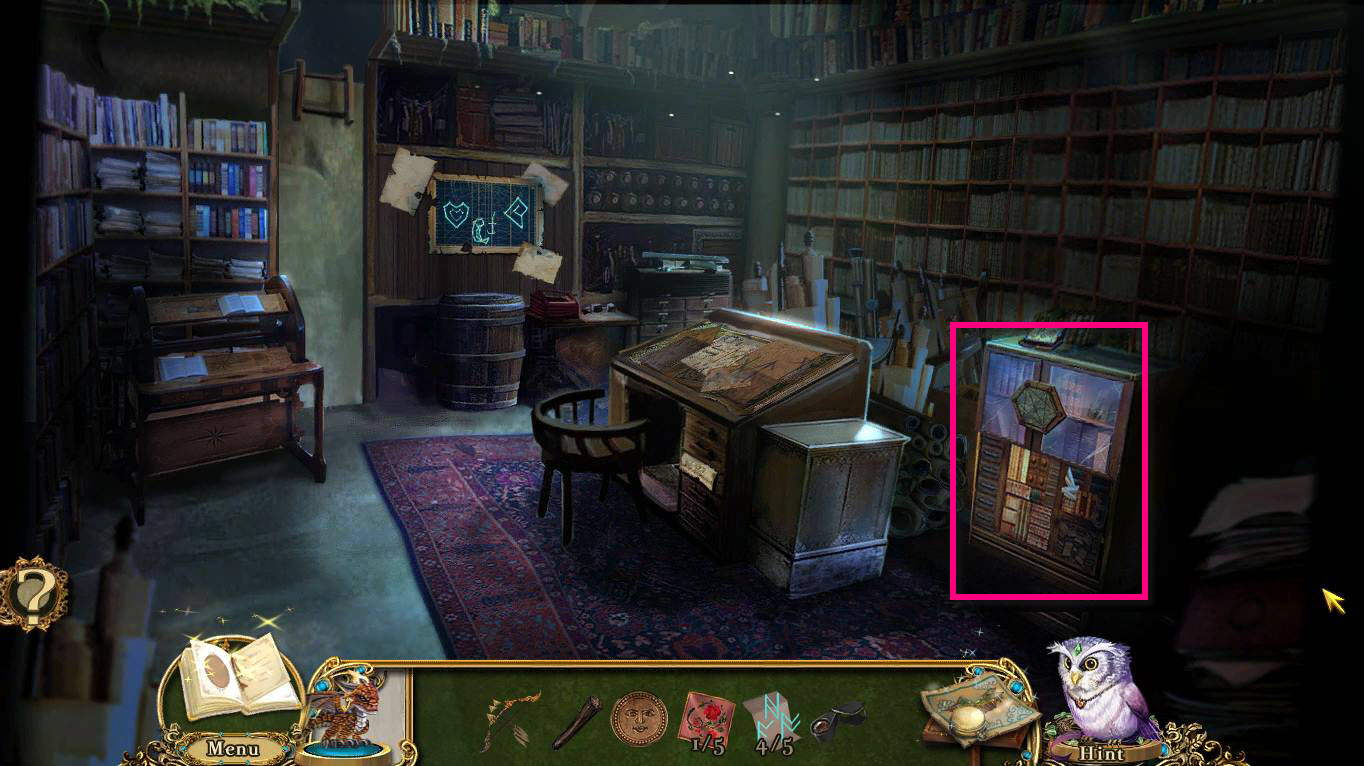
- Click on the book display case on the right.
-
This will start another mini-game.
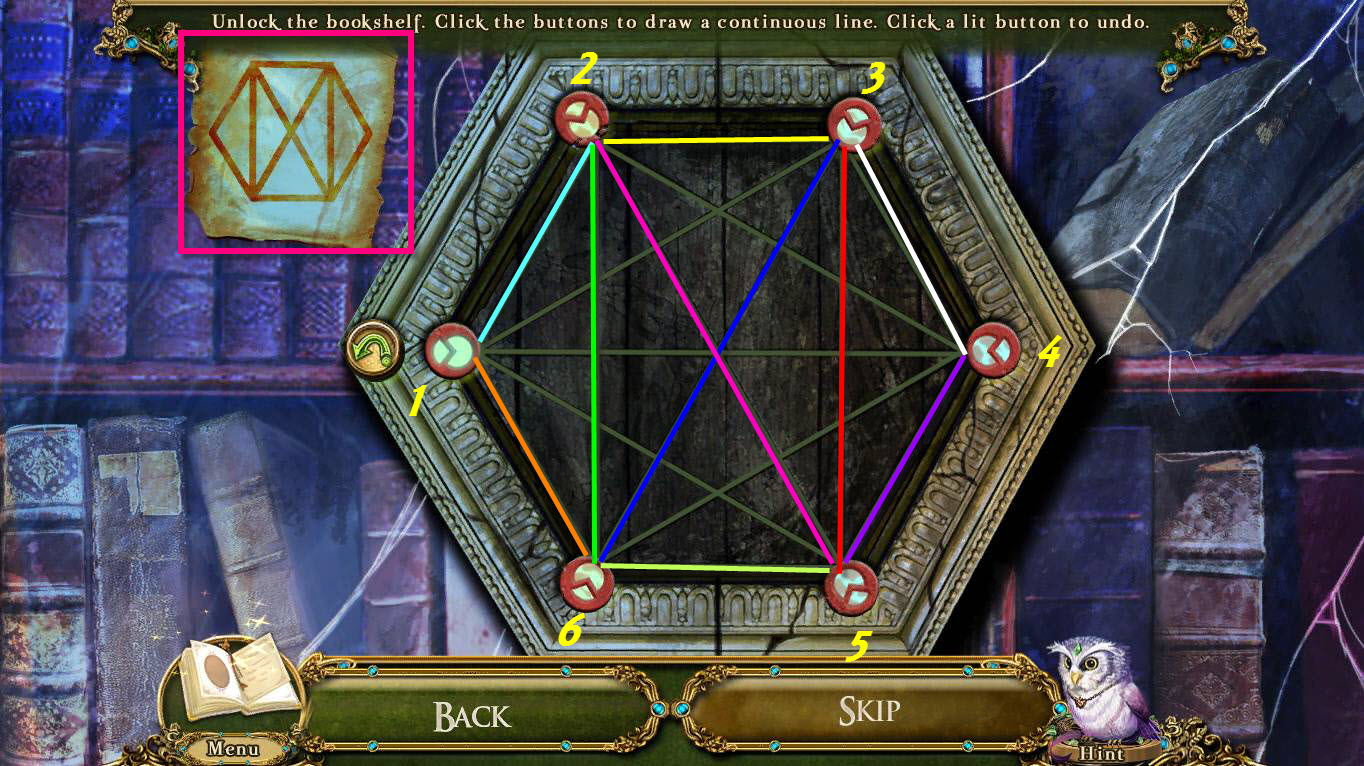
- You need to click on the buttons to draw one continuous line.
- The diagram in the left corner is what the lines should eventually look like.
- Using the screenshot above, the solution is, 1, 2, 6, 3, 5, 2, 3, 4, 5, 6, 1
- Once you are done, click on the carved figure.
- Take the COMPASS HALF and the 5/5 RUNES.
-
Now, go back to Sophia's Bedroom.
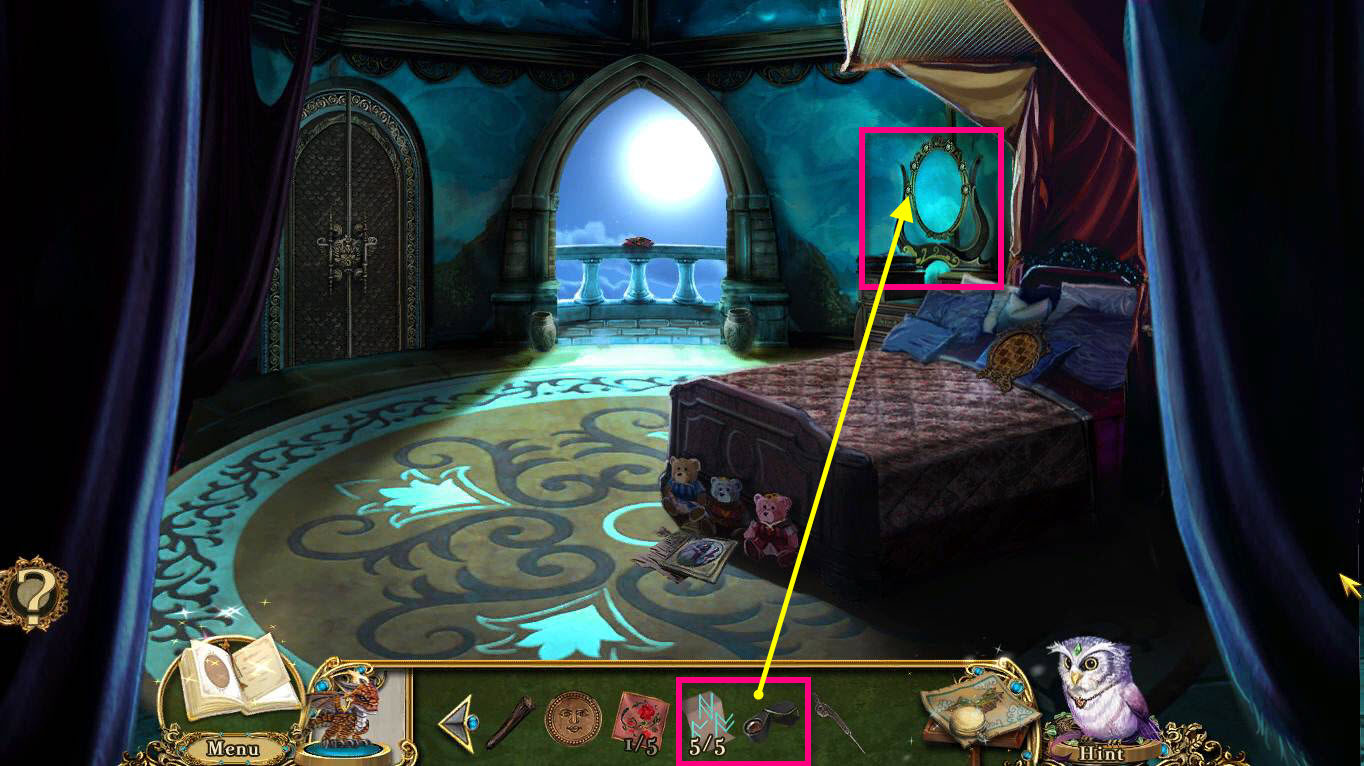
- Click on the mirror to zoom in.
- Use the 5/5 RUNES on the frame of the mirror.
- A symbol in the mirror will appear.
- Use the LOUPE on it.
-
This will start a mini-game.
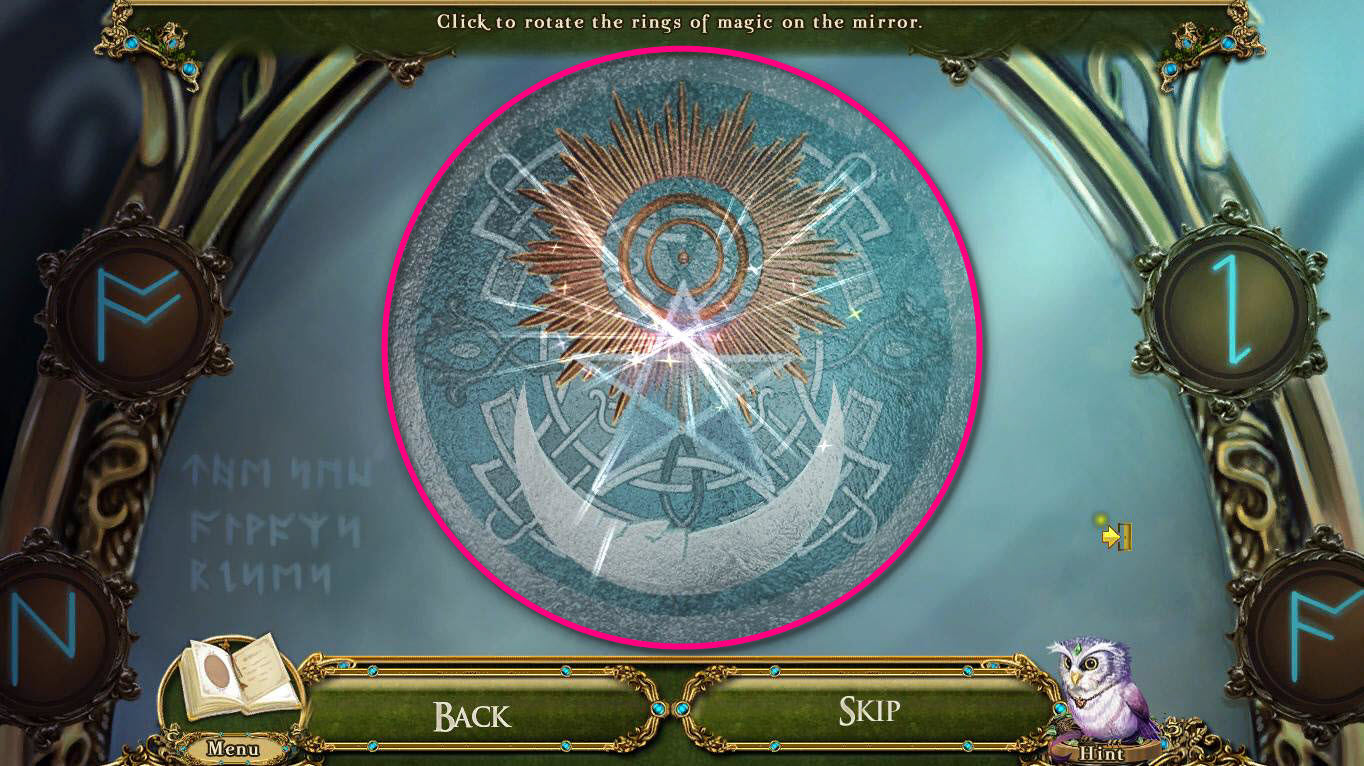
- The goal of the game is to rotate the rings to form the image.
- There are 4 rings to rotate.
- See the screenshot above to see the final image.
- Take the SILVER STAR.
-
Go back twice so that you're at the main hall again.
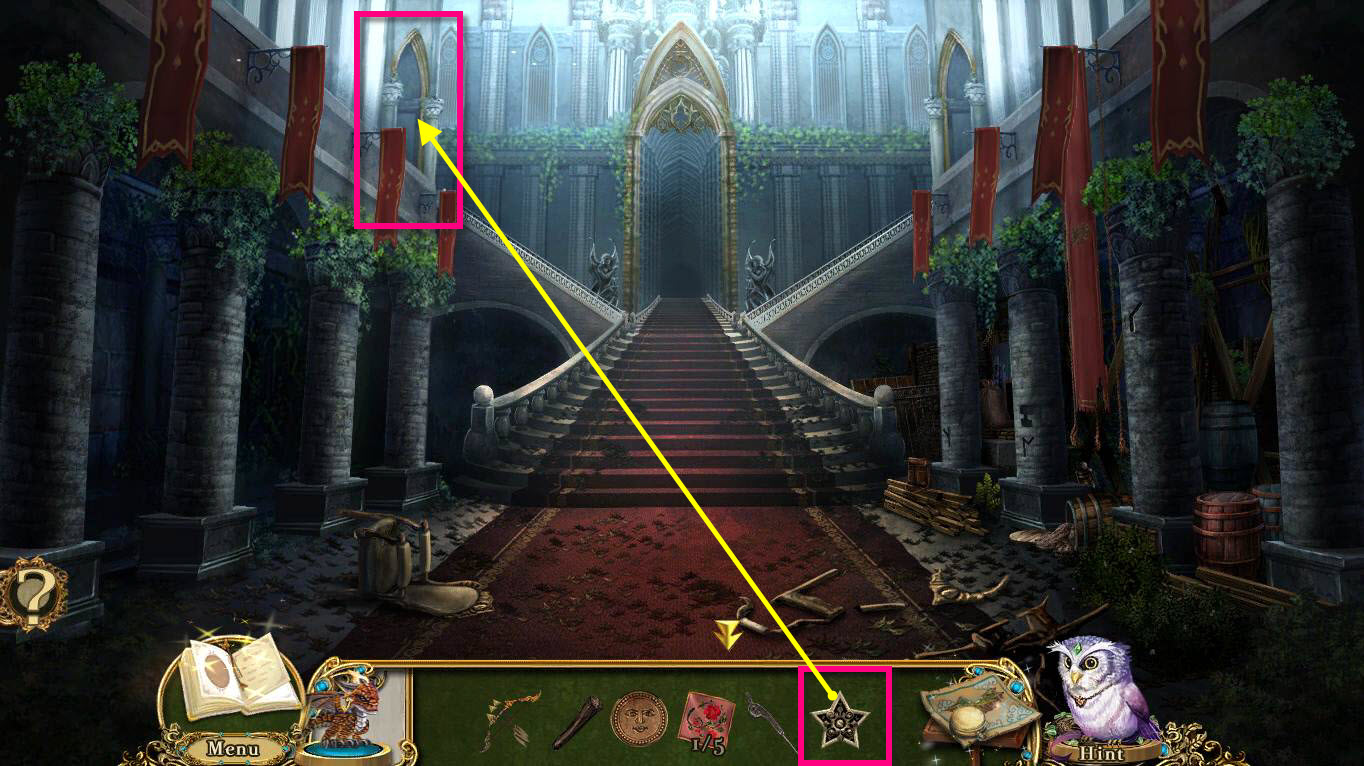
- Click on the Starward Gate on the left to zoom in.
- Use the SILVER STAR on the lock.
-
Click to turn the key.
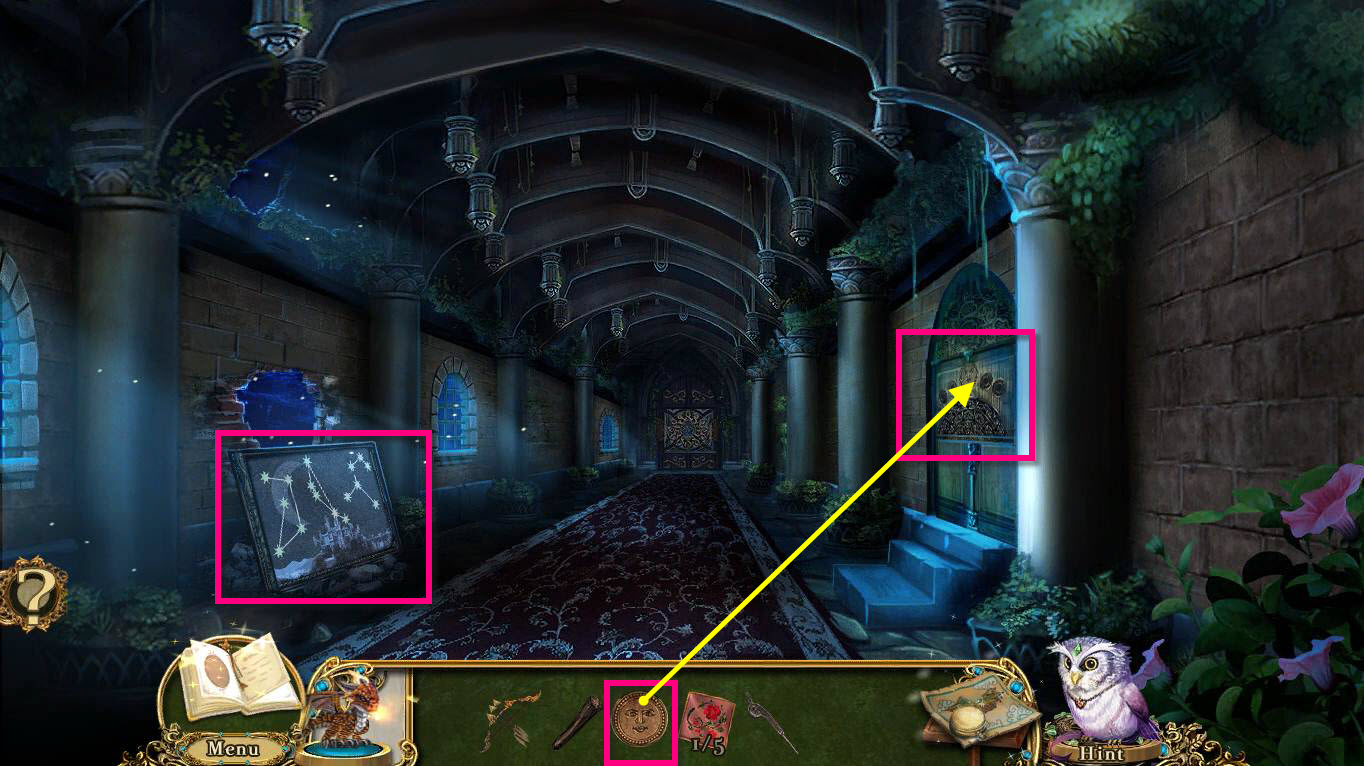
- Click on the Moon Mural on the left to zoom in.
- Click on the constellations and it will be added to your journal.
- Click on the door of the Wizard's Retreat to zoom in.
- Use the SUN EMBLEM on the door.
-
This will start a mini-game.
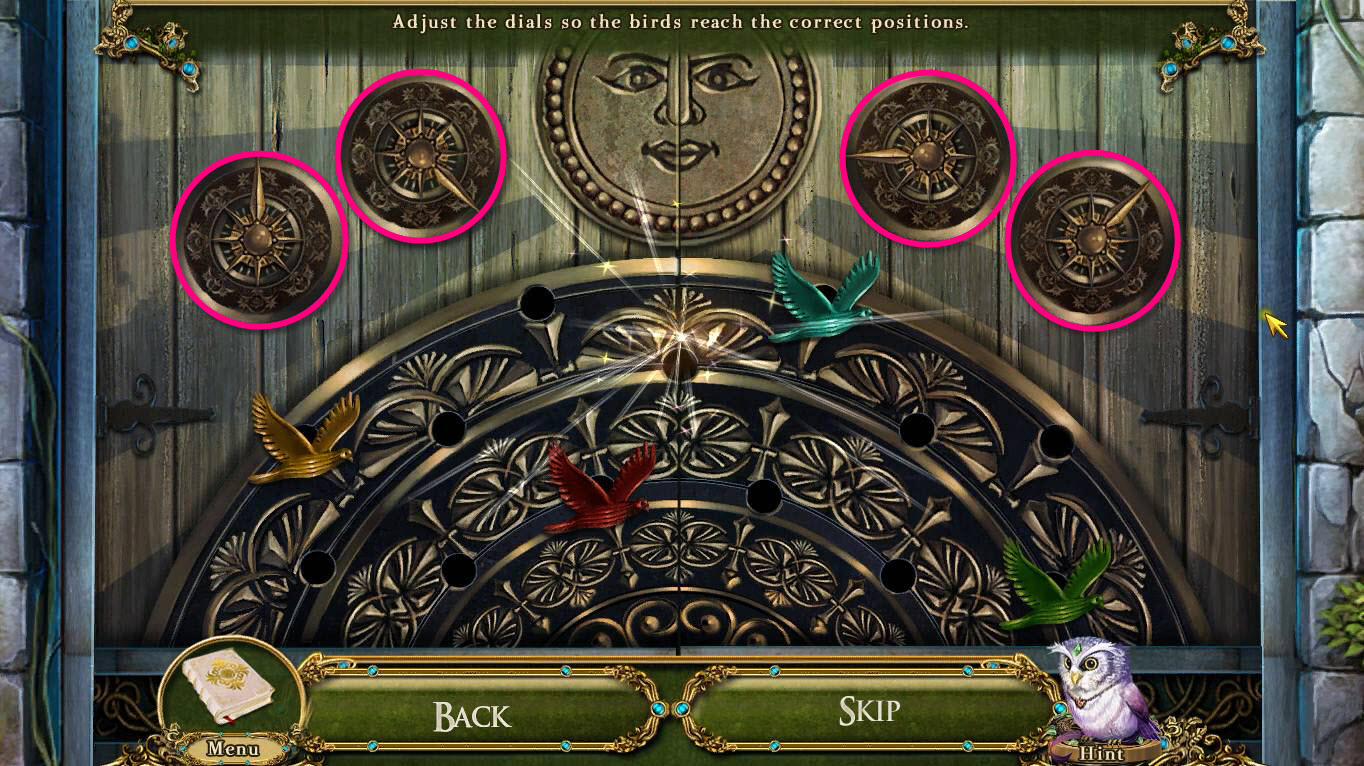
- The goal of the game is to move the dials so the birds are in the correct position.
- Go back to your journal to see the where the birds are supposed to go.
- Click on the dials to make the birds move.
- When you are done, go into the Wizard's Retreat.
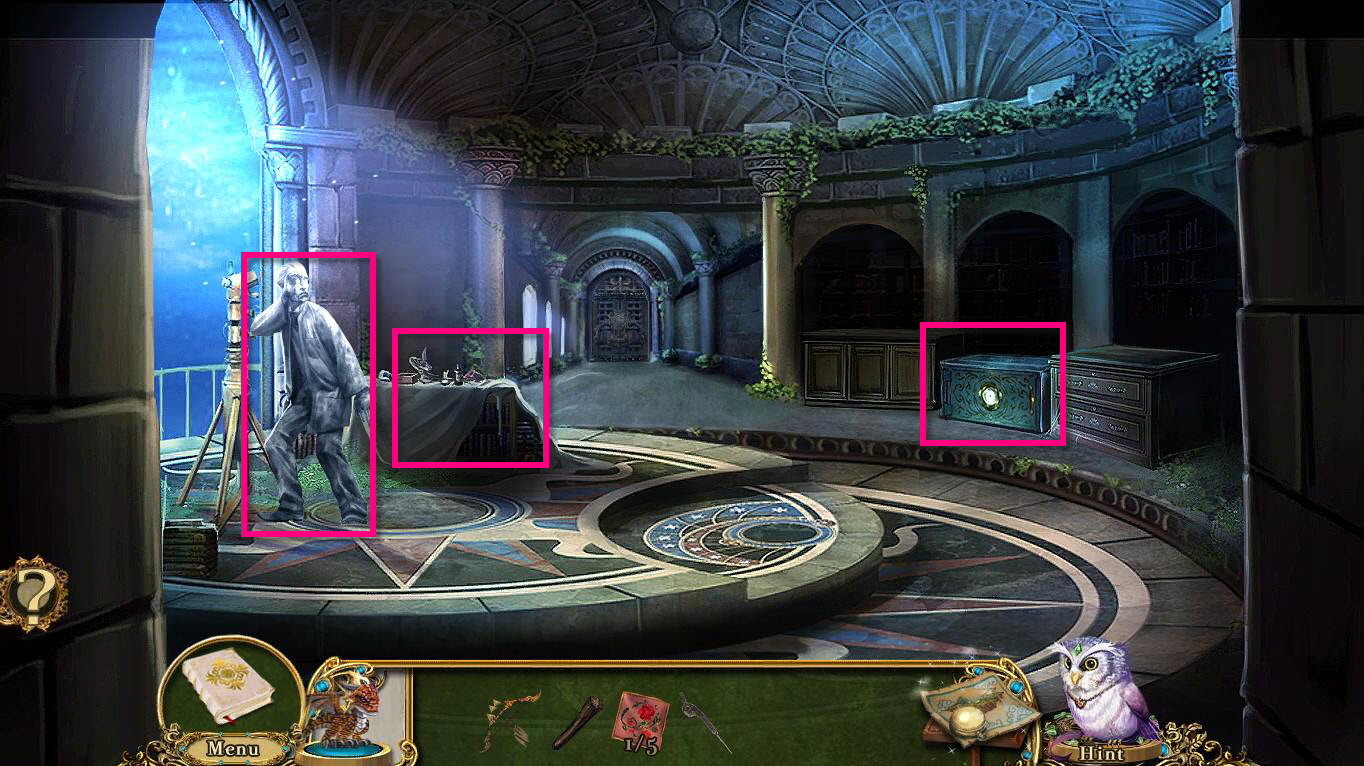
- Click on the Specimen Storage to zoom in.
- Take the 2/5 QUILT PATCH.
- Click on the Cartographer to zoom in.
- Take the WAX TABLET.
-
Click on the Worktable to zoom in.
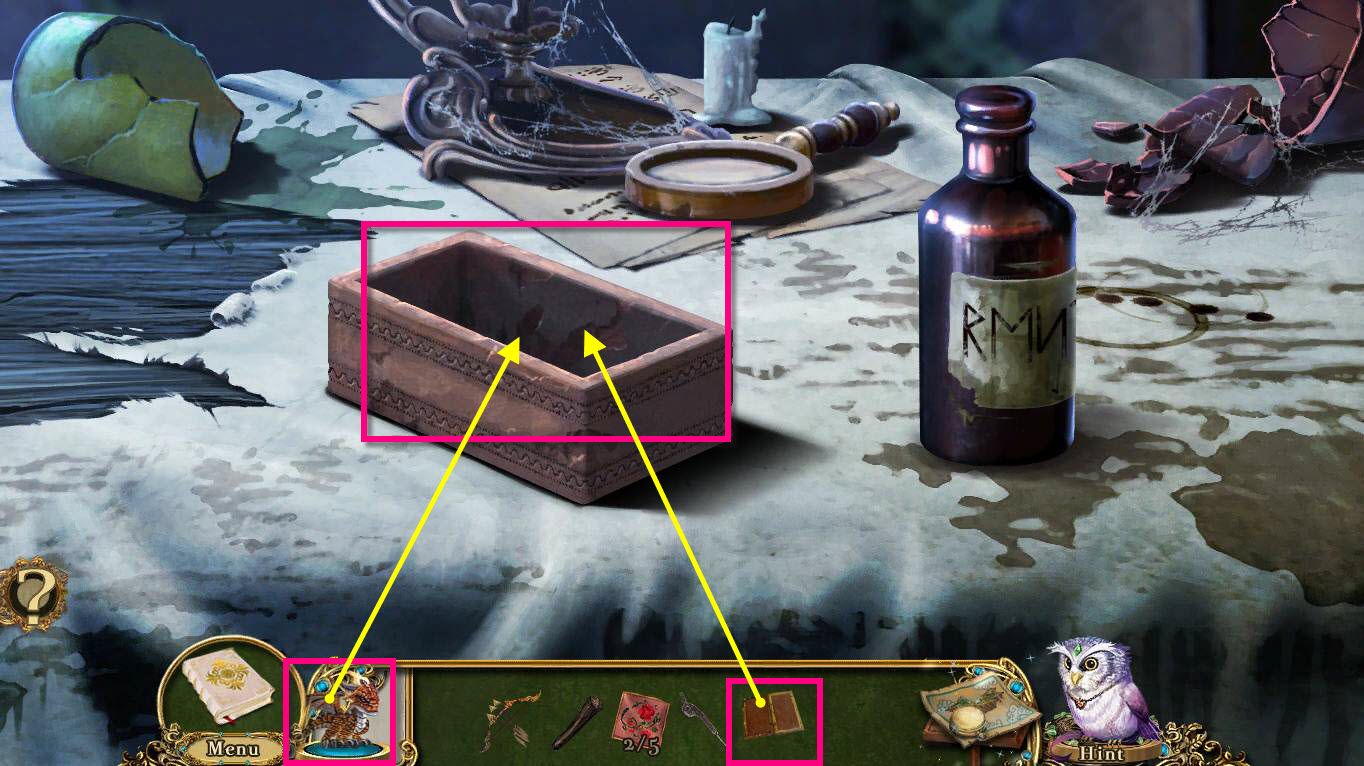
- Use the WAX TABLET on the Mold.
- Use the Pocket Dragon on the mold to melt the wax.
- Take the WAX MOLD.
-
Use your map to fast travel back to Sophia's Room.
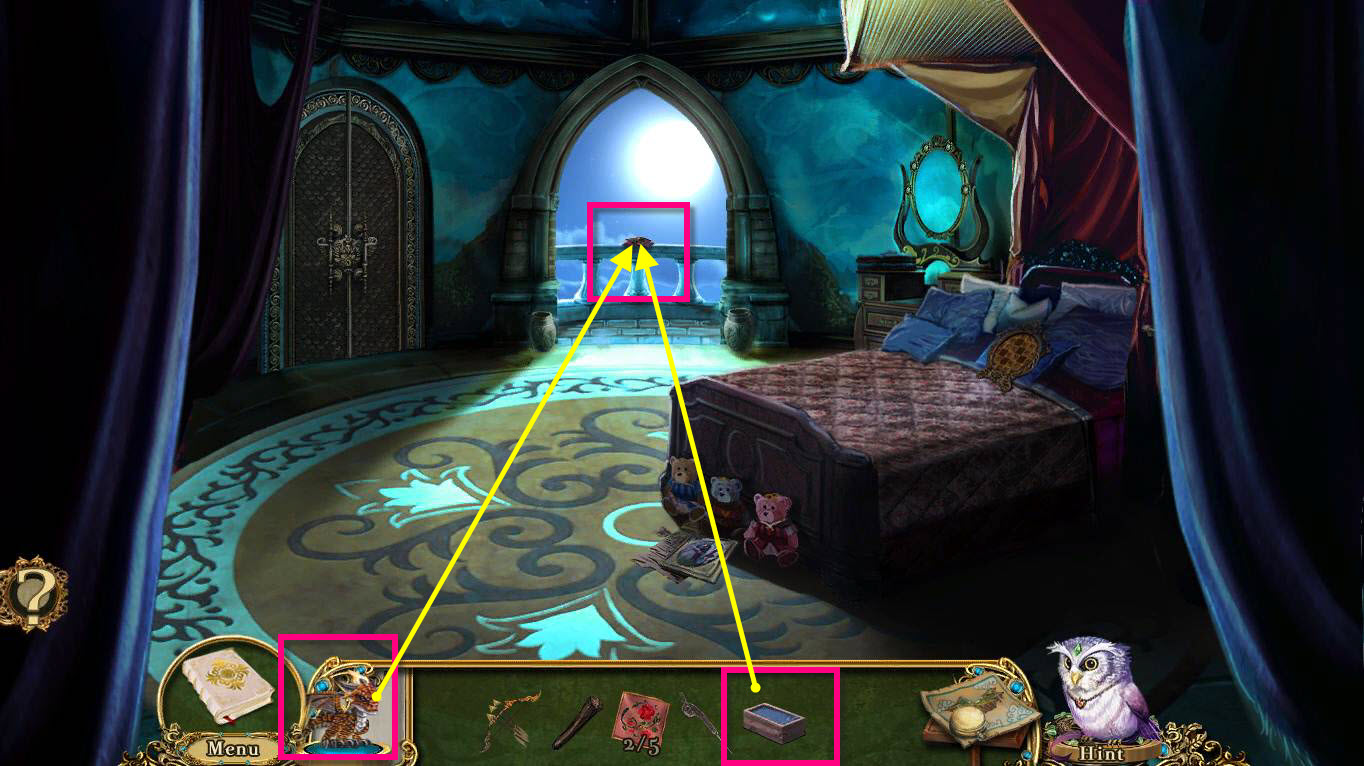
- Click on the Balcony to zoom in.
- Use the WAX MOLD on the Worn Key.
- Use the Pocket Dragon on the mold to melt it.
- Take the KEY MOLD.
-
Use your map to fast travel back to the Wizard's Retreat.
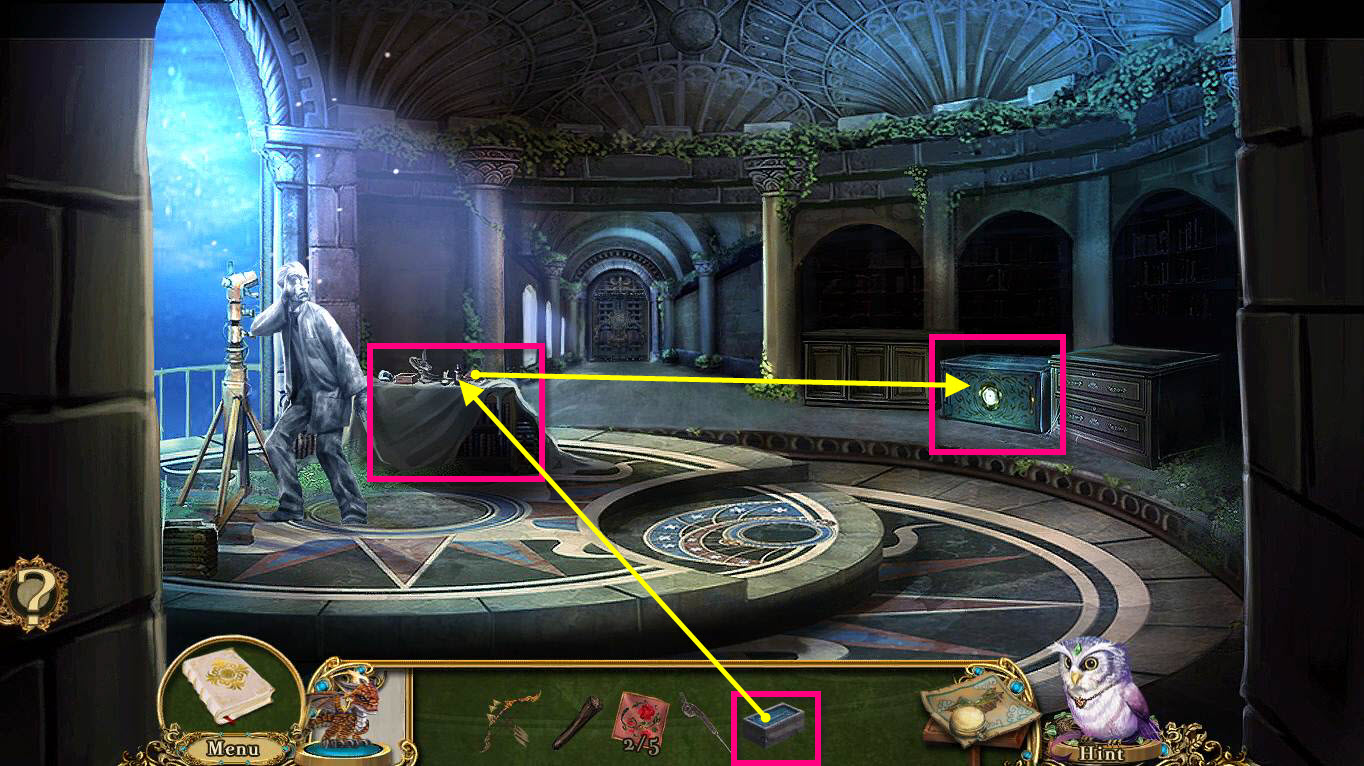
- Click on the Worktable to zoom in.
- Use the KEY MOLD on the Frostbreath Resin.
- You will receive the LIQUID KEY MOLD.
- Click on the Specimen Case to zoom in.
- Use the LIQUID KEY MOLD on the freezer.
- Take the FROSTBREATH KEY.
-
Use the map to fast travel back to Sophia's Room.

- Click on the wardrobe to zoom in.
- Use the FROSTBREATH KEY on the lock.
- Click to turn the key.
- Go into the wardrobe.
-
Click on the Dollmaker's Stand to start a Hidden Object Game.
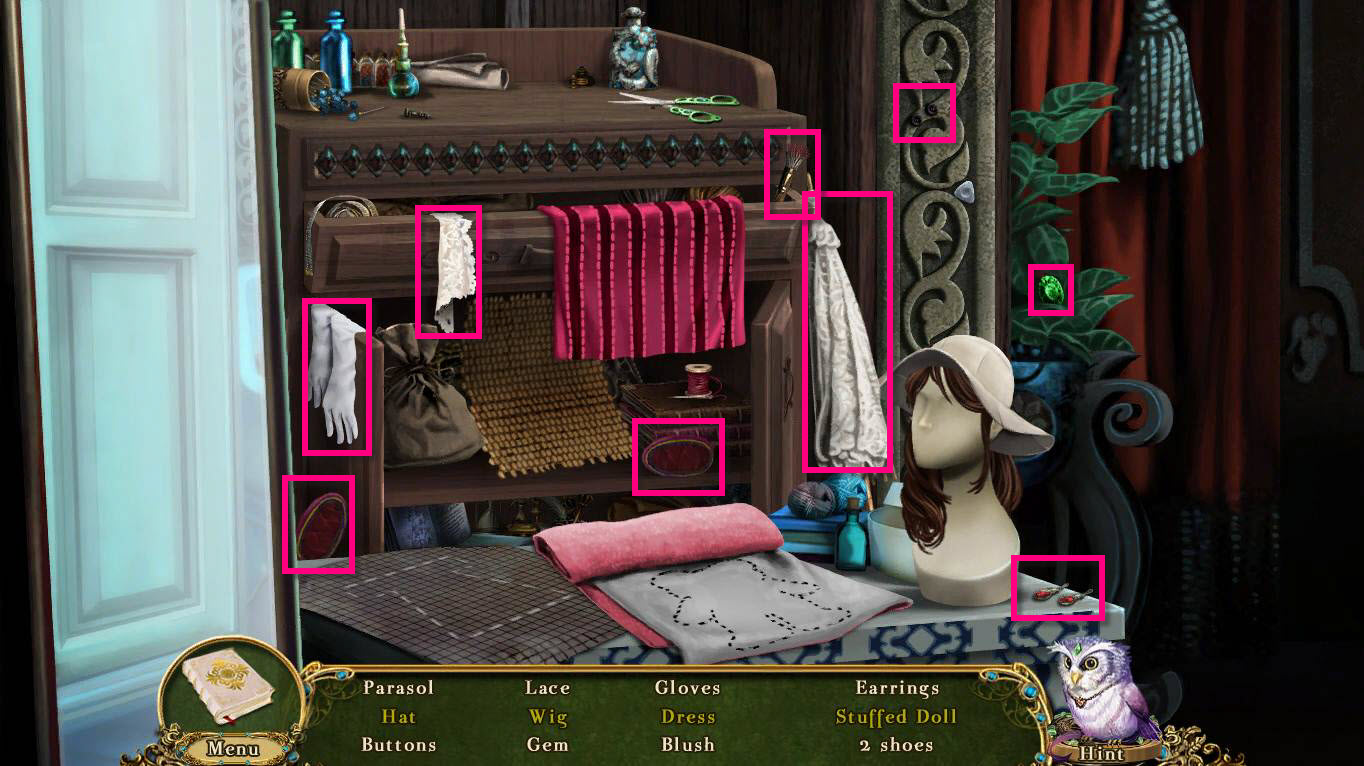
-
Find all the items on the list that are in white first.
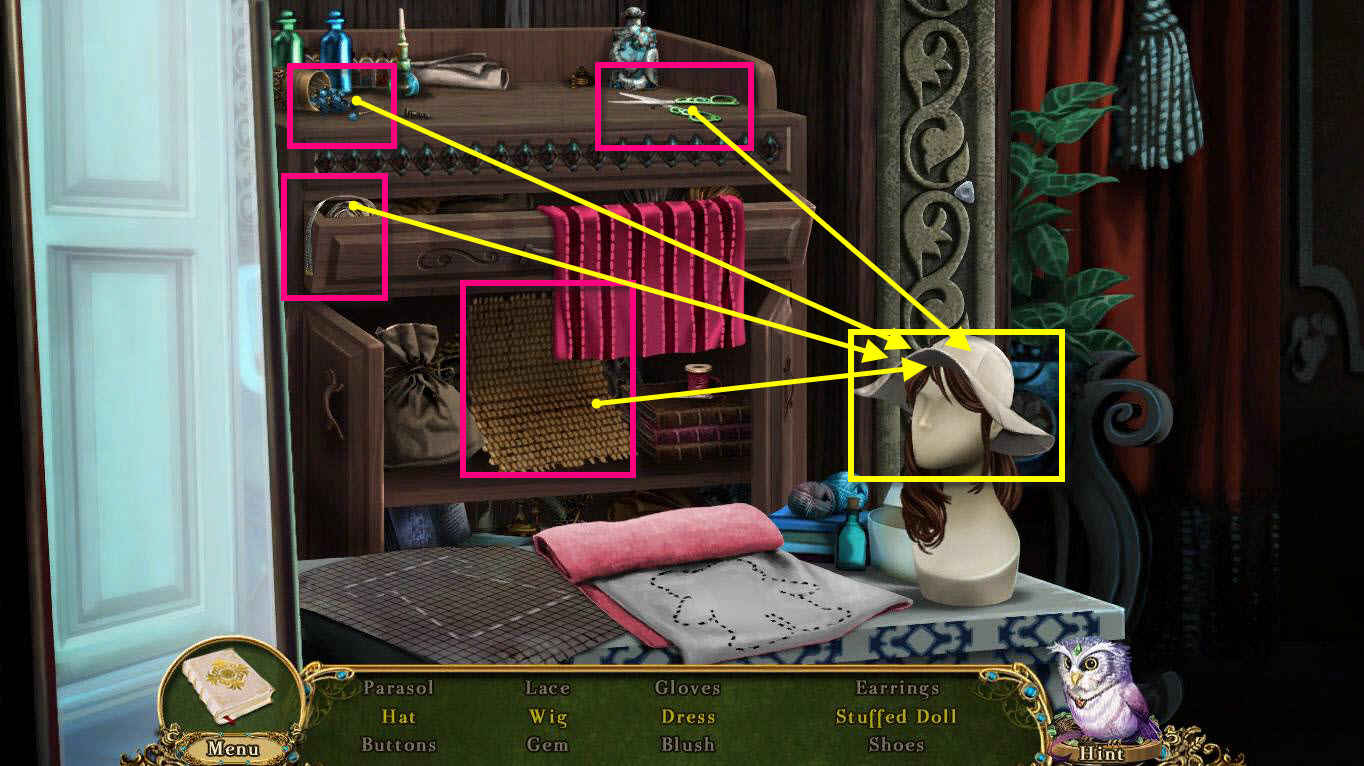
- Use the Straw Weave on the Hat.
- Then use the Hat Pins on the Hat.
- Use the Measuring Tape on the Hat.
- Then the Scissors.
- Take the Hat.
-
Take the Wig.
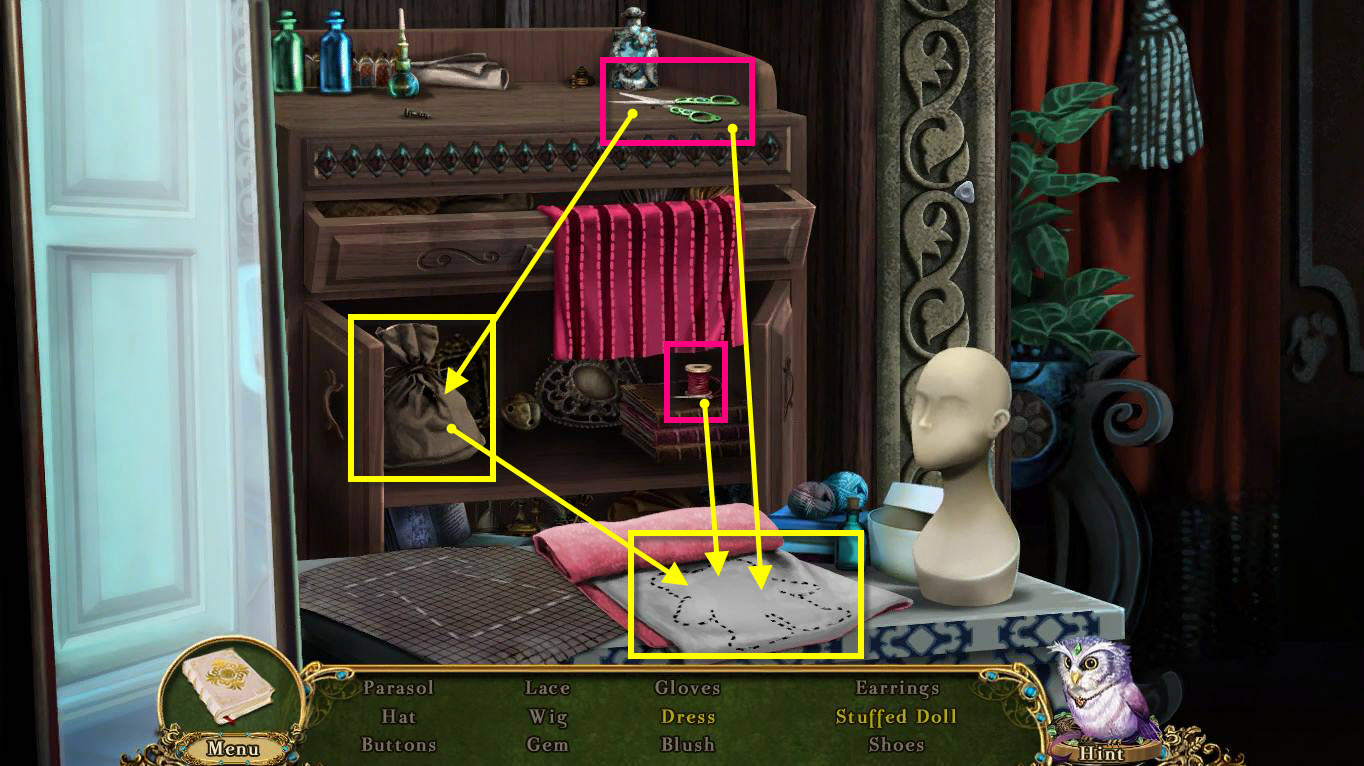
- Use the Scissors on the doll plans.
- Use the Scissors on the bag of stuffing.
- Use the cotton stuffing on the unstuffed doll.
- Use the Sewing Kit on the stuffed doll.
-
Take the Stuffed Doll.
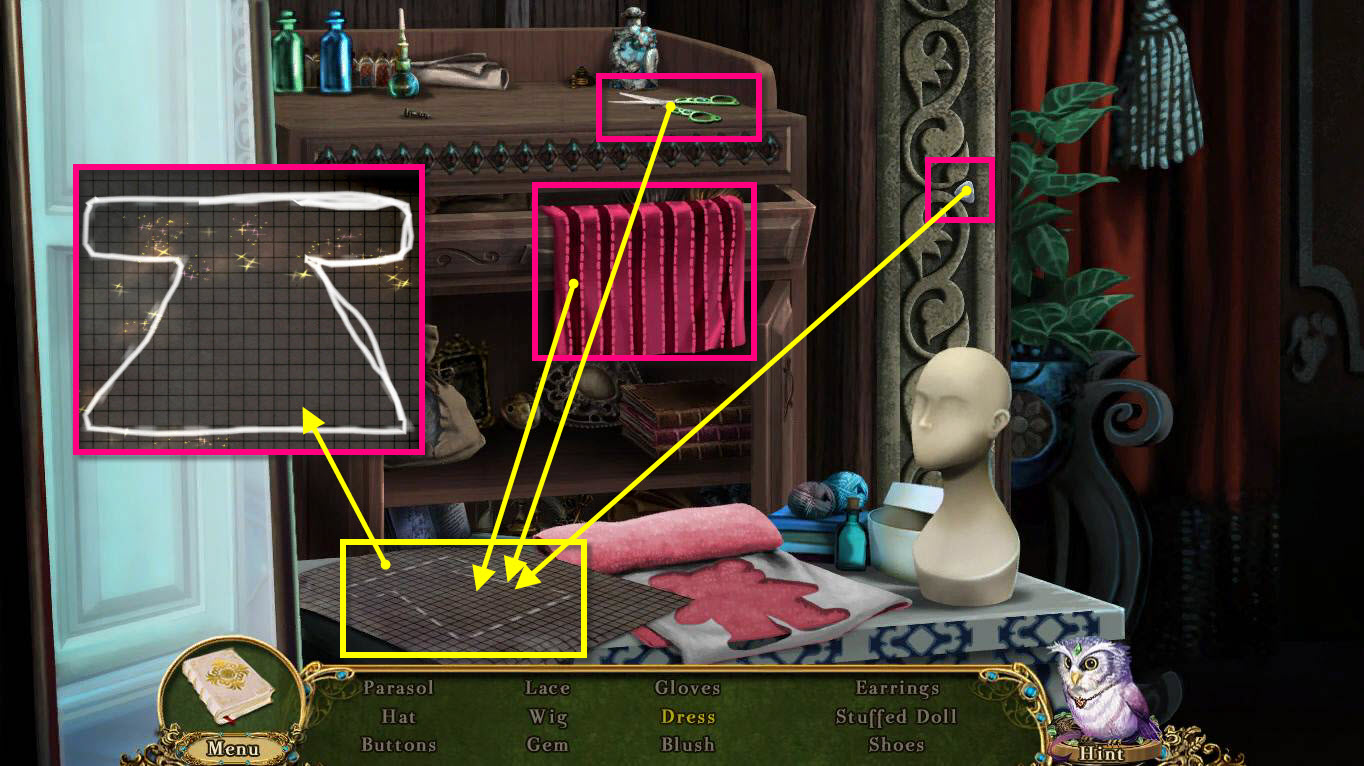
- Use the Triangle Chalk on the plan for doll clothes.
- This will start a mini-game where you just have to drag and draw the outline of the doll clothes with the chalk.
- Use the silk cloth on the plans.
- Then use the scissors on the cloth.
- Take the dress.
-
This will start another mini-game.
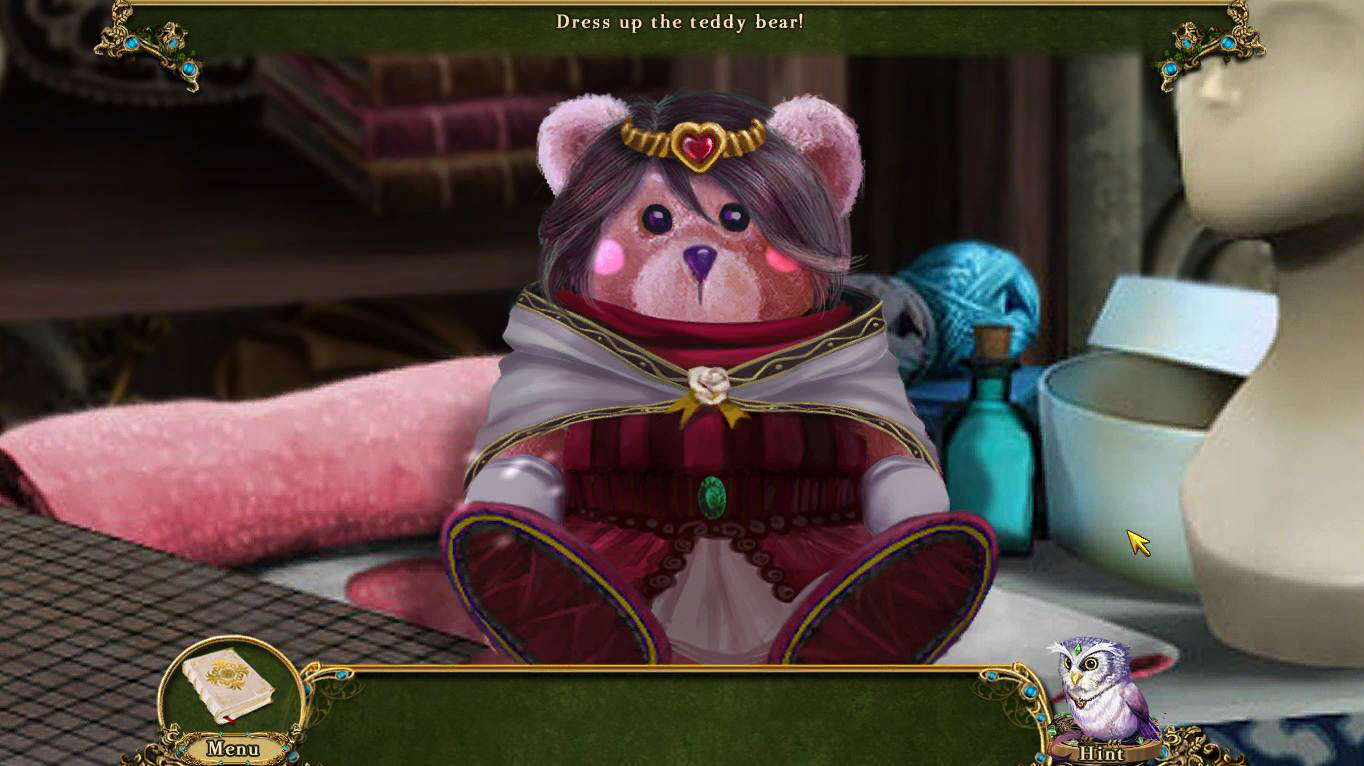
- The goal of the game is to dress up the teddy bear.
- See the screenshot above for the final product.
- Take the 3/5 QUILT PATCH and the COMPASS HALF.
- The two compass halves you have in your inventory will combine and you will receive the CARTOGRAPHER'S COMPASS.
-
Use your map to fast travel to the Wizard's Retreat.
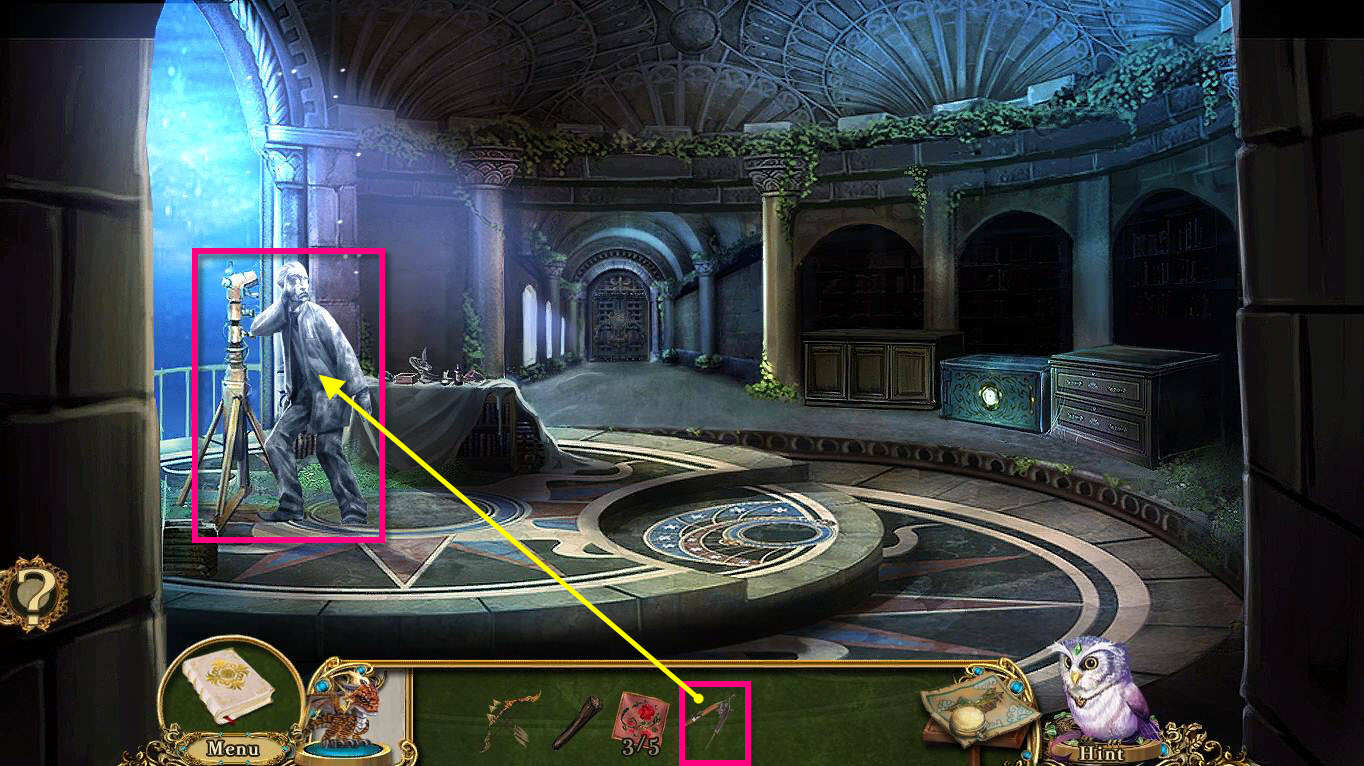
- Click on the cartographer to zoom in.
- Use the CARTOGRAPHER'S COMPASS on him.
- He'll come back to life.
- Click on him to talk to him.
- You will receive the SOLAR KEY.
-
Go down one screen.
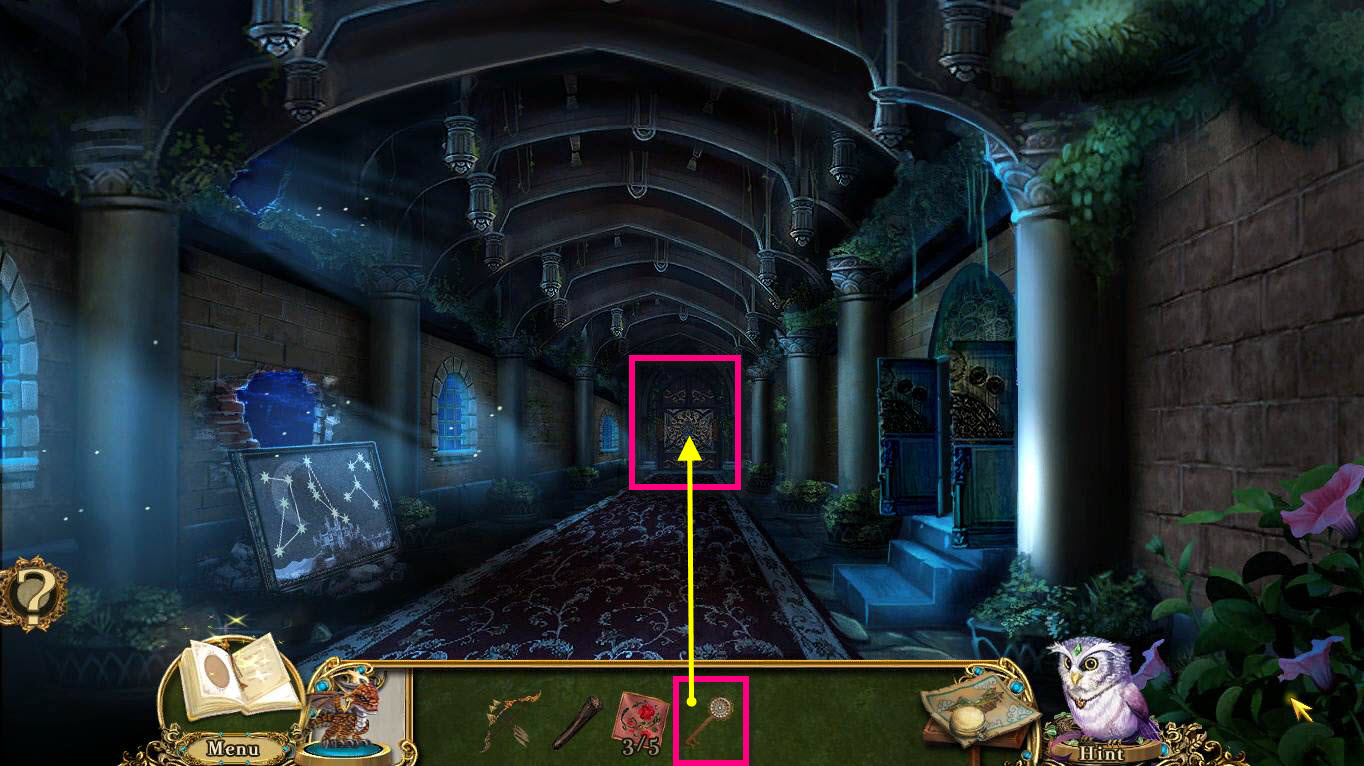
- Click on the solar door at the end of the hall to zoom in.
- Use the SOLAR KEY on the lock.
- Click to spin the key.
-
Walk forward.
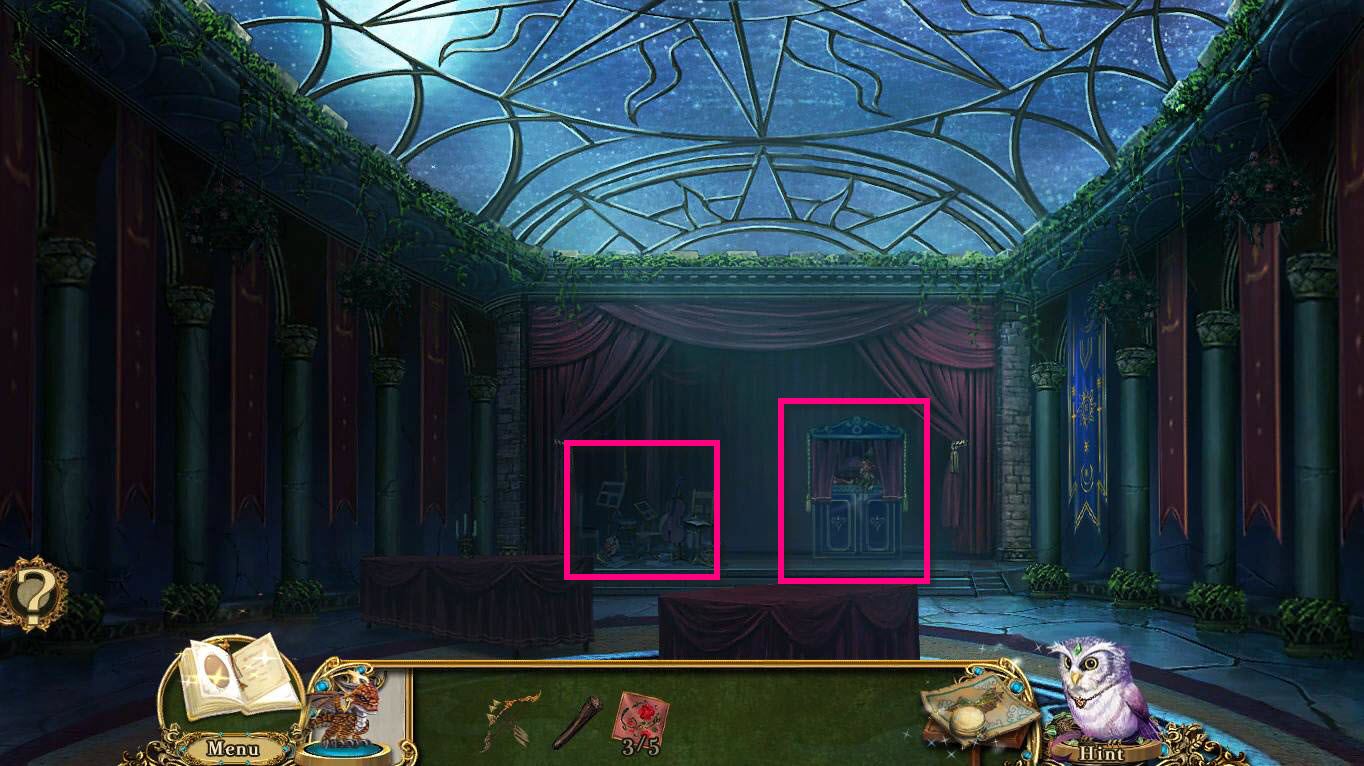
- Click on the puppet stage to zoom in.
- Click on Xim to talk to him.
- Leave the puppet stage.
- Click on the Musician's Stand to zoom in.
-
This will start a hidden object game.

- Find all the items on the list.
- You will receive the MUSIC SHEETS.
-
Use your map to fast travel to the Walk-in Wardrobe.
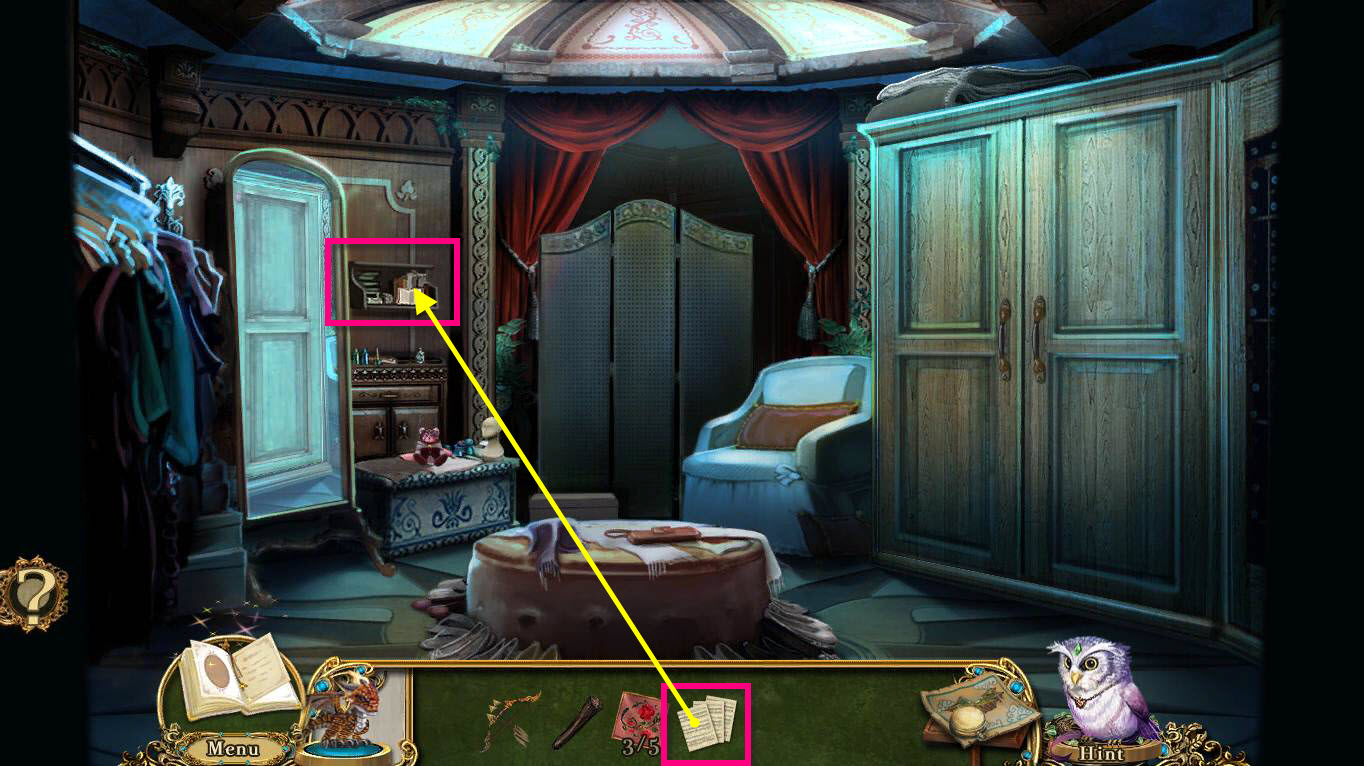
- Click on the book shelf to zoom in.
- Use the MUSIC SHEETS on the book.
-
This will start a mini-game.

- The goal of the game is to arrange the footsteps with the right notes.
- The top row is correct so use this as a guide.
- Click on two footsteps to swap them.
- When you are done, take the MUSIC BOX.
-
Use your map to fast travel back to the Solarium.
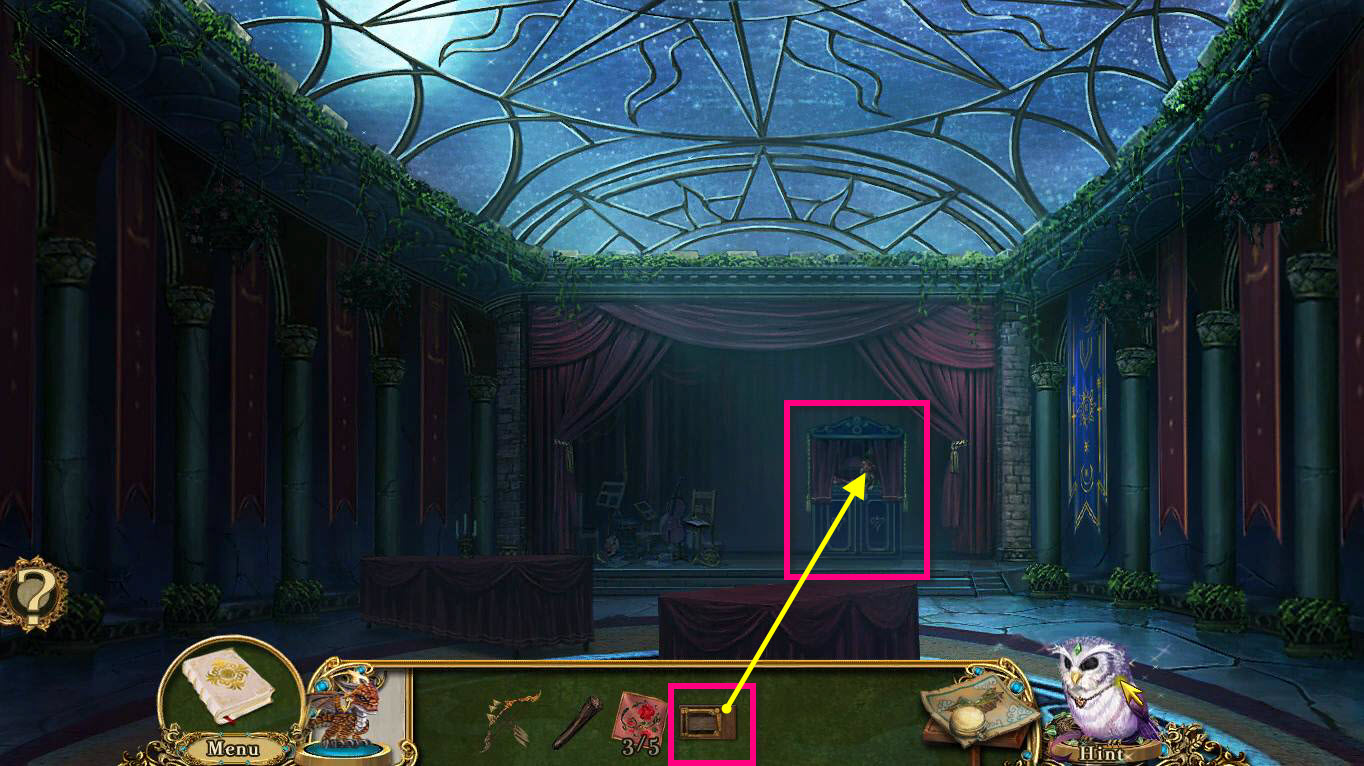
- Click on the puppet stage to zoom in.
- Use the MUSIC BOX on Xim.
-
This will start a mini-game.
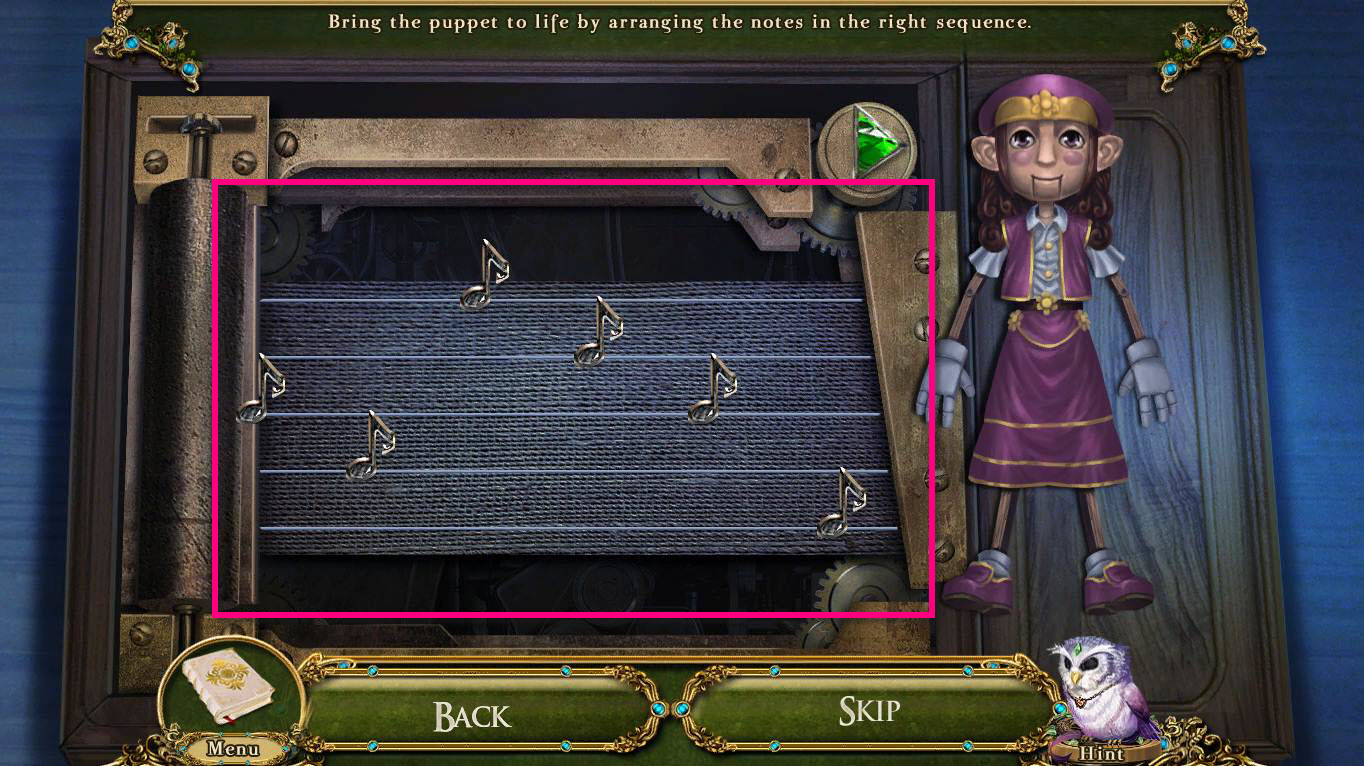
- The goal of the game is to place the notes in the right position.
- Click the green arrow at the top for hints.
- It will show green notes when they are correct, yellow notes that are close, and red notes that are way off.
- See the screenshot above for the solution.
- Once you are done, click on the puppets to talk to them.
- You will receive the SHIMMERGEMS.
-
Go back to the Wizard's Retreat.
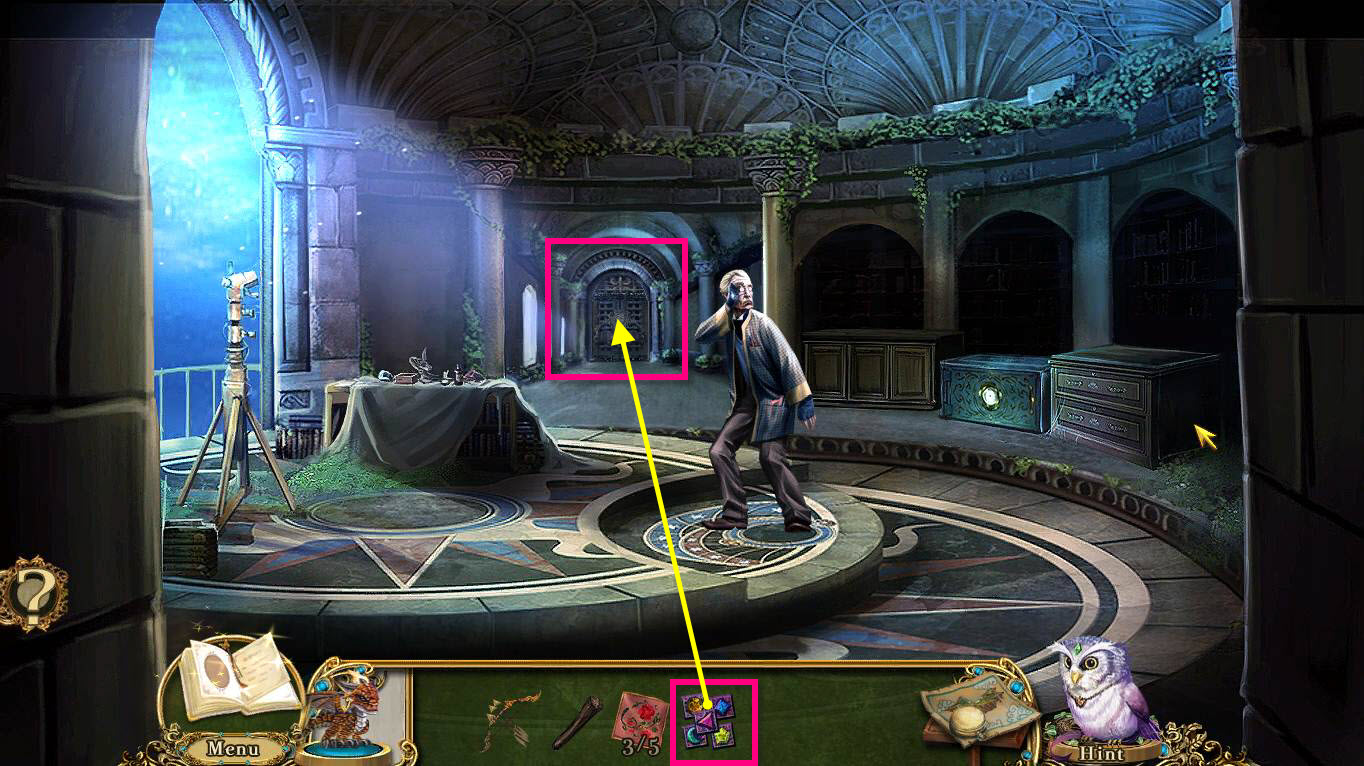
- Click on the Research Room Door to zoom in.
- Use the SHIMMERGEMS on the door.
-
This will start a mini-game.
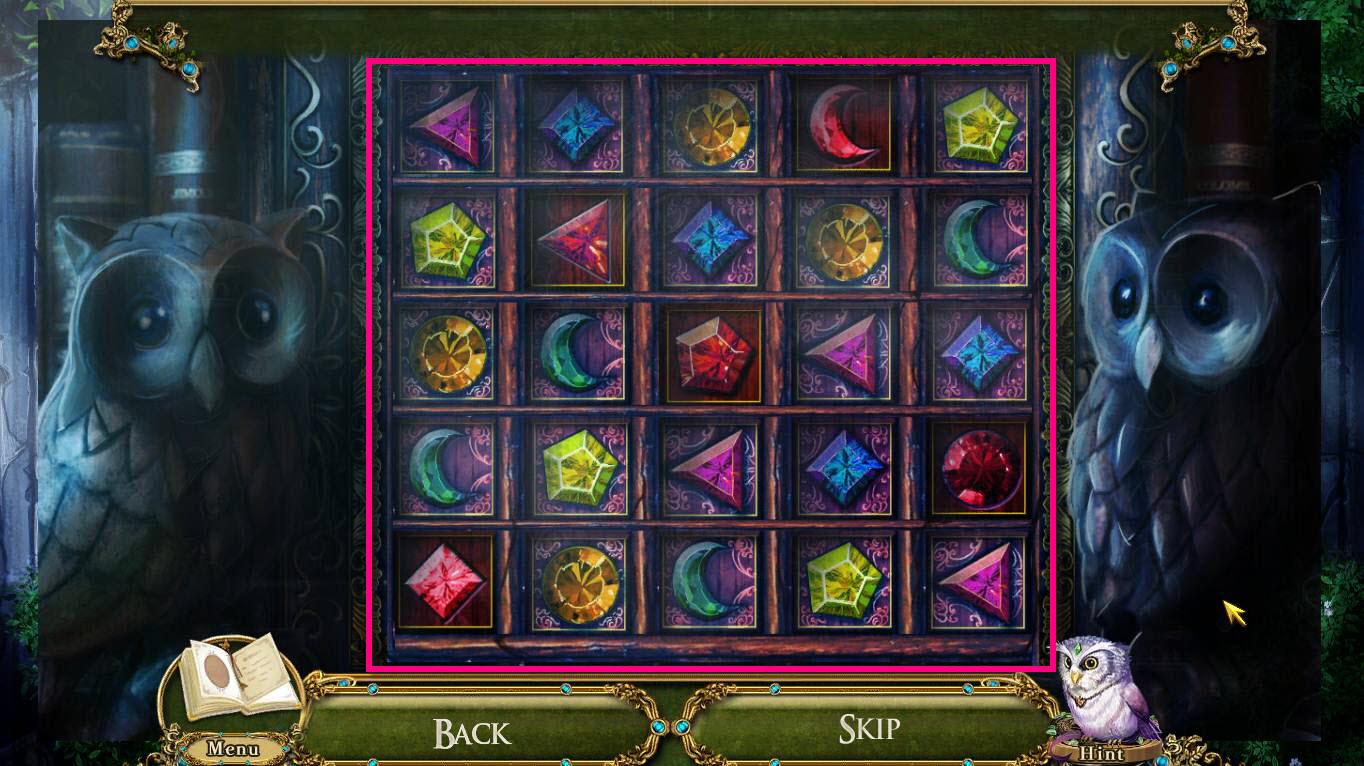
- The goal of the game is to make sure that no gems are repeated in the same column or row.
- Some gems can't be moved.
- Click on a gem and it will change.
- See the screenshot above for the solution.
-
Enter the Research Room.
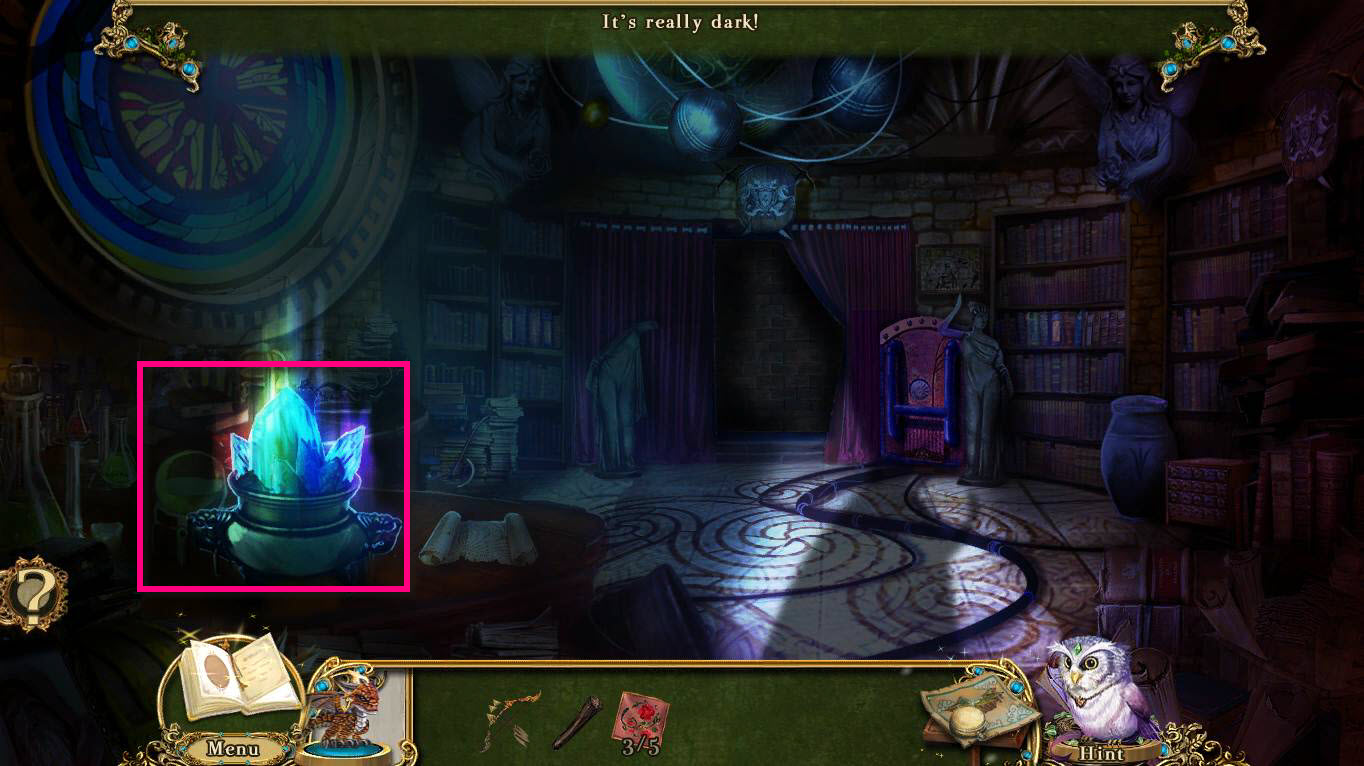
- Click on the crystal brazier on the left.
-
This will start a mini-game.
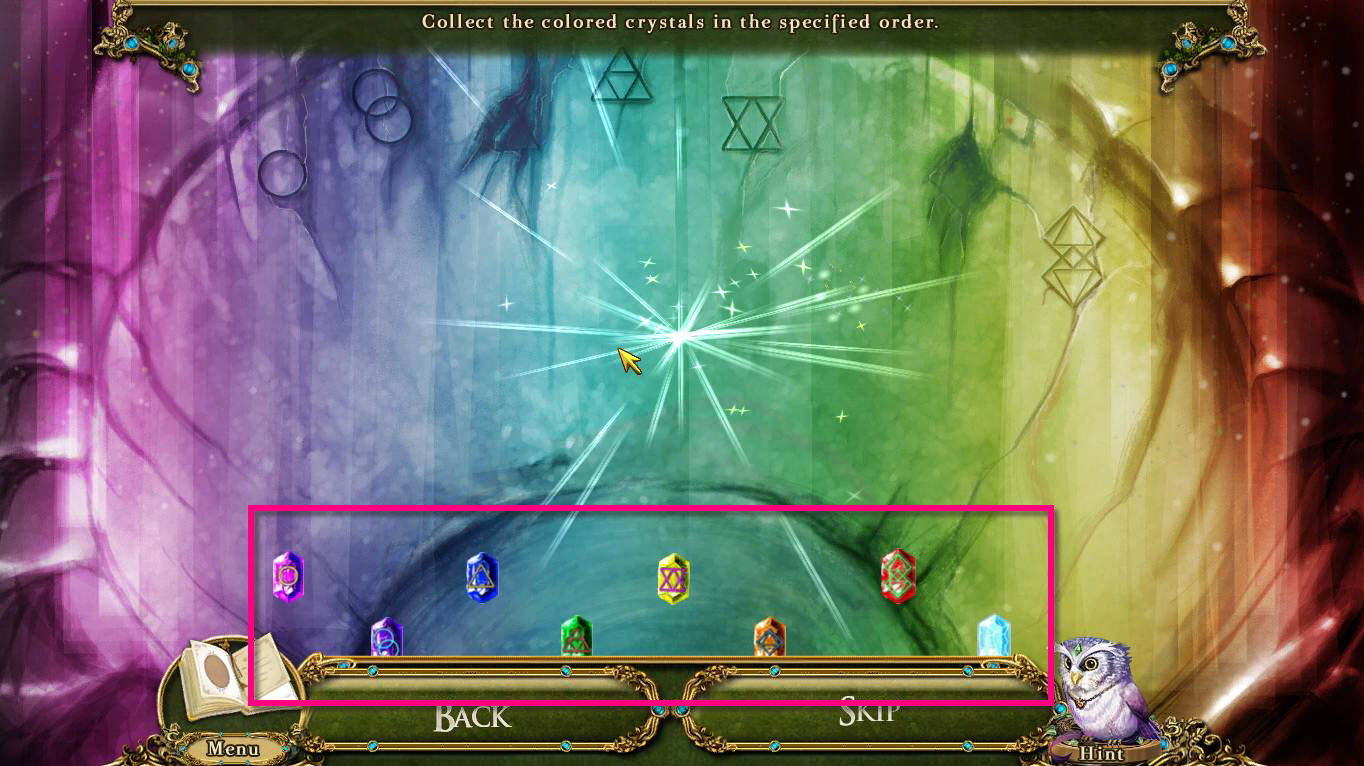
- The goal of the game is to collect the crystals in the right order.
- There are symbols on the wall that designate the order and when you hover your mouse over a crystal, it will show you it's symbol. It's done by color.
- Collect the crystals in this order: Pink, purple, blue, green, yellow, orange, red, white.
-
When you are done, the room will be lit up.

- Click on the right bookshelf to zoom in.
- Click on the book Monsters and Mythical Creatures to open it.
- Turn the pages until you find the CLOTH SUN.
- Click on the left bookshelf to zoom in.
- Click on the book Astrological Events and Phenomena.
- Turn the pages until you find the CLOTH MOON.
-
Use your map to fast travel to the Solarium.
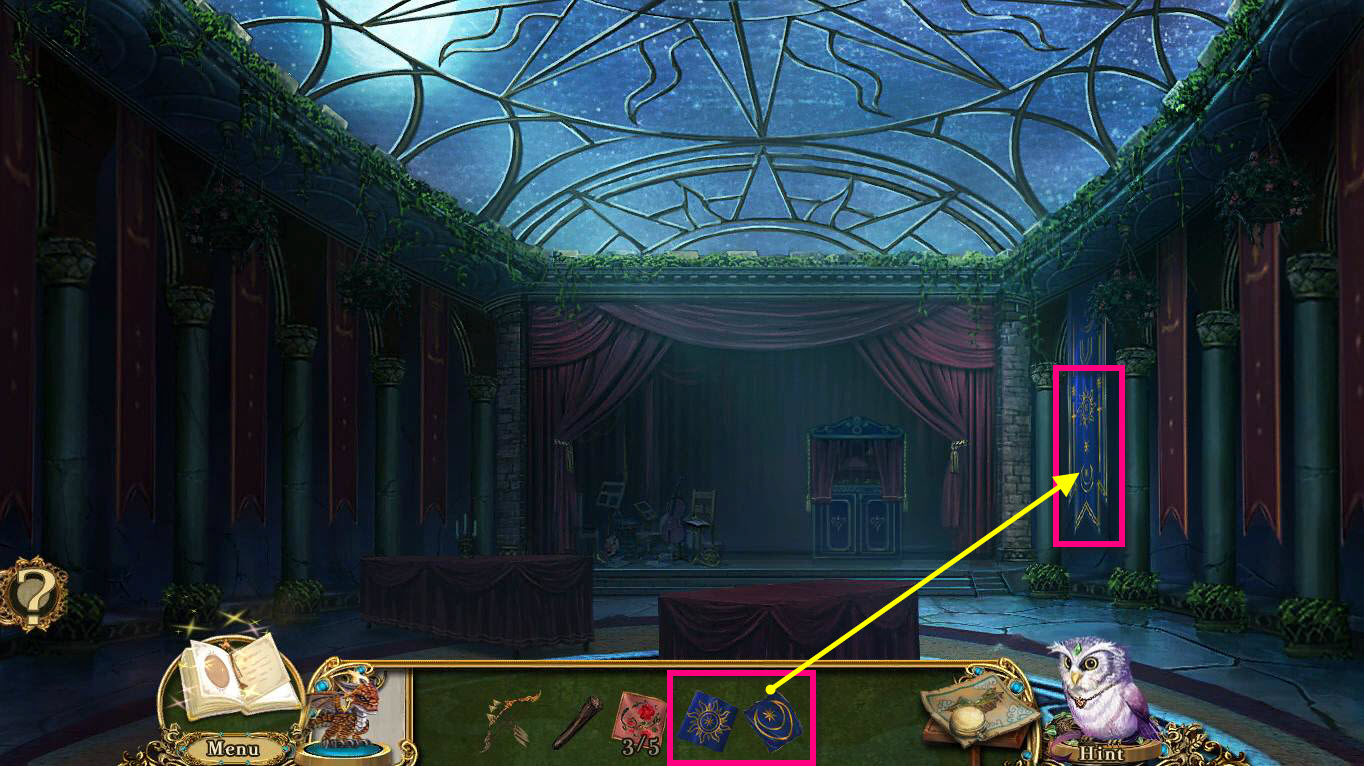
- Click on the astral banner on the right to zoom in.
- Take the 4/5 QUILT PATCH.
- Use the CLOTH SUN on the top part of the banner.
- Use the CLOTH MOON on the bottom part of the banner.
-
This will start a mini-game.
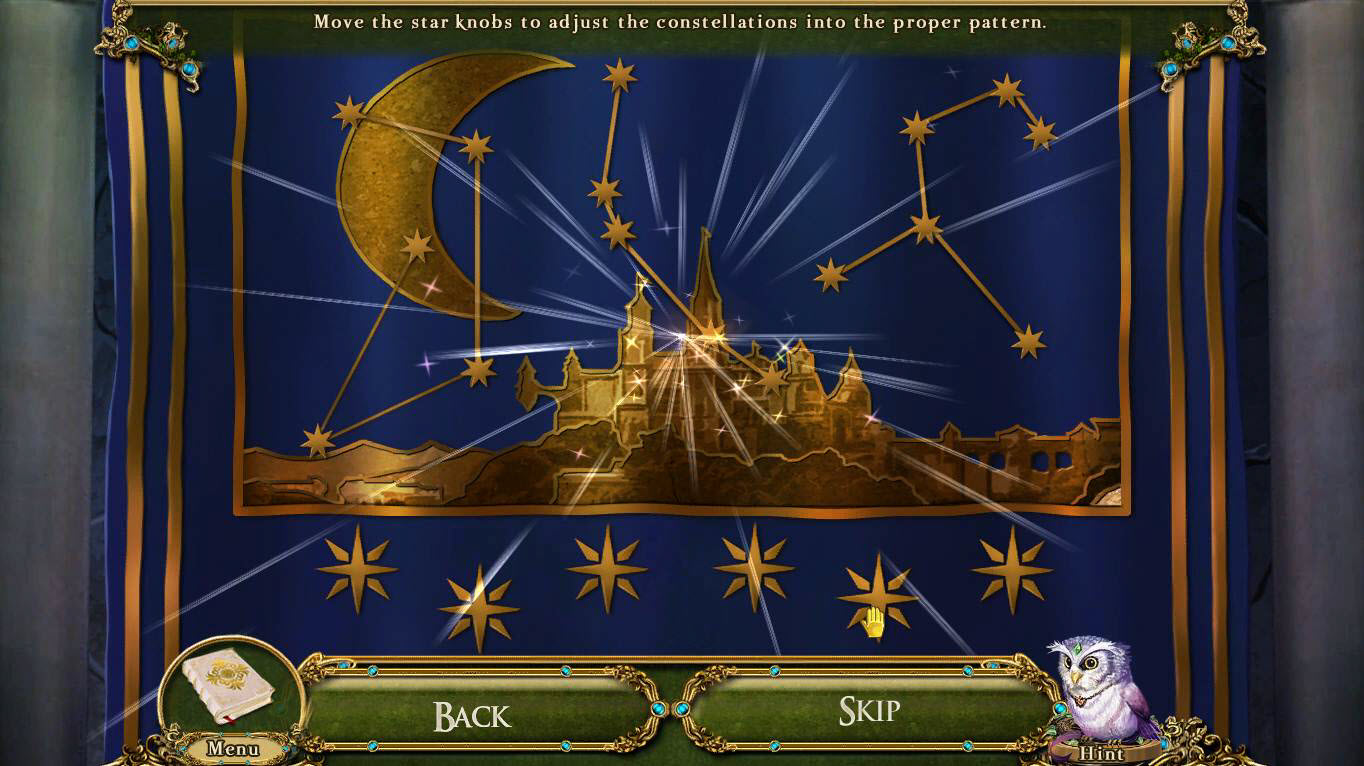
- The goal of this puzzle is to put the constellations in the correct position.
- You'll find the right positions in your journal under the moon mural.
- Each button at the bottom moves a particular constellation.
- Keep click on them until they form the pattern in your journal.
- See the screenshot above for the solution.
-
Use your map to fast travel back to Sophia's Room.
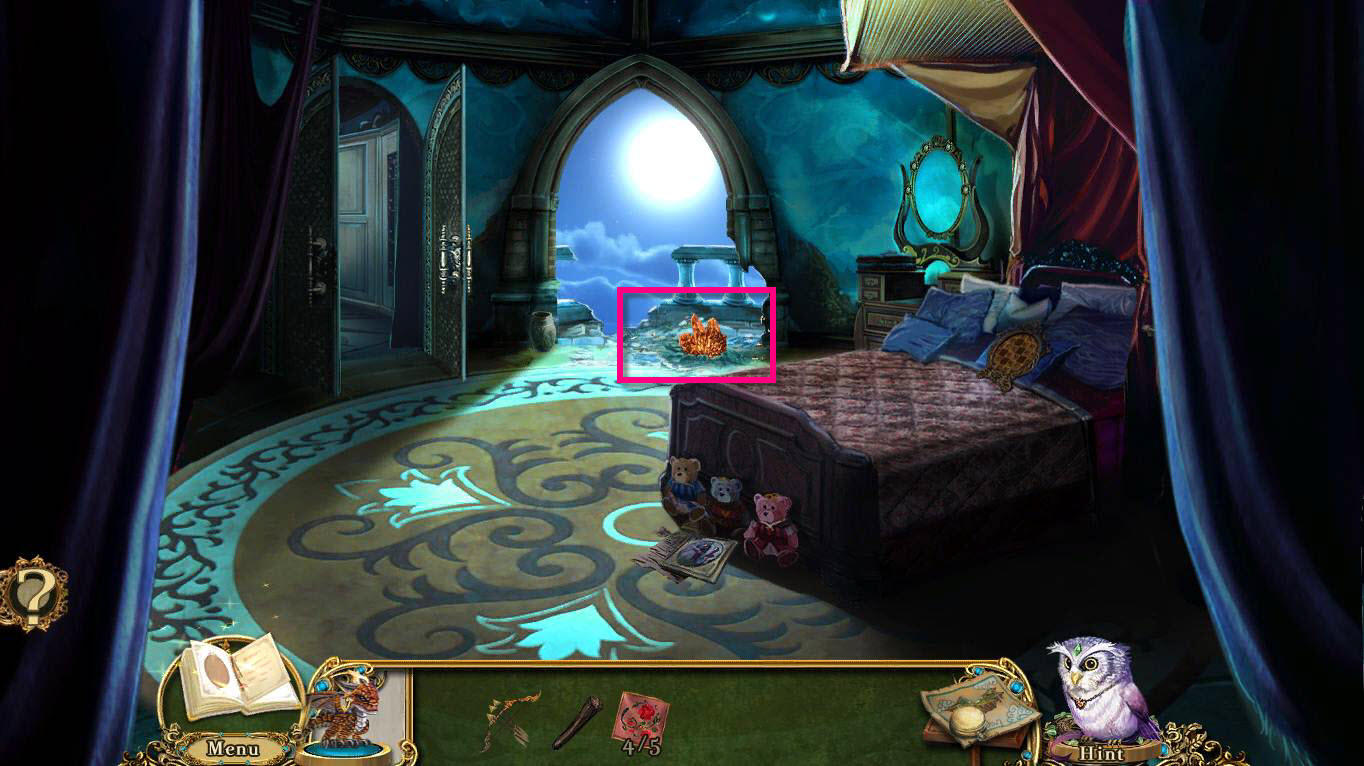
- Click on the balcony to zoom in.
- Click on the star. It's too hot to hold.
- Go into the walk-in closet on the left.
-
Click on the clothes rack to start a hidden object game.
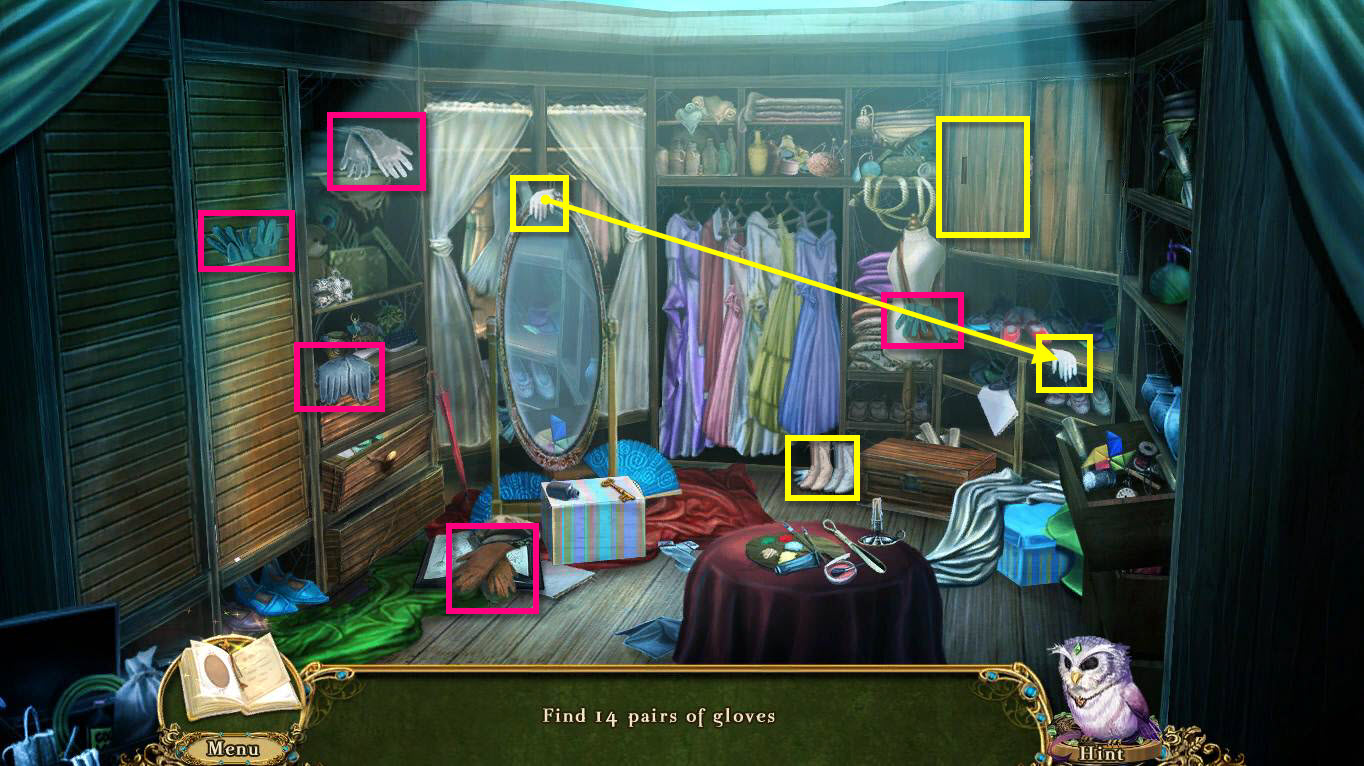
- You need to find 14 pairs of gloves.
- Find all the gloves in the open first.
- Click on the one glove on the mirror and bring it to its pair on the shelf on the right.
- Click to move the shoes on the floor. Take the glove.
-
Click on the left sliding door. Move the messy pile. Take the gloves.
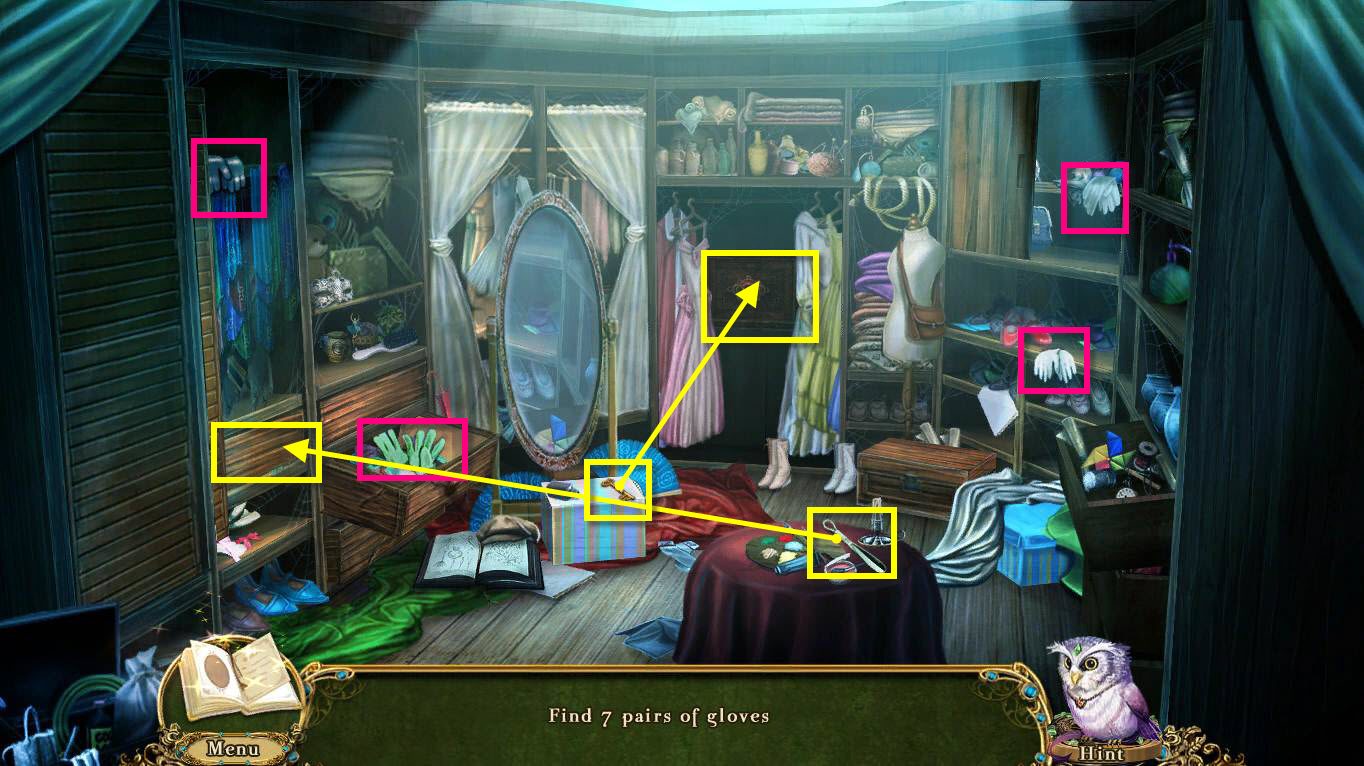
- Click on the right sliding door. Take the gloves.
- Click on the drawer on the left. Take the gloves.
- Click on the slat door. Take the gloves.
- Use the Shoe Horn on the wooden cover on the left. Take the gloves.
- Use the Key on the Accessories Shelf.
-
Click on the accessories shelf to start a mini-game.
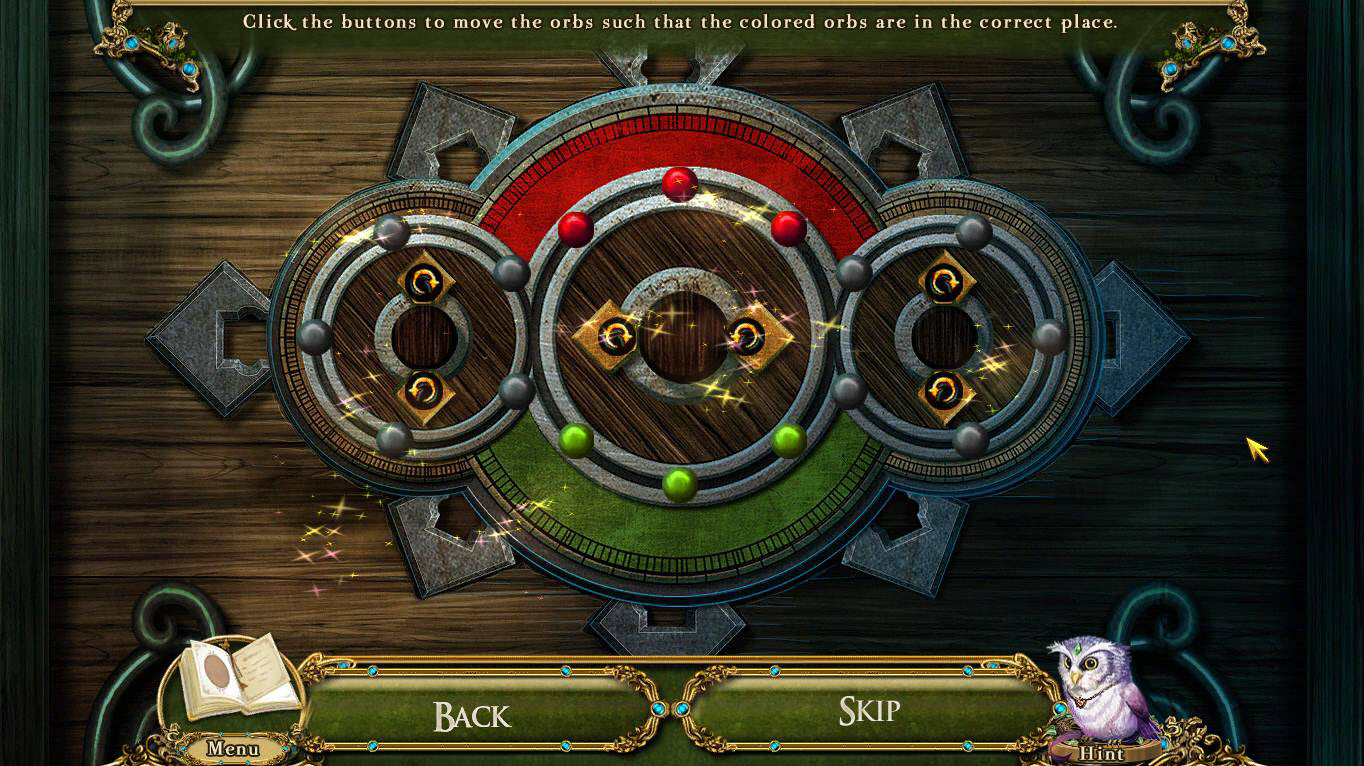
- The goal of the puzzle is to get the red buttons in the middle on the top and the green buttons in the middle on the bottom.
- See the screenshot above for the solution.
- Click back on the accessories shelf.
-
This will start another mini-game.
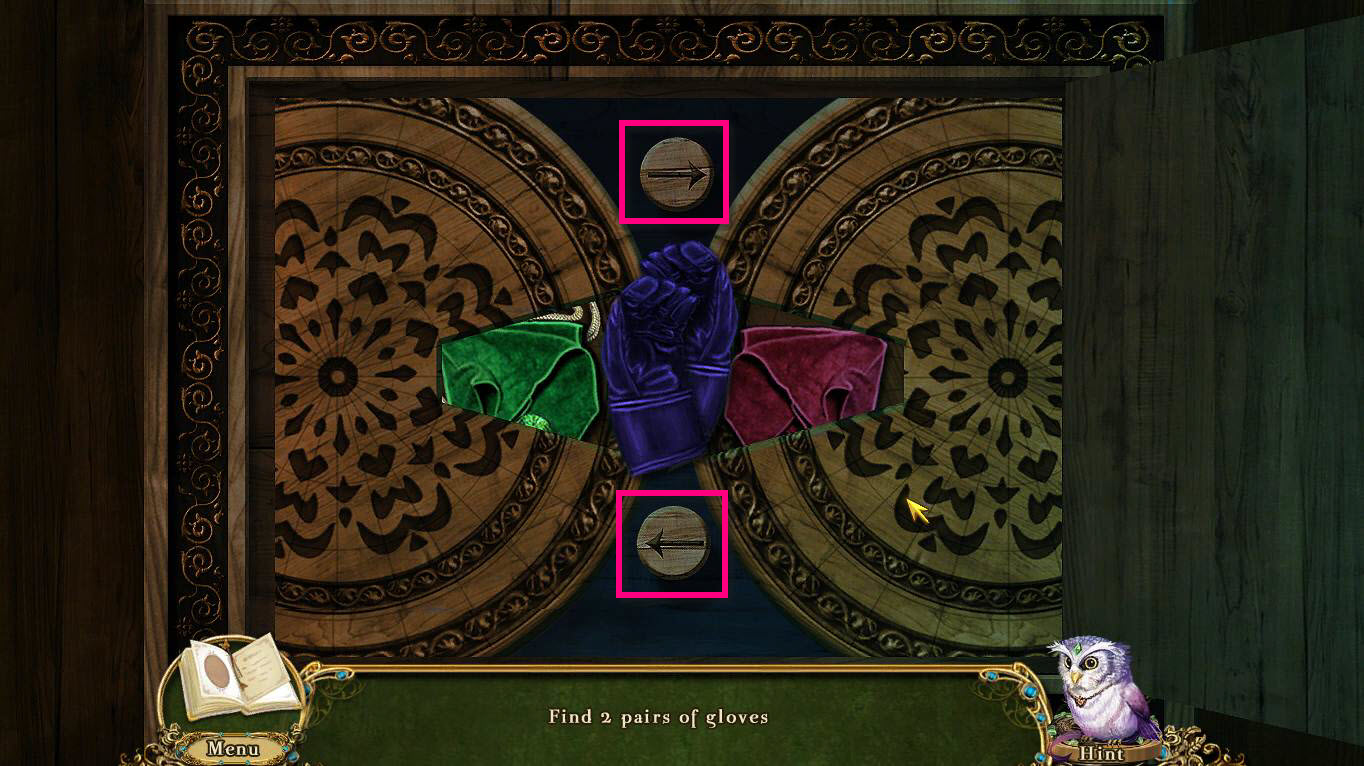
- Simply click on the buttons to move the contents in the wheels.
- Stop when you see the blue/black gloves on either side.
- Take the gloves.
- Now click on the scarf rack on the left.
-
This will start another mini-game.
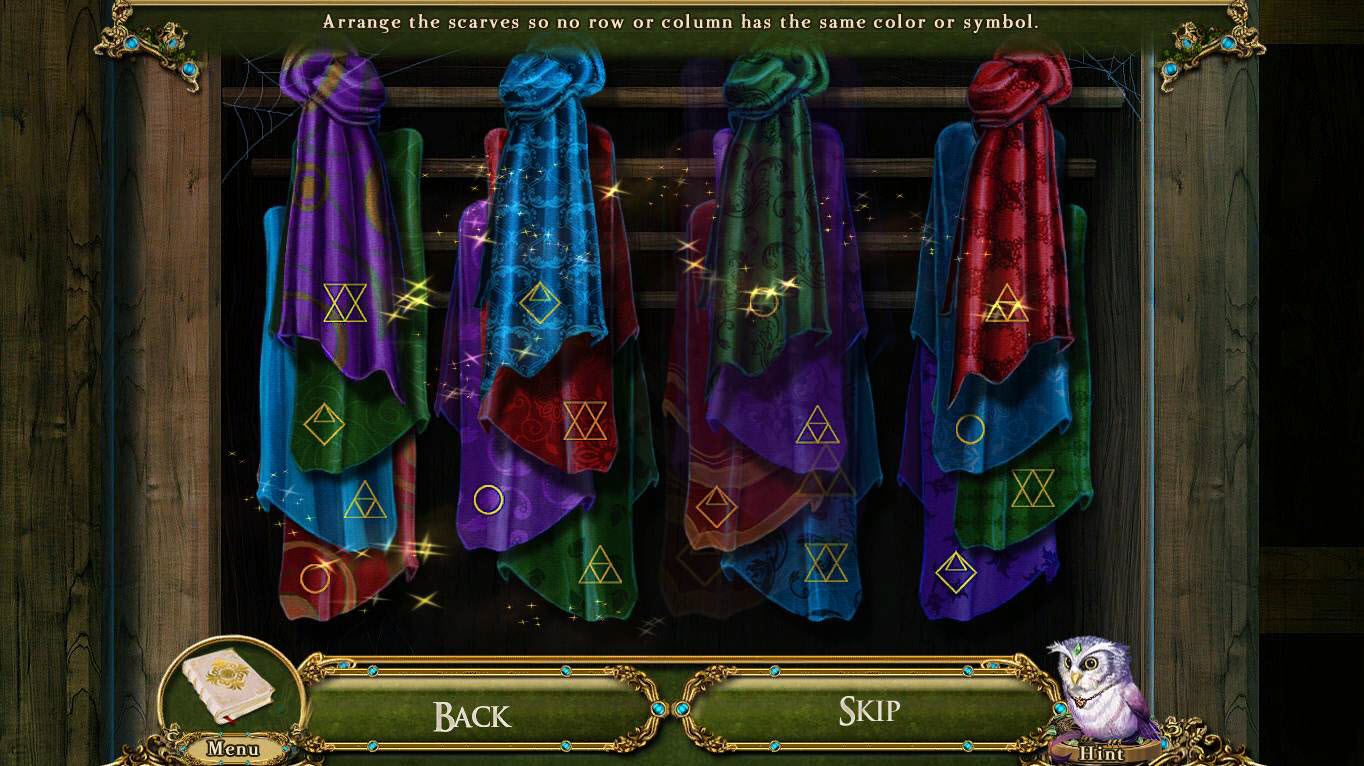
- The goal of this game is to arrange all the scarves so that no row or column has the same color scarf or symbol.
- Just click on two scarves for them to swap places.
- See the screenshot for the solution.
- Take the gloves.
- Once you are done, you will receive the PADDED GLOVES.
-
Go back one screen.
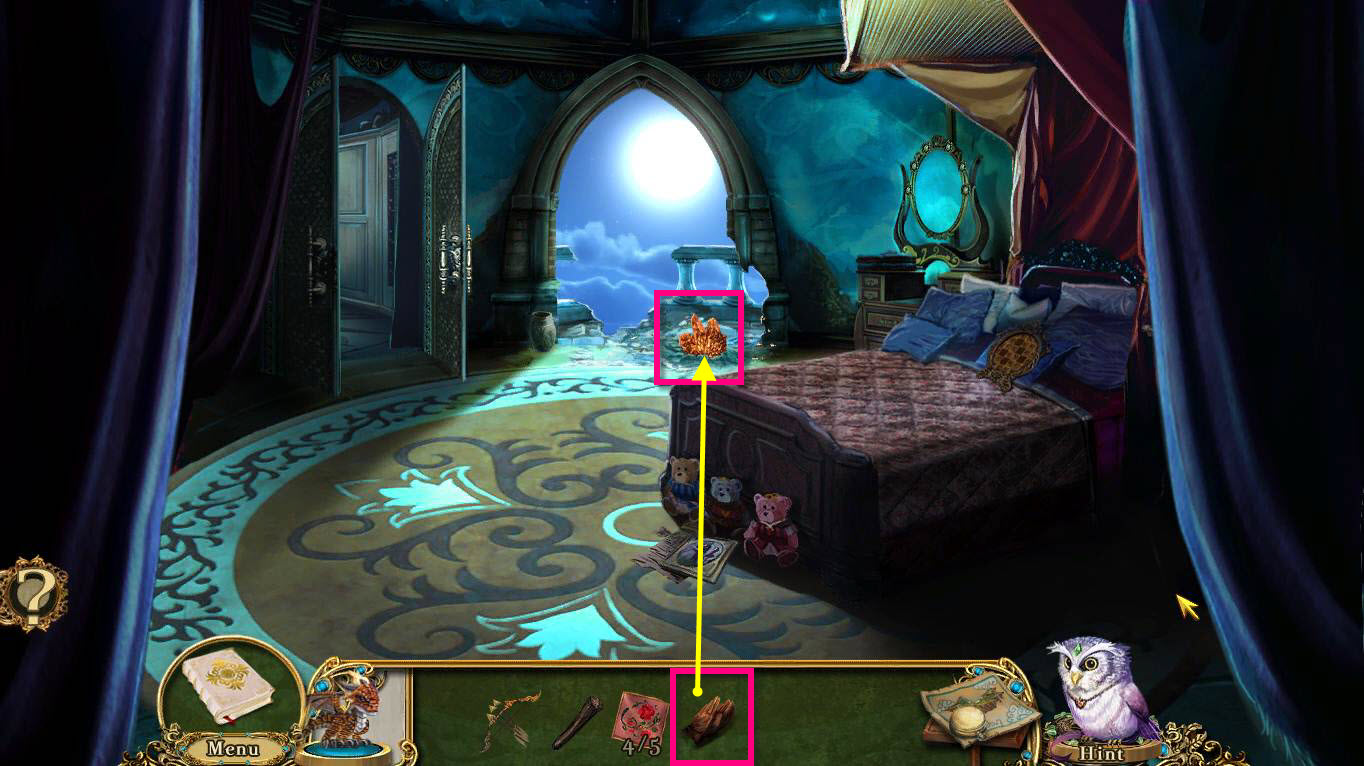
- Click on the balcony to zoom in.
- Use the PADDED GLOVES on the star.
- You will receive the REIGNING STAR.
- Click on the Cartographer to talk to him.
-
Use your map to fast travel to the research room.
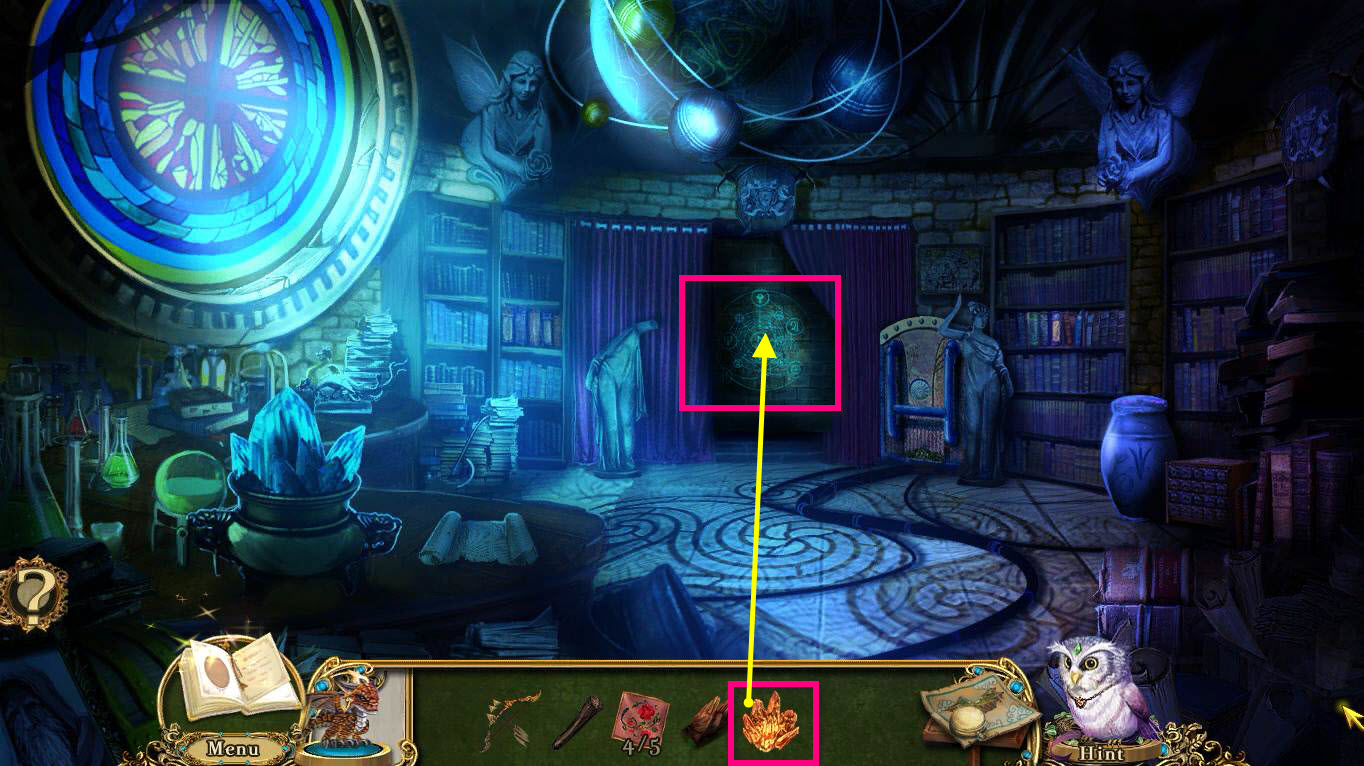
- Click on the glowing mural to zoom in.
- Use the REIGNING STAR on the mural.
-
This will start a mini-game.
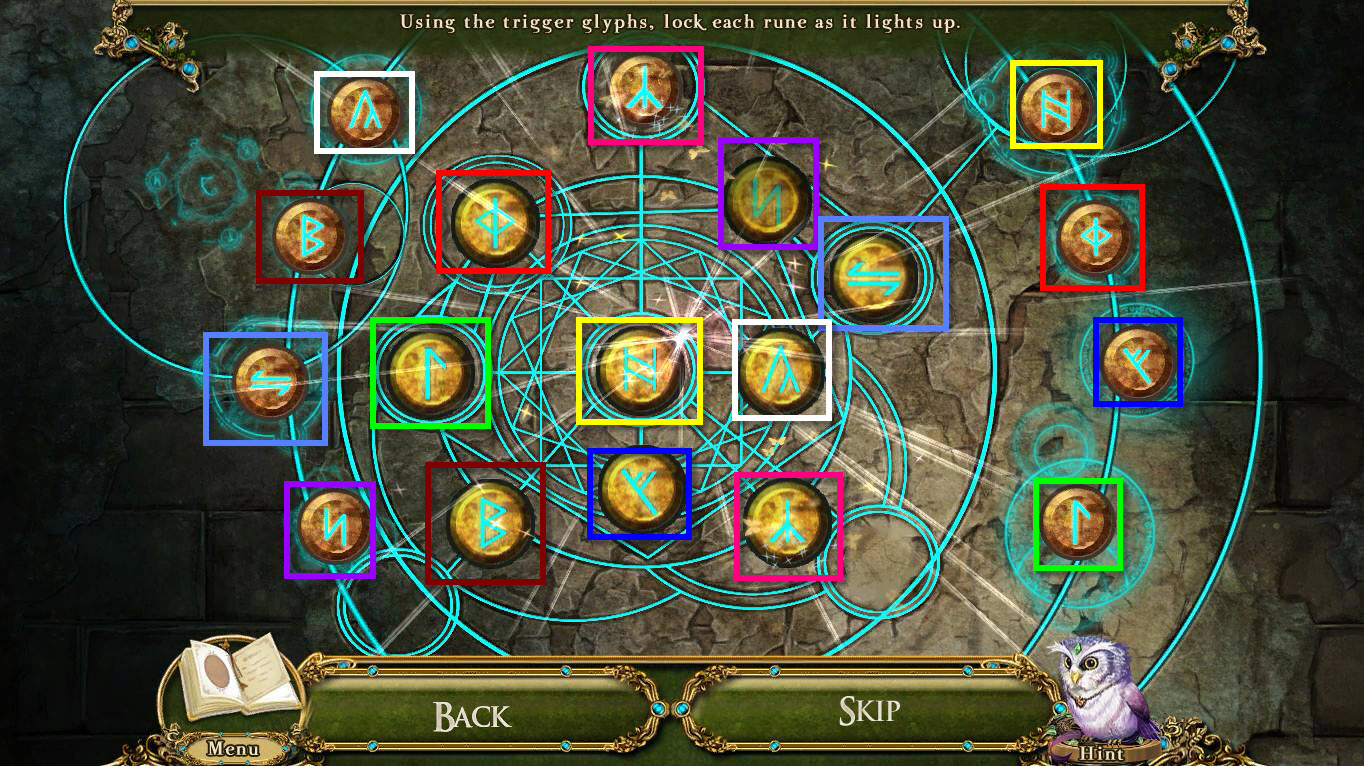
- You'll notice that the lights in the middle flicker on and off.
- The goal is to get all the symbols in the middle lit.
- To do this, you need to click on the buttons on the outside when that particular symbol is lit up.
-
Once you are done, enter the secret chamber.
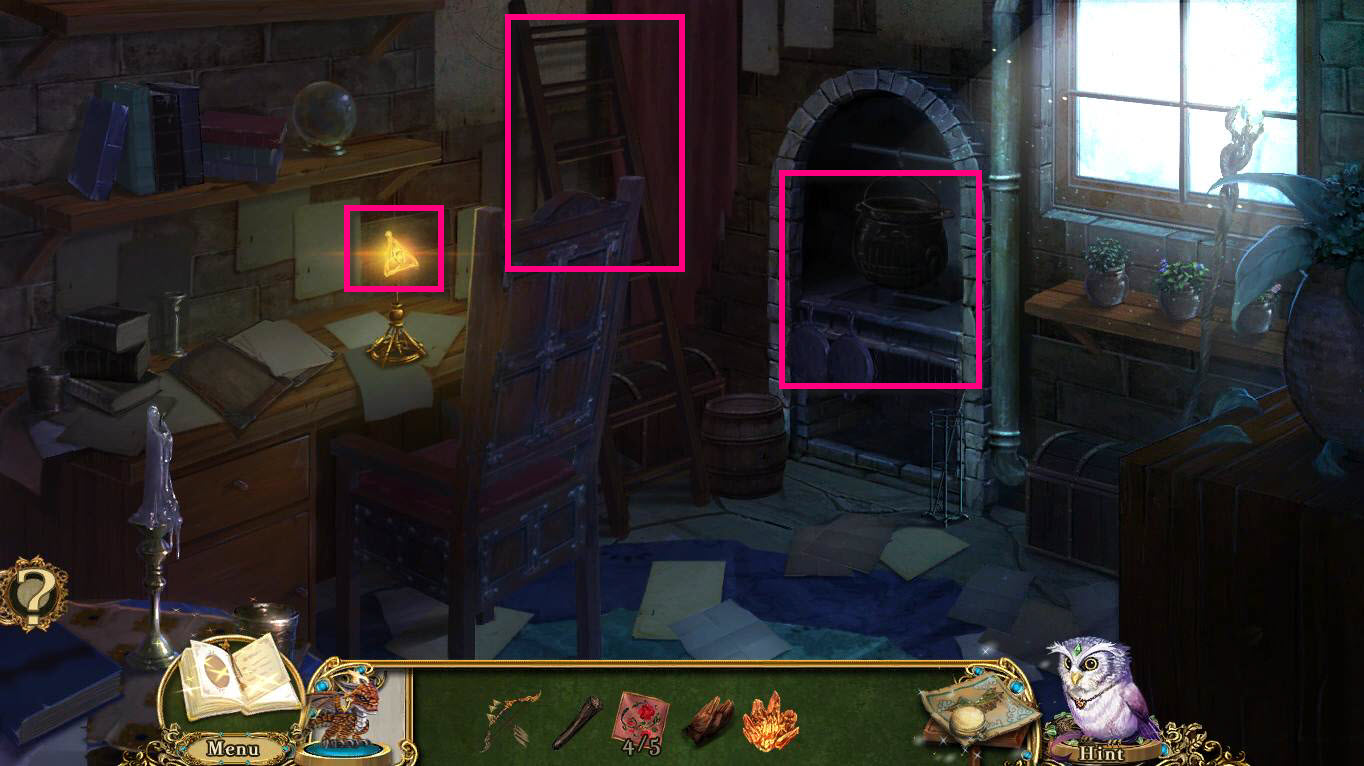
- Take the TESSERACT PRISM.
- Take the STEPLADDER.
-
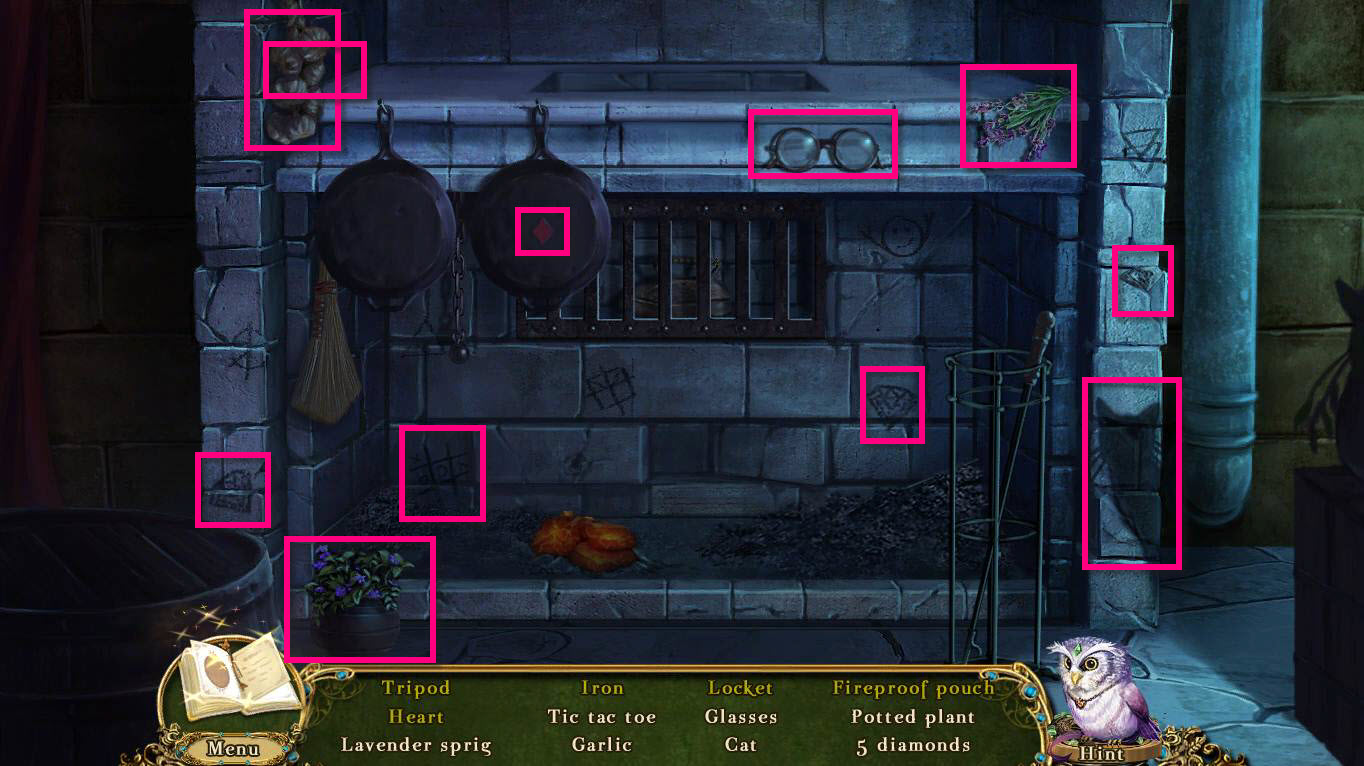
Click on the fireplace for a hidden object game.
-
Find all the objects in the open first.
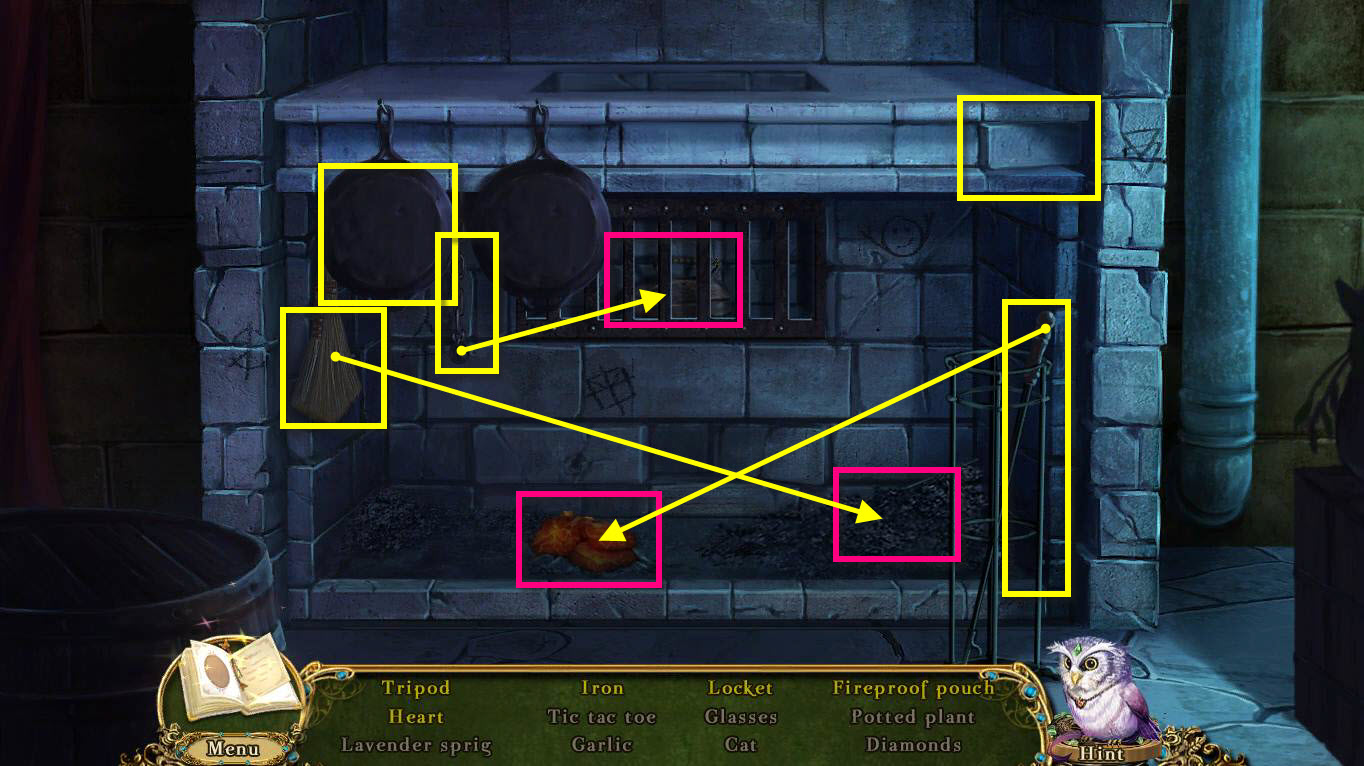
- Click on the iron pan to reveal the heart.
- Use the dust broom on the ash pile to reveal the Tripod.
- Pull the chain to get the iron.
- Use the poker on the embers to get the fireproof pouch.
- Click on the loose brick to reveal the locket.
- You will receive the FIREPROOF POUCH.
-
Go back one screen.

- Click on the incubator to zoom in.
- Use the PADDED GLOVES on the door.
- Use the FIREPROOF POUCH on the firm charm.
- You will receive the FIRE CHARM.
-
Go back into the secret chamber.
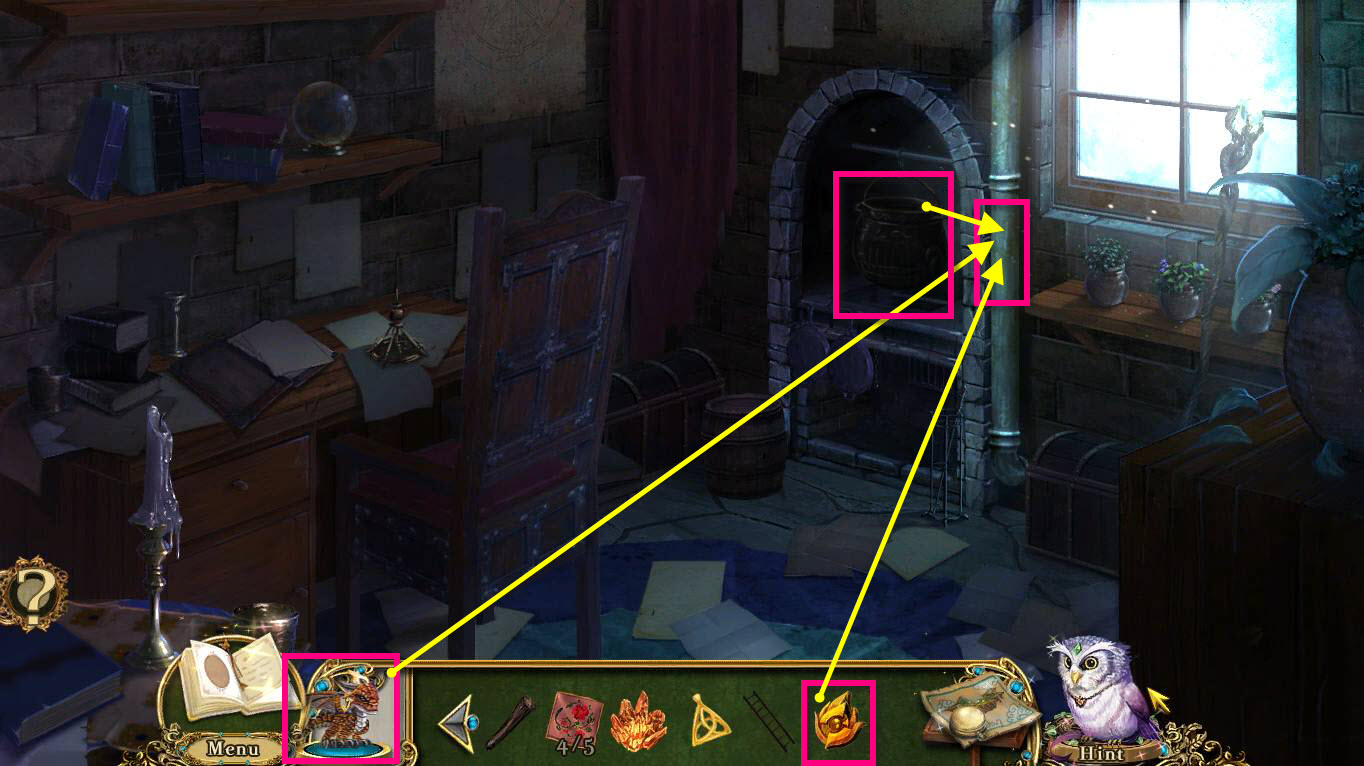
- Use the FIRE CHARM on the water pipe next to the stove.
- Use the Pocket Dragon on the Fire Charm to break the pipe.
- Click on the Cauldron in the fireplace to pick it up.
- Use it on the gushing water to fill it.
- You will receive the CAULDRON OF WATER.
-
Go back to the Wizard's retreat.
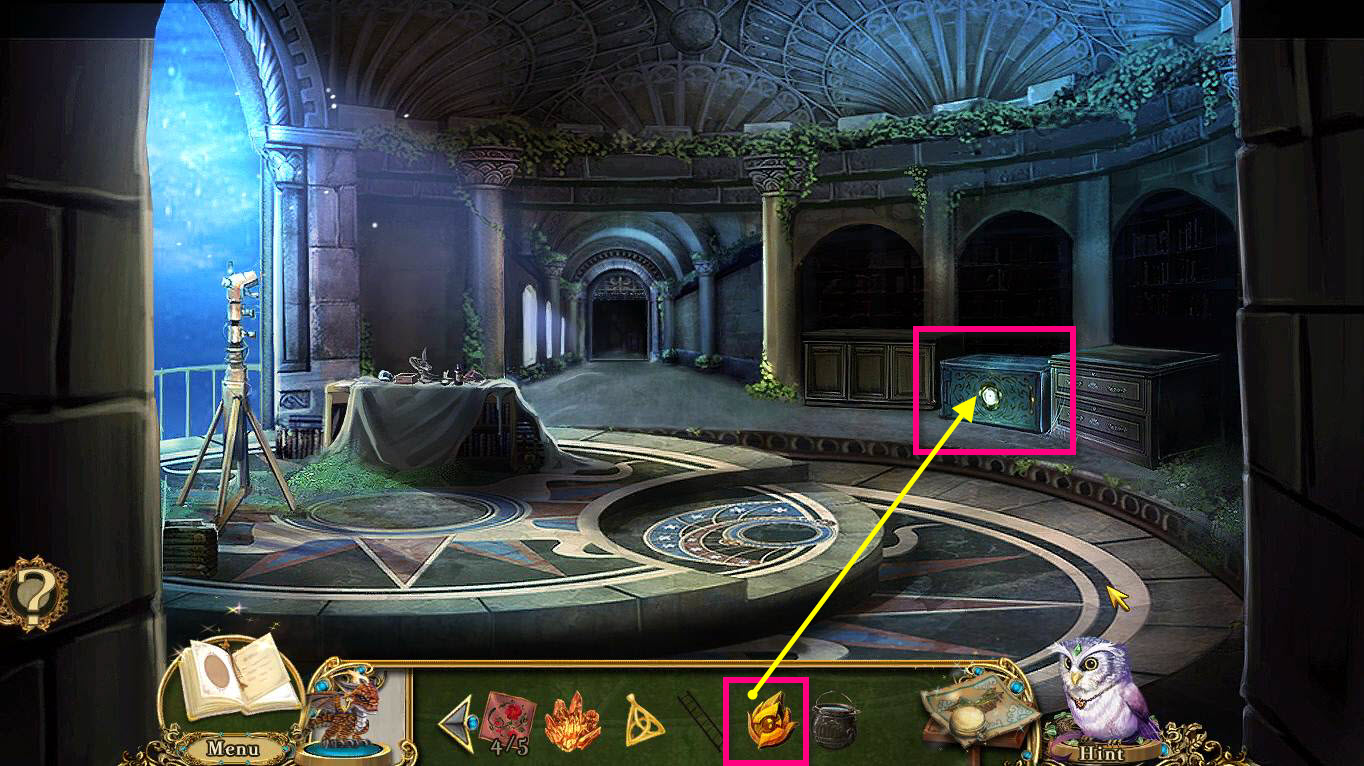
- Click on the Specimen Storage to zoom in.
-
Use the FIRE CHARM on the freezer.
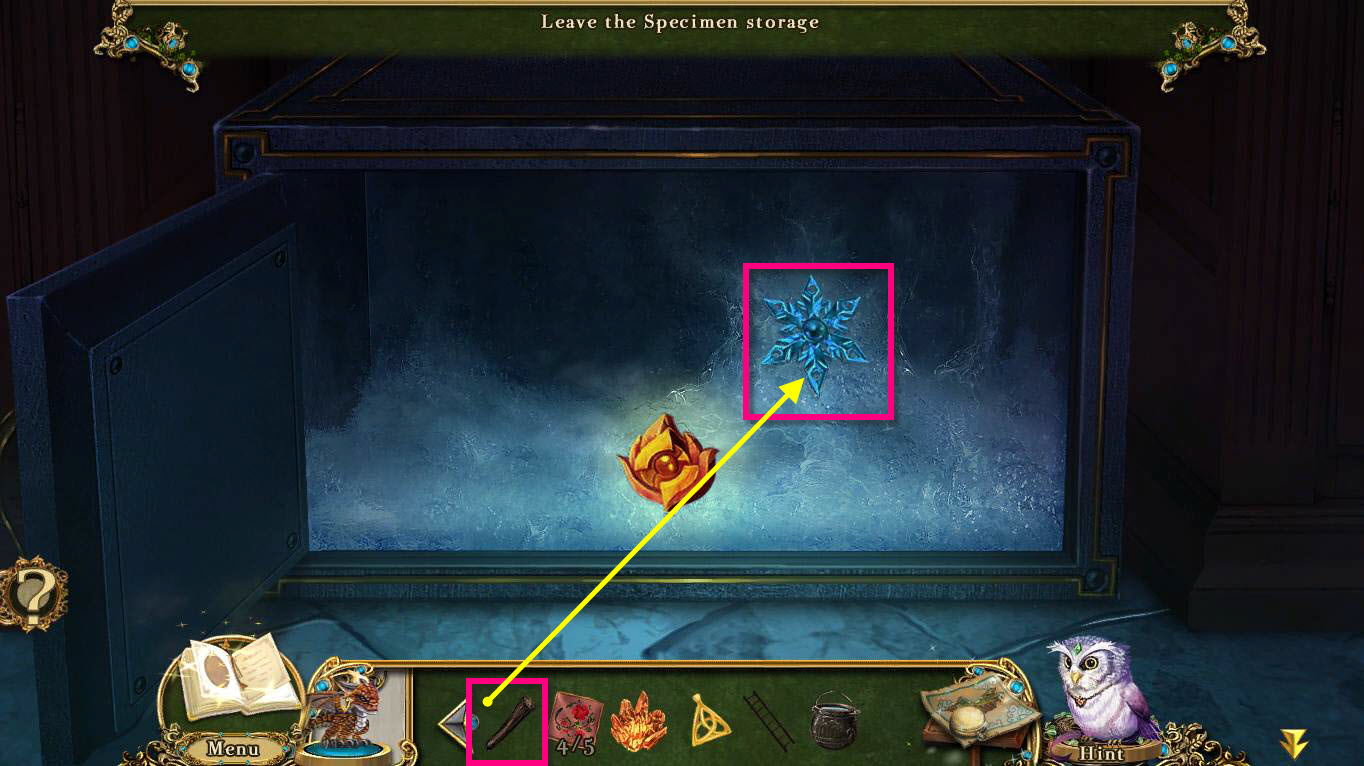
- Use the BROKEN CHAIR LEG on the frost charm to dig it out.
- You will receive the FROST CHARM and the FIRE CHARM will return to your inventory.
-
Use your map to fast travel to the Cartographer's Room.
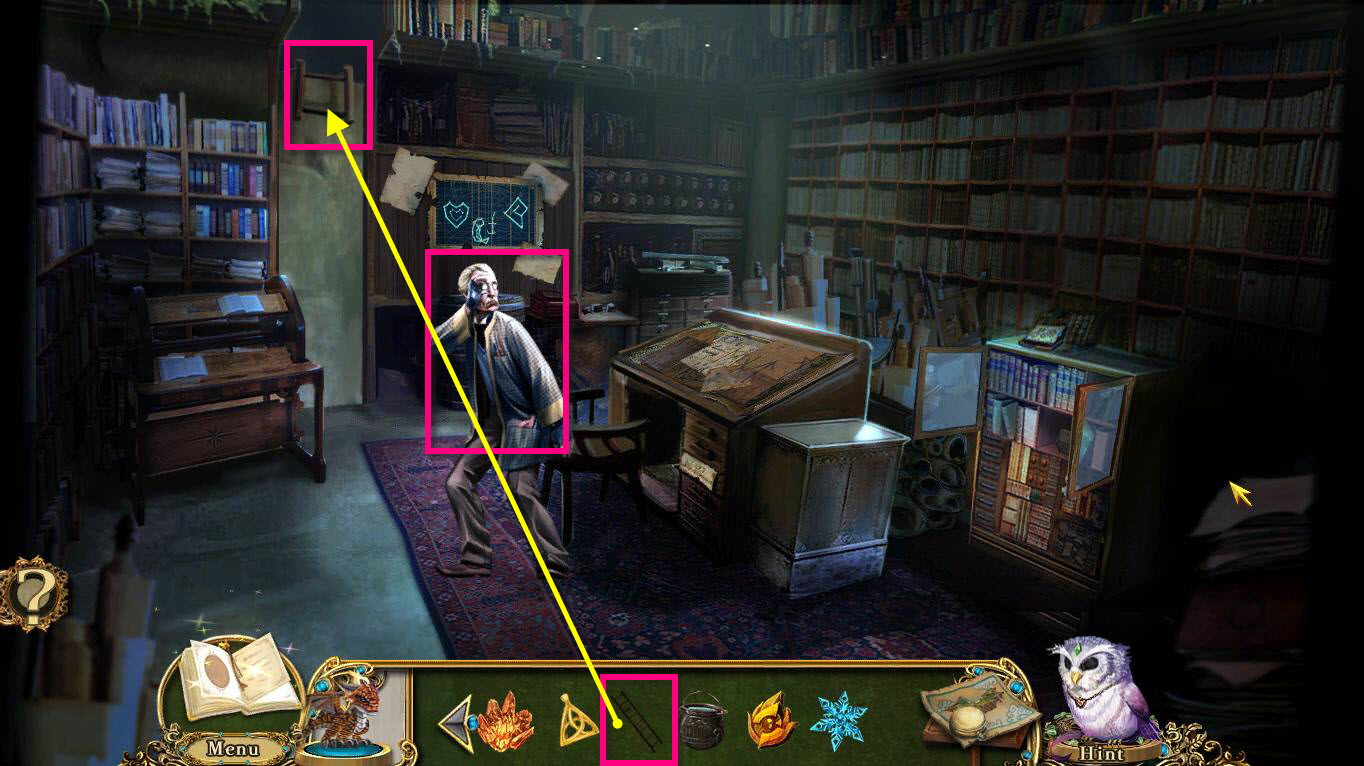
- Click on the Cartographer to talk to him.
- Use the STEPLADDER on the Maintenance hatch.
- Click on the Maintenance hatch to zoom in.
-
This will start a mini-game.
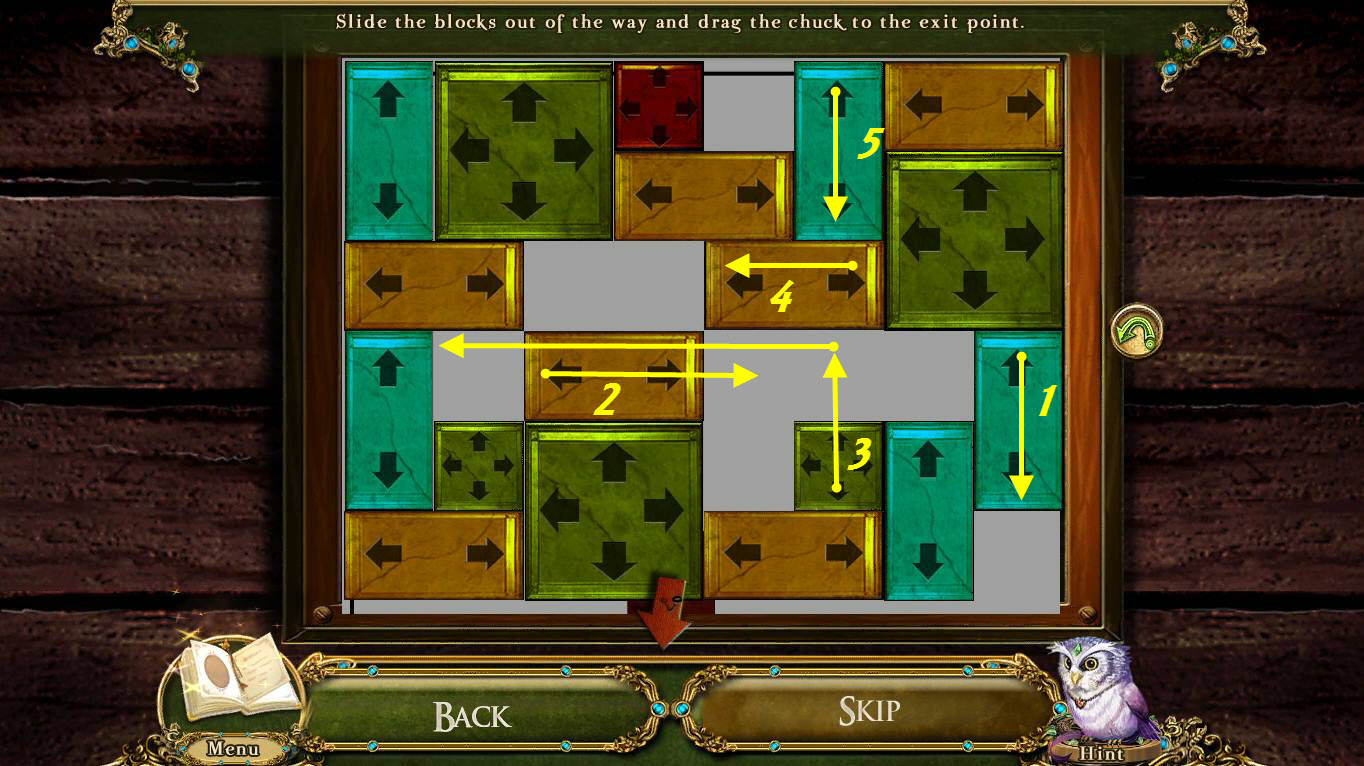
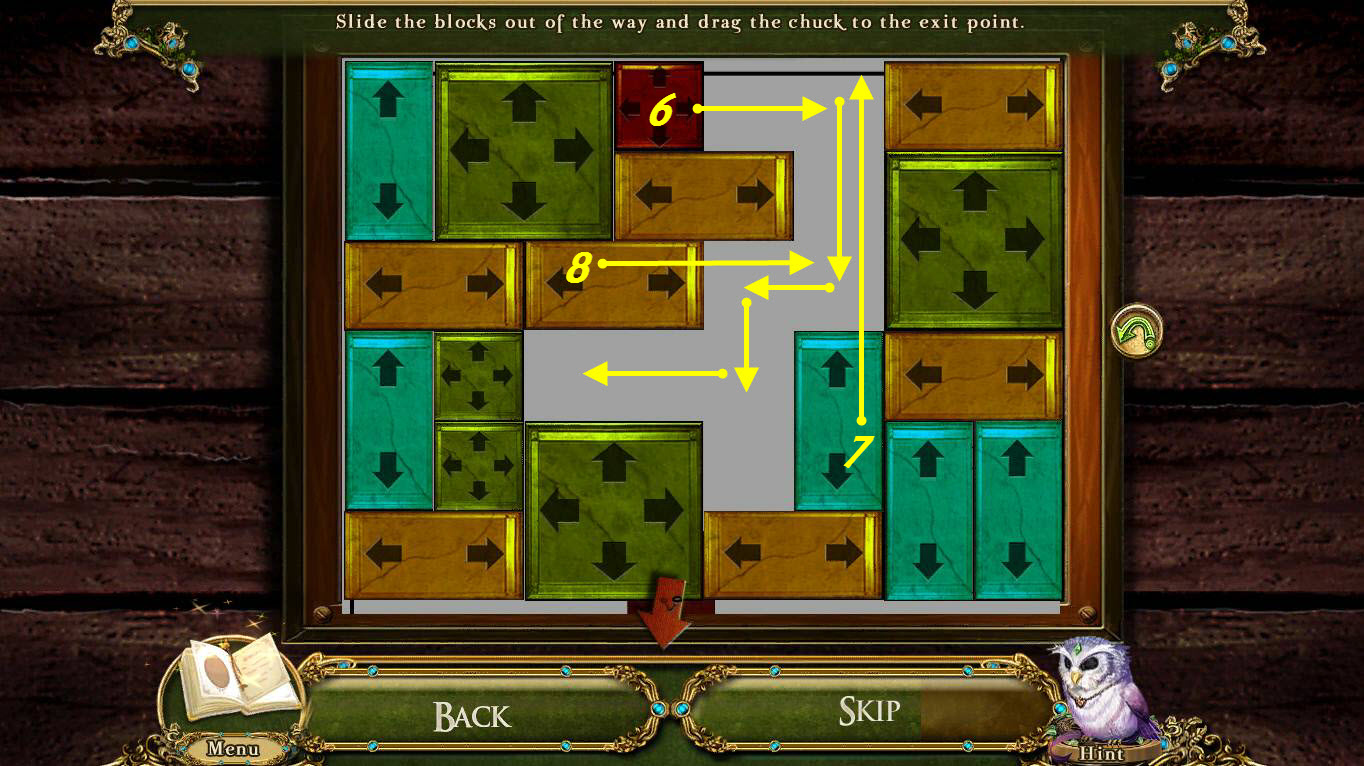
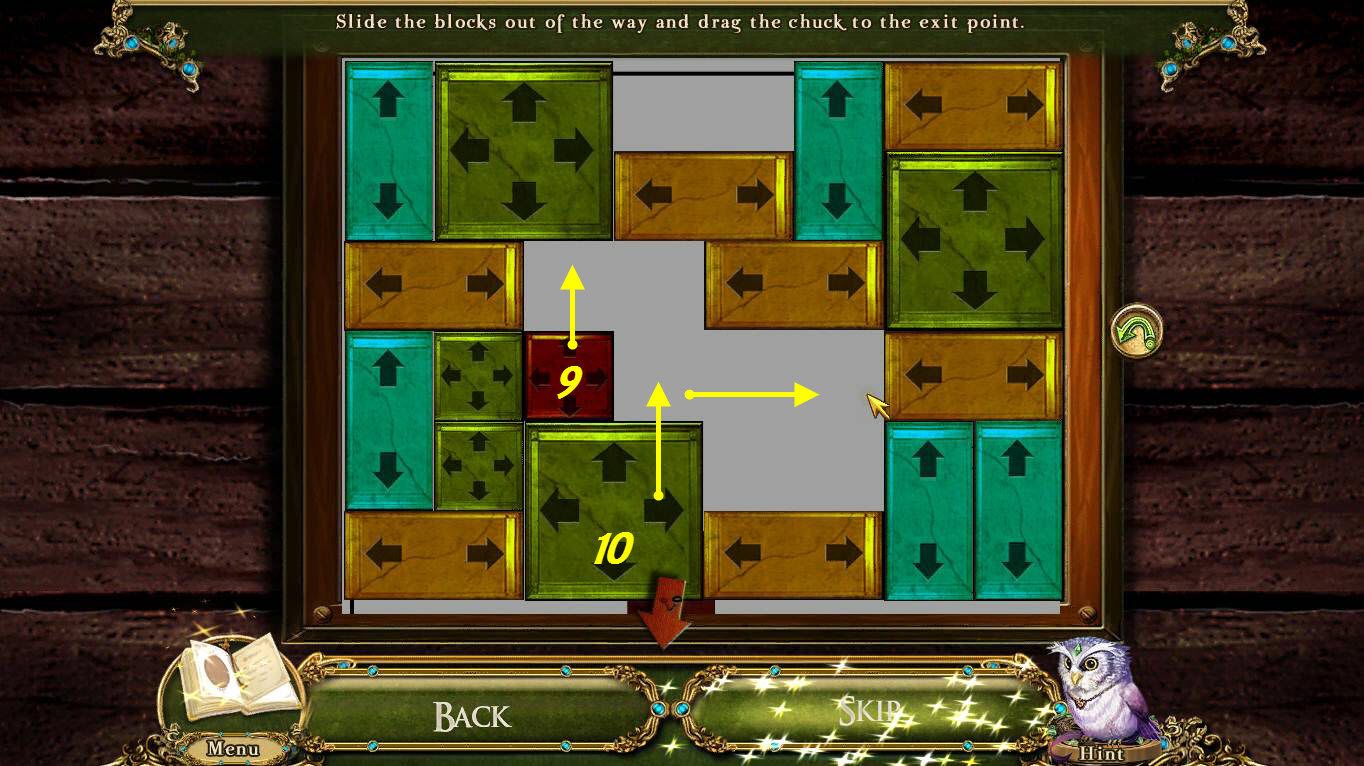
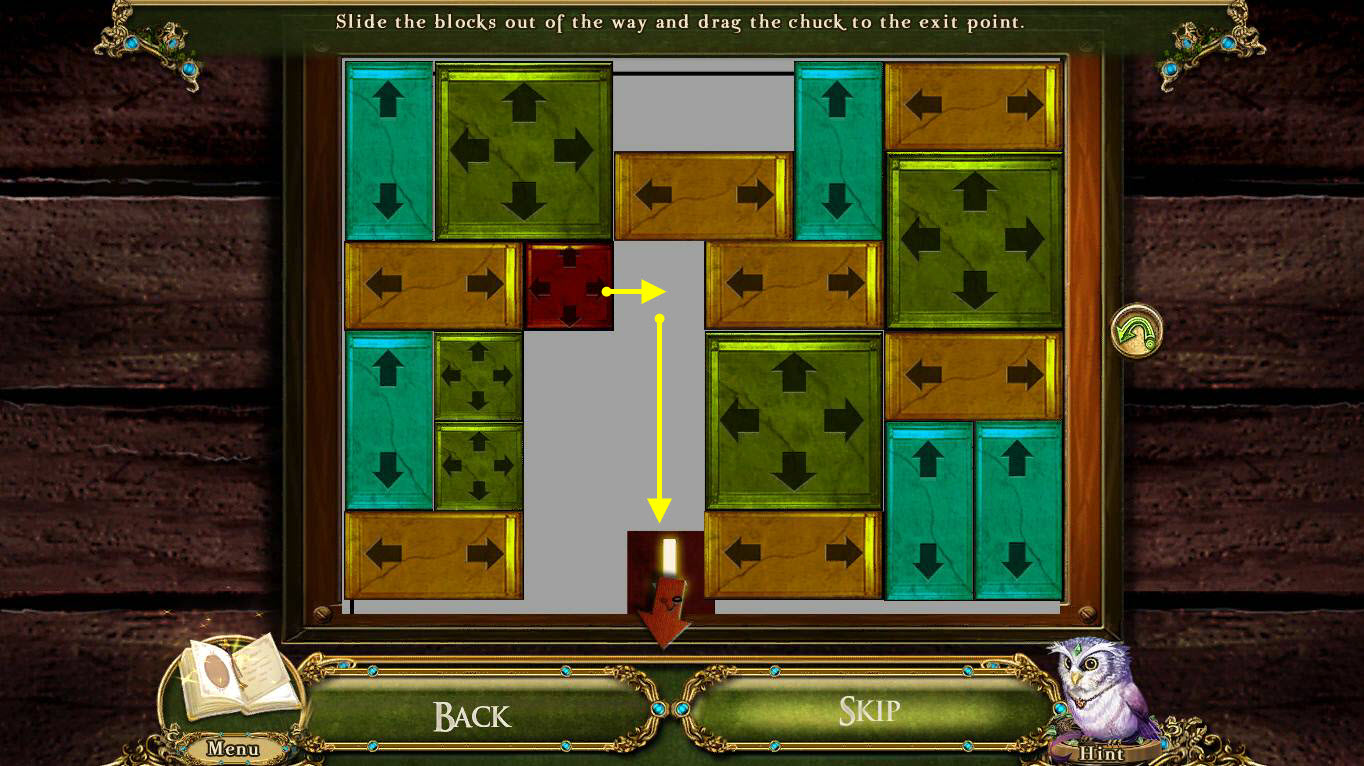
- The goal of the game is to get the red box to the exit.
- See the screenshots above for the solution.
-
Go to the Rafters.

- Use the BROKEN CHAIR LEG on the rafters where it's broken.
- Use the CAULDRON OF WATER on the crossbeam to hang it.
- Use the FIRE CHARM on the Cauldron.
- Use the Pocket Dragon on the FIRE CHARM to give it a boost.
-
Use your map to fast travel to the Grand Archway.
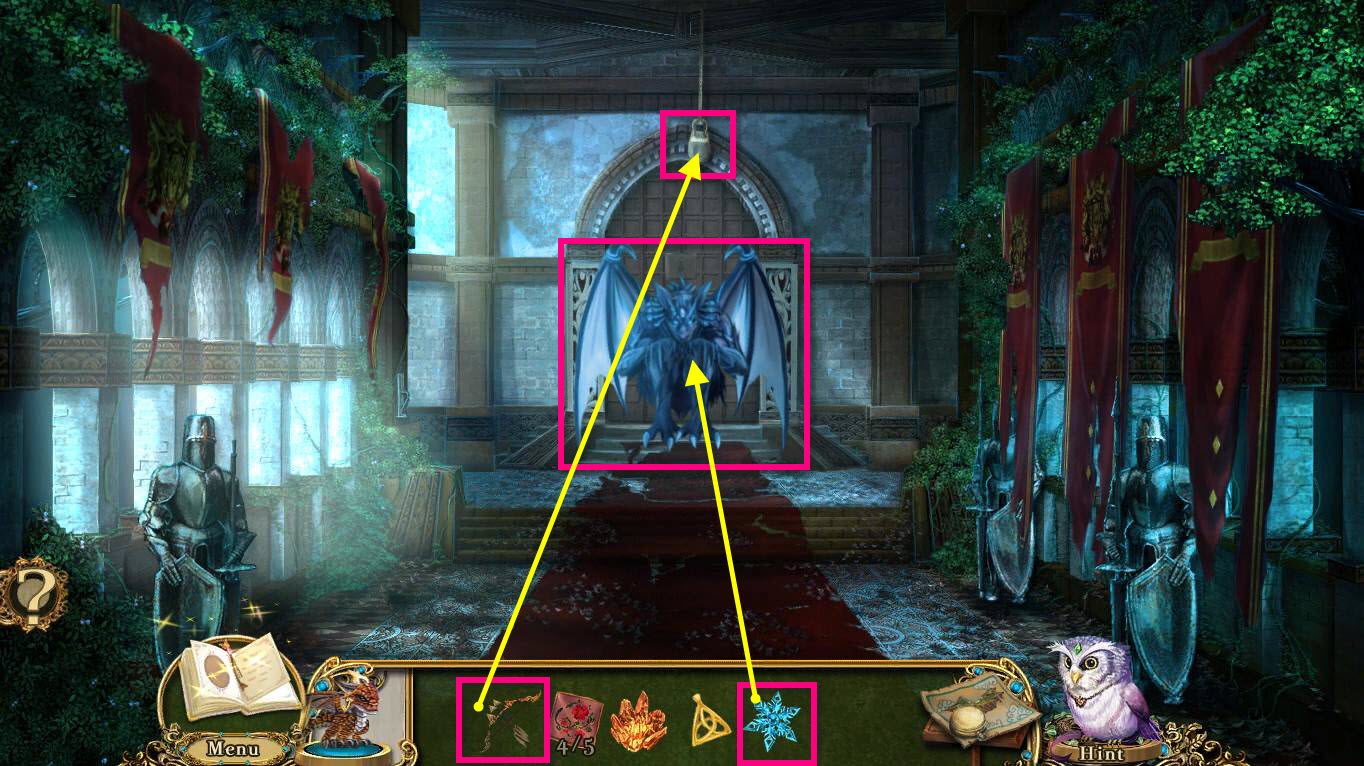
- Use the FROST CHARM on the Gargoyle.
- Use the BOW AND ARROWS on the hanging weight above the gargoyle.
- Click on the maid to talk to her.
- She will give you the 5/5 QUILT PATCH.
-
Use your map to fast travel to Sophia's Room.
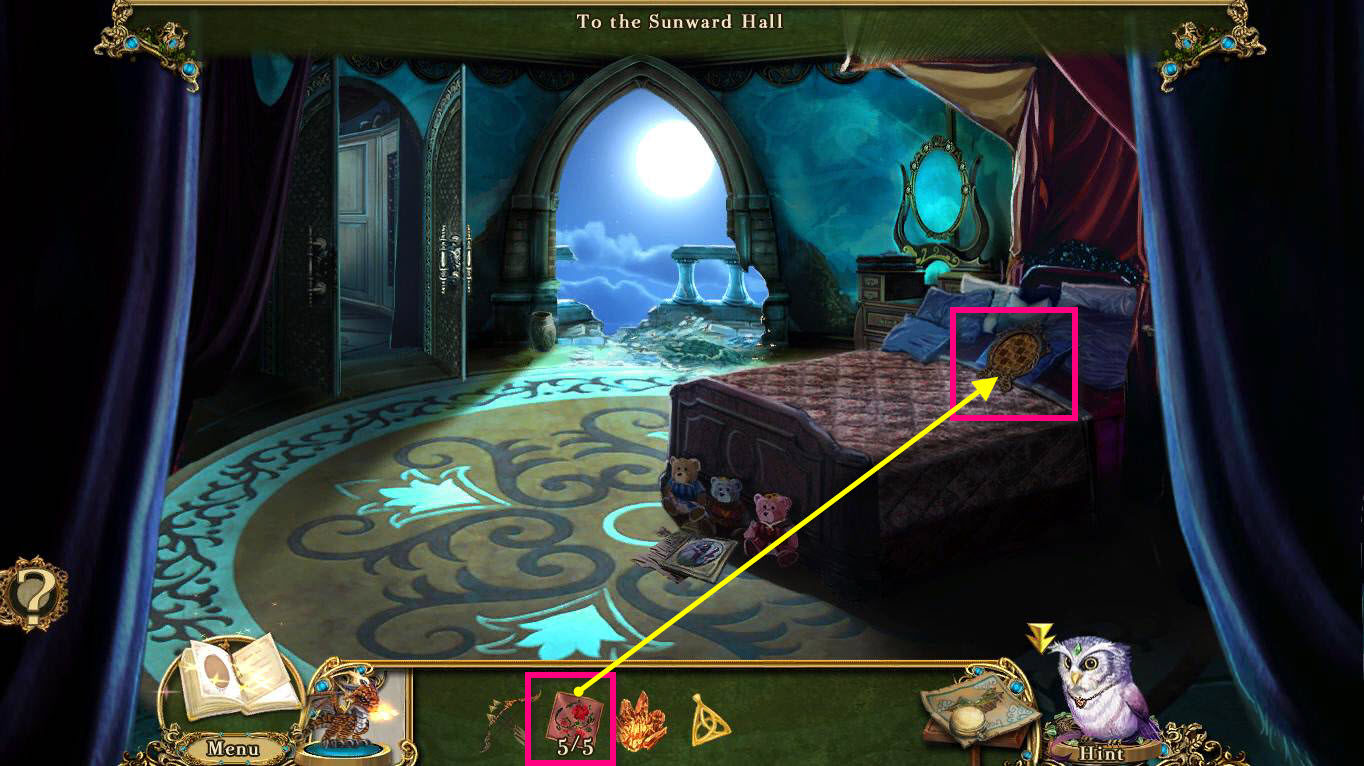
- Click on the bed to zoom in.
- Use the 5/5 QUILT PATCHES on the quilt frame.
-
This will start a mini-game.
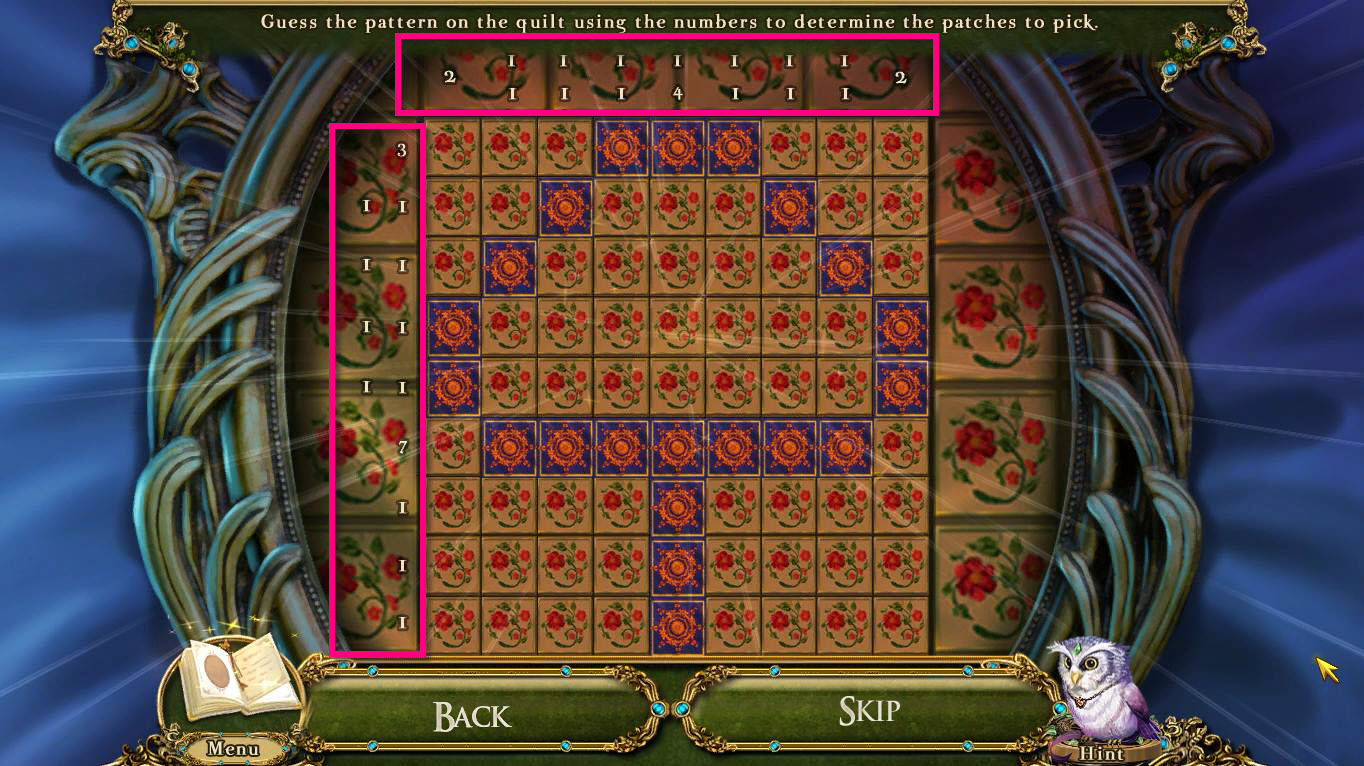
- The goal of the game is to have the right number of patches turned over.
- Check the numbers on the top and the left to know what the right numbers are.
- The end result will look somewhat like a mushroom.
- See the screenshot above for the solution.
- Once you are done, take the PARADISE PENDANT.
-
Use your map to fast travel back to the Grand Archway.
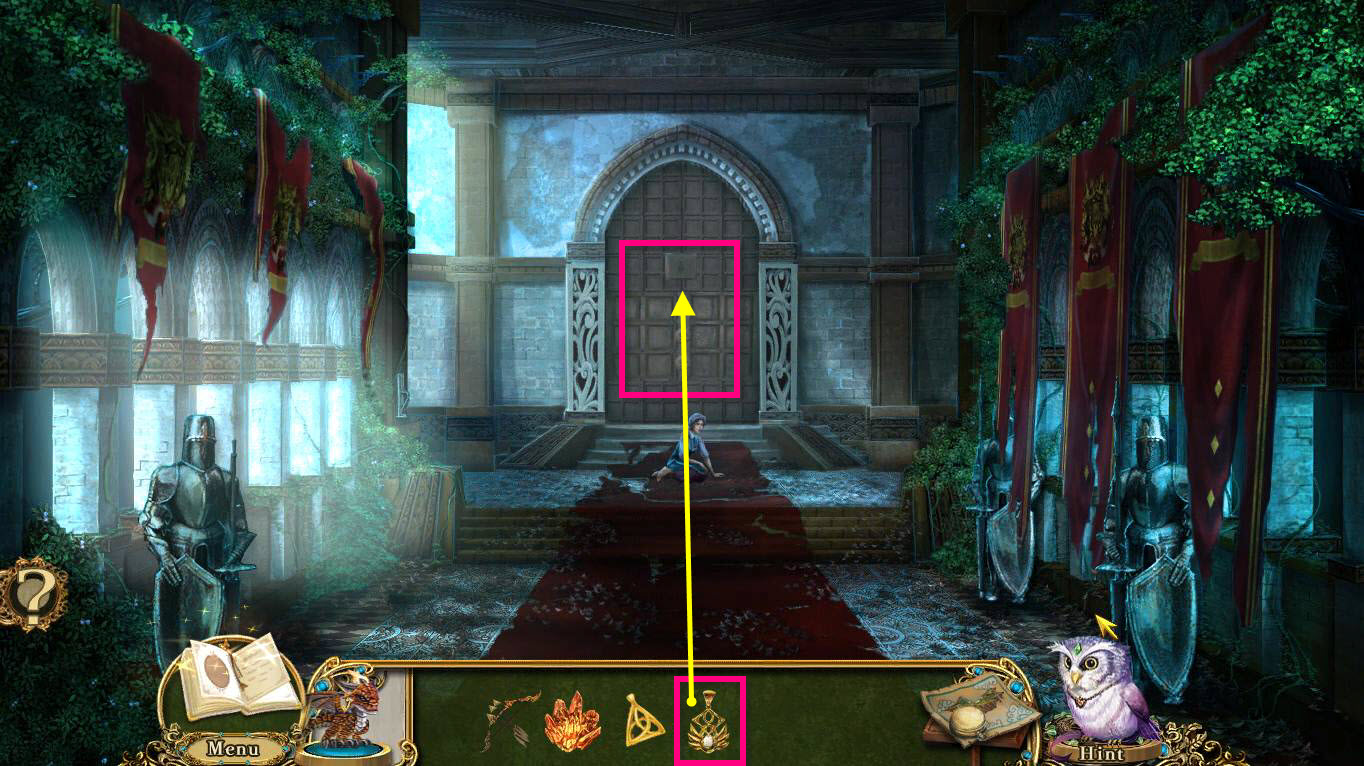
- Click on the doors of paradise to zoom in.
- Use the PARADISE PENDANT on the doors.
-
This will start a mini-game.
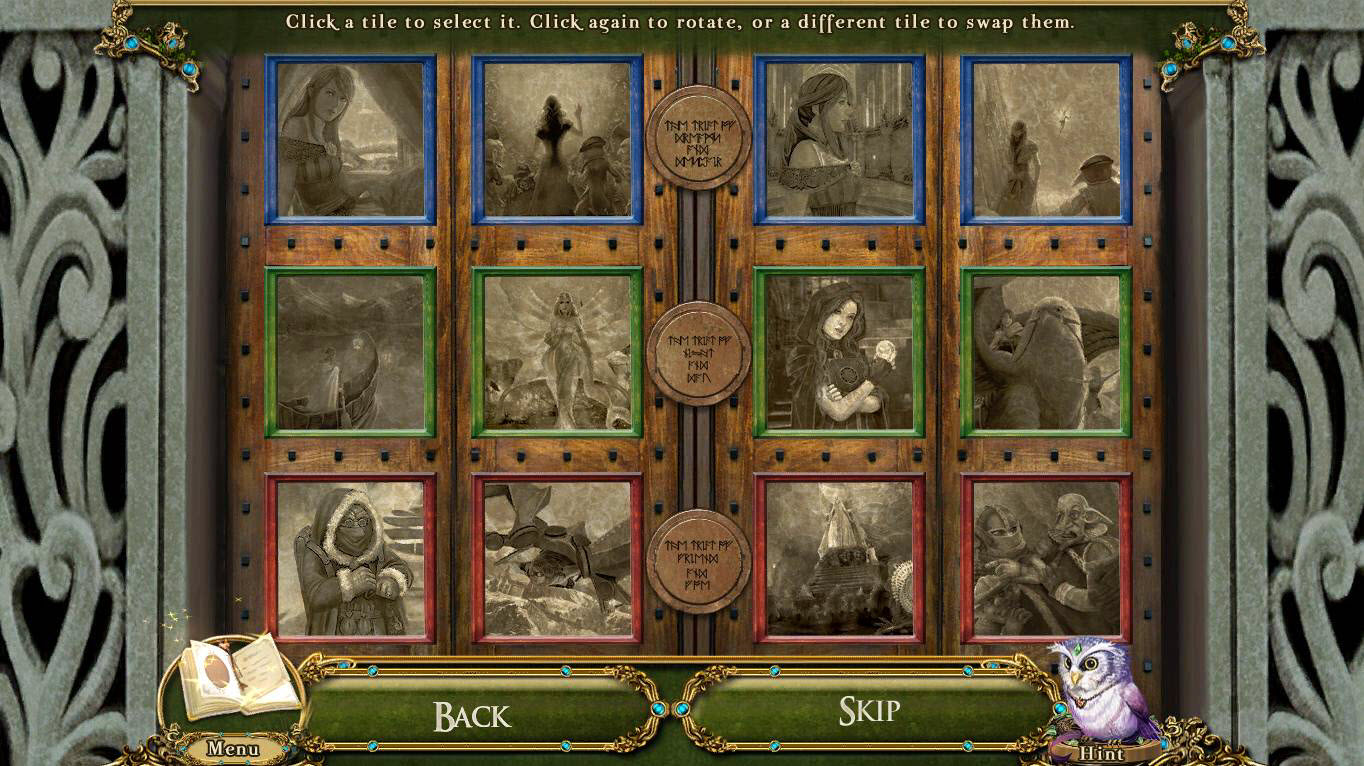
- The goal of the game is to put the story in the correct order.
- Click on the tiles to rotate them
- Click two tiles to swap them.
- See the screenshot above for the solution.
- Enter the throne room.
Congratulations! You've completed Chapter 3 of Awakening the Skyward Castle!
General Info and Tips
Chapter 1: Landsong Village
Chapter 2: Cloud Court
Chapter 3: The Skyward Castle
Chapter 4: Ascension
Ask for help in the comments below!
Chapter 1: Landsong Village
Chapter 2: Cloud Court
Chapter 3: The Skyward Castle
Chapter 4: Ascension
Ask for help in the comments below!
